Friday, June 5, 2015

Anything But Cute Mixed Media Challenge-#2-Make It Masculine

Hello everyone!

 Today marks the beginning of our second challenge over at  Anything But Cute. Thank you to all those who entered our last challenge, and for those who visited and left lovely comments!  I would call our first challenge a huge success, thanks to all of you! The wonderfully talented Cec is our hostess for this month's challenge, and she has chosen the theme "Make It Masculine".

For my project, I went with a steam-punk-ish/John Wayne-ish cigar box tranformation. I made this as a Father's Day gift for my husband, so he can store all those little notes the kids wrote him when they were little.


For this challenge, Cec would like you to make a mixed media card or other project for a fellow in your life. It could be for Father's Day, a birthday, an anniversary or just because you want him to know how special he is.


 I actually started this a couple of years ago.  I was trying out a wax paper resist technique on another project, and I loved the "waste" wax paper so much, I just had to use it! A friend of mine gave me a huge tub full of cigar boxes, and so I got right to work using the wax paper on one of the boxes.  But after doing two sides, I got bored and up on the shelf it went, until I heard about Cec's "Make It Masculine" challenge.

I love leather and rust, and both of these just smack of "masculine" to me. So you will see that I used a lot of both of these elements in my altered cigar box. More is MORE, I say!

My cigar box started out like this.

To get a tooled leather look, I papered four sides of the cigar box with wax paper, which was embossed using Tim Holtz'  Regal Texture Fade.   After using the embossed wax paper for a resist on another project, and therefore, rendered basically wax-less wax paper, I colored the "waste" wax paper with alcohol inks to get this tooled leather look.  After I glued it on, I added some grunge to it, using stencils, texture paste, crackle texture paste, micro beads, Cloisonne High Gloss Granules, embossing powders, Distress embossing powders, stains, inks and paints. Note to self: Open the Closet door before going at all these chemicals!

For the lid of the box, I decided to go with a different leather look.  This time I used a simple brown paper shopping bag as my substrate. I've used variations of this technique several times before; I've used Kraft Core HERE and  a water spritzed lunch bag HERE to make backgrounds similar to this.


I used Distress inks, a Tim Holtz Pocket Watch Texture Fade, a Darice Crackle embossing folder, Glossy Perfect Paper Adhesive,  Rock Candy Distress Crackle Paint and a touch of  metallic wax medium to make this leathery-looking lid. Fortunately, I took a photo in progress; otherwise, you would never get to see how textured it is! Ha! Ha!  A little bit of a wasted effort, but at least I know it's under there!

 I used a piece of a  Tim Holtz Weathered Clock die cut from my leftovers pile and added texture paste, distress paints, embossing powders and Cloisonne Granules. I found the metal hinge on  my work table, and I have no idea how it got there. But it was a perfect addition, so I painted it and grunged it up from it's original shiny brass finish.


The tag is  stamped with a  Paperbag Studio image inked in Archival. I added a watch button from my stash--aged with Crackle Accents and black texture paste-- and a Tim Holtz Remnant Rub. I aged the Spare Parts knob with alcohol inks and Distress embossing powder. The number plate is made from a Tim Holtz  Ticket Texture Fade and a pink metal label frame. The brads were given a coat of Tarnished Brass Distress paint.  Here's the "before" when I was working on my arrangement.  The hinge had only been painted with Black Soot at that point.
.


Here's  how I made my rusty cogs: I used Tim Holtz'  Gadget Gear die to cut the cogs from Grunge paper and blotted them randomly with silver alcohol ink Mixative and a drop or two of Blending solution on a felt blending tool, leaving some areas unpainted.  After this was completely dry, I wiped on watered down Black Soot Distress paint with my finger and wiped it off with a paper towel.  The Mixative acts as a resist of sorts, and most of the black paint wiped off. Caution: you're going to think you need new glasses when you look at these blurry shots.  There's only so much I can do with an  iphone camera!


Next I splattered on Distress paints, drying with a heat gun between each to build up the color.  I used Black Soot, Spiced Marmalade, Vintage Photo, Fired Brick and Antiqued Bronze. Before drying the last color, I sprinkled on a little Tea Dye Distress embossing powder and then heated to emboss. I then added a few more paint splatters, drying between colors. You can see the cog is really starting to curl up!


I dabbed on some Vintage Photo Distress stain, and sprinkled this with more Tea Dye Distress embossing powder, then heated.  A few more splatters of Distress paints, heated between layers to finish off the color.  To give it just a little more texture and to flatten the cogs out, I dry embossed them with a Sizzix embossing folder 2 times.  Here is what the folder looks like. I don't know the name;  I purchased it used at a yard sale. It's hard to see the texture in the second photo, but it really adds a lot in real life


I followed a similar routine for the rest of the cogs, but used other products, and different sequence of paint application, and omitting the alcohol ink on some. I used clay embossing powder, Tea Dye Distress embossing powder, and Cloisonne High Gloss Granules on some of the cogs and some were cut using Tim's Steampunk On the Edge die.  I had so much fun trying different combinations, and enjoy seeing the results. (Each one made me smile, Jan!) That is what I love so much about mixed media--there are no mistakes!


The smaller cogs are made with paper clay and a Mod Podge mold. I painted and heat embossed them added micro beads to some and high lighted some of them with metallic wax medium.

The corners on the front of the box and key  are also made with paper clay and a Mod Podge mold and painted and heat embossed in the same manner as the smaller cogs.


I used Tim's Hardware Findings die for the keyhole and hinges using waste packaging for the keyhole and Kraft Core for the hinges. I used black texture paste, distress paint and embossing powder to make the keyhole look like old iron, and 2 brads were rusted for the nails.  The phillips head screws securing the hinges are made from grunge paper-- an idea I got from our super talented and lovely Pamellia at My Little Craft Things.  I changed her technique up a bit by folding the die cuts in half, sanding and painting the ridge with Black Soot.  Then I painted and embossed with Tea Dye Distress embossing powder.


In each of the four corners, I added paper clay medallions, crackle texture paste, micro beads, embossing powder and Cloisonne Granules, to give it an old mildewed look. If you've ever spent time in a barn you know that even the nicest leather ends up looking like this.


Here's a view of one of the sides.  You might have noticed there's a black cord at the bottom.  It's just simple black cord that I dipped in Mod Podge and left to stiffen over night.  It's got a great leathery hand to it and attached around the bottom of my box like a dream.  I used Tim's Measured Layering stencil, texture paste and Peeled Paint and Tea Dye Distress embossing powders and clay embossing powder to make the design.  I wiped on some metallic wax medium to high light.


The opposite side; more of the same. The clock hands were done the same way the key hole was, and fastened with an altered brad. A couple more paper clay gears and cogs.


And finally, the back of the cigar box.  I had removed the label before adding my wax-less wax paper, and so I added it back and distressed it in keeping with the vintage look.  More cogs and gears and a steampunk clock made with the same mold but this time with Sculpy, because paper clay just wouldn't cut it for this shallow mold. I cut my "leather" (Kraft Core) using Tim's Ticket Movers and Shapers die and added some "nails" made out of grunge paper.


Here's another look at my steamy-leathery box.


That's it for today! Please let me know if you have any questions.Thank you so much for stopping by and leaving your lovely and encouraging comments!  I hope you will be inspired to join in with our "Make It Masculine" challenge at Anything But Cute. I can't wait to see what you make for the man in your life! Hugs and Blessings!

Sara Emily

I would like to enter this into the following inspiring challenges:


Mixed Media Monthly Challenge #13 "A Year of Choices" I chose MMMC #2 Around the House.  I used wax paper as "tooled leather" and a paper shopping bag for "leather" in another background. If a cigar box counts, well, I used that, too!  It's just not commonly found around our house!


Our Creative Corner "What Makes You Smile?" Knowing I was making a special gift for my husband had me smiling the entire time I was creating this. Rust and grunge always make me smile.  Altering things and making something from junk makes me smile.  

A Sprinkle of Imagination "Anything Goes" I used lots of Distress products, which A Sprinkle of Imagination sells in their shop.

Sandee and amelie's Steampunk Challenges "The Ravages of Time" This is my first time entering this challenge, and so excited to find it. I may just have to enter more often, now that I've given steampunk a try!

Wednesday, June 3, 2015

Eroded Metallic

Hello crafty friends!  Today I have a wall hanging using Tim Holtz' technique "Eroded Metallic" from his book A Compendium of Curiosities Vol. 3. I even photographed my piece on my old eroded metal file box here. It's raining here today; otherwise I would have taken this outdoors to photograph.  Sorry for the glare.


Linda Ledbetter's Studio L3 is up to their 29th Compendium of Curiosities 3 Challenge, and she is challenging us to make an original project using this technique.  You can find full instructions on how to do this on page 44 of Tim's book.  You can order your own copy here, if for some unfortunate reason you do not yet have this valuable resource.  Linda and the Crew have a few prizes:  Tim has generously donated a massive pile of goodies for the Crew's choice, and Joy and her family at Inspiration Emporium are offering a generous $50 gift certificate to the lucky winner.  And if that's not enough, you also get to learn and practice a new Tim technique!

This technique lends itself to just about any crafting style, but I wanted to go with a vintage look so I could join in the fun at Mixed Media World for their third challenge, "Vintage".  If you have not yet had a look at what this talented Design Team is up to, hurry over as fast as you can!  You will enjoy the view!

I wanted to use some of my new to me goodies, so I could join in with one of my favorite Mixed Media challenge blogs, Mixed Media Monthly whose challenge this month is "Year of Choices".  They are celebrating their one year anniversary, and to mark the occasion, Donna is allowing us to choose one of this past 12 month's challenge themes.  I am choosing "New to You", since I've recently picked up a few items I haven't used yet. I've also used my stain glass foil tape in a new way!  And of course, this technique is new to me, too!

Another reason I love this technique is that it allows me to play with my Distress paints.  A Sprinkle of Imagination is in the middle of an "Anything Goes" challenge, as long as you use at least one product available from their store. I think I have it covered!  Be sure to check out this challenge blog--you will get plenty of inspiration from the talented Design Team there!

What makes me smile? Jan over at Our Creative Corner wants us to answer this question in our artwork with her challenge "What Makes You Smile?".  For me, blue skies with white puffy clouds make me smile.  They remind me of simpler times when my kids were babes, and we would lay on a quilt in the backyard and while away the afternoon looking for dinosaurs, dogs, and any other animal in them. Of course, any one who knows me knows I love RUSTY things! I also smile when I've learned something new. So I've focused my wall hanging on these things.

I used the Eroded Metallic on each of my elements which are all mounted to a plain black metallic card adhered to cardboard. I went with a simple background, because I really wanted to showcase the technique.


Inspired by Hels Sheridan's gorgeous tag, I chose similar colors for my cloud filled sky. I was also inspired by Candy Colwell and her lovely vintage clipboard in making my frame.  She used embossed images coated with gesso prior to laying down her colors, and I followed suit. I used Tim's Distressed Frame Texture Fade to emboss my plain white card stock .  As Candy did, I gave it a coat of gesso, dried it, and applied my color.  When dry I stamped my cloud image (CI Stamping) in Jet Black Archival.  I wanted to give my clouds a silver lining, so I used Brushed Pewter for the Eroded Metallic technique on this section.  It's very difficult to photograph, but the Eroded Metallic is there.


For the "frame" portion, I laid down color, then stamped a wood grain image (Heidi Swapp) in Coffee Archival ink. This was kind of a wasted step, since it barely shows after doing the Eroded Metallic.  For the technique I used Antiqued Bronze and Tarnished Brass.


My sentiment comes from my new (to me) Tim Holtz Phrases 2 set, stamped in Jet Black Archival ink. I love this quote. Next, I embossed the complete card a second time to get nice raised texture.  I applied Ranger Embossing Dabber to the raised areas randomly and sprinkled with Ranger copper embossing powder.

I did the Eroded Metallic technique on some black card scraps, this time using only Antiqued Bronze for the technique, and made two die cuts using Sizzix Curly Gate. I also used a sponge to dab on a tiny bit of Chipped Sapphire Distress paint. I'm showing this shot of my work while I'm figuring out how I wanted to arrange my elements, because I think the true colors on the butterfly really show up quite nicely.


On a piece of thick glossy waste packaging, I used the Eroded Metallic technique using Tarnished Brass, Antiqued Bronze and Brushed Pewter. I felt like I had the best results using this type of card. I cut a butterfly and embossed it using my new Butterfly  Duo set.  I adore butterflies, and I've been saving my pennies to get this die!  I'm sure I will get a lot of use out of it!  Here are 3 more butterflies I used the technique on using various colors and card types. I decided to make little brooches out of them. I added some Chipped Sapphire Distress paint on the silver one after doing the technique, because it looked a little ho-hum.


Each butterfly got some body work.  The one on my wall hanging got some microbeads and curled up wire in two metallic tones, since I couldn't decide which one to use!  I added the teensiest bit of Cloisonne High Gloss Crystals for the head. I popped the butterfly up with several thicknesses of foam tape to give my otherwise flat piece some dimension and to make it look as if he were flying through a window. I used Cloisonne High Gloss Crystals on the butterfly brooch bodies (say that 5 times fast!) and various wires curled up for antenna.

My foil tape edging was inspired by Cheryl Grisgby and her wonderful altered phone box.  I tried using Tissue Tape, but the colors didn't quite look right.  So I reached deep into my stain glass supplies (I haven't even looked at them in years!), pulled out the foil tape, and Eroded Metallic'd it, too!  This was another surface that this technique worked very well on. I used Antiqued Bronze and Tarnished Brass for the technique here.


So there you have it!  Each one of my elements on my wall hanging got the Eroded Metallic treatment!  I want to thank the Curiosity Crew--each one inspired me, through their lovely artwork and by encouraging us to practice this technique.  That was very good advice!


Thank you for stopping in, and for all your lovely, encouraging and inspiring comments!  I read and appreciate every single one of them! Hugs and Blessings!

Sara Emily

I would like to enter this into the following inspiring  challenges which also happen to be five of my favorites:

Mixed Media Monthly Challenge #13 "A Year of Choices" I chose Challenge #8 "New to You" because I wanted to use some of my newest Tim Holtz buys: Butterfly Duo die and Phrase 2 stamps and try a new Tim Holtz technique.  I also wanted to try using one of my old crafty items in a new way!
Our Creative Corner "What Makes You Smile?" White puffy clouds in a blue sky and rust...and trying new things!

Distress products used:  Paint: black soot, antique linen, walnut stain, peeled paint, tumbled glass, faded jeans shaded lilac, chipped sapphire, antiqued bronze, tarnished brass and brushed pewter. Inks: vintage photo, shaded lilac, chipped sapphire, and tumble glass (I think)

Other products are mentioned in the text.

Friday, May 29, 2015

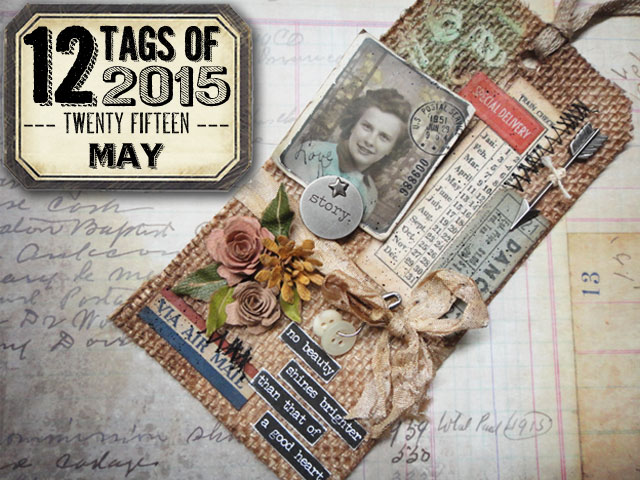
12 Tags of 2015-May

Hello, again!  It's been over 3 weeks since I've posted anything, and I bet you might have thought I fell off the face of the earth.  It's just been a tremendously busy three weeks for me and my family, and now that the weather is perfect, I like to get out and tame the garden.

Today, I spent the day in shear joy in my closet creating this vintage tag with inspiration from the Vintage Master--Tim Holtz.


  You can see details of Tim's fabulous inspirational tag and follow along with his easy to follow tutorial HERE on his blog.


I followed his instructions, with some minor tweaking here and there, either due to lack of the goods or just because I like to put my spin on things. I am now able to lift my sewing machine, and I wanted to put it to good use by sewing a burlap tag I cut using Tim's Tag and Bookplates die to black card stock.  After sewing it on, I frayed the edges, and trimmed the card.


UPDATE: You may notice the photo above does not have the Remnant Rub arrow on it!  I made the tag, and added my spritzing.  I goofed spritzing, and totally messed up the young lady's face.  I was able to correct that, but in the heat of the moment forgot to add the rub on.  After uploading all my photos and writing my post, I noticed it was missing.  I had to completely redo!  Now I notice I forgot to take this photo out of the post.  Well, I like it, so it's staying!  I just didn't want you to think your eyes were playing tricks on you!

I chose to use black texture paste to really show off my brand new Cracked Pistachio Distress ink. I love the color so much,  I made my entire tag around it. Isn't it such a happy color?  It makes me so happy to use it, I thought I would enter my tag in Georgie's  Happy, Happy, Happy challenge at Frilly and Funkie.  And nothing makes me happier than Vintage, Vintage, Vintage!  So I'll be joining in the fun at Mixed Media World for their Vintage challenge, too.

  I used Tim's Measured Layering stencil to lay down my paste. Ephemera was chosen from Tim's Ephemera Packs--Expedition and Emporium and one vintage match box label from my collection.  No originals were harmed; I photo copied it, and treated it to a little Cracked Pistachio Distress ink.


 I cut up the Bus Route piece from Tim's collection so it would better fit my collage and popped up "Route 4" with foam tape.  I also chose to use my Vintage Photo Distress marker to give a little shadow to my pieces, after covering the entire tag with Glue and Seal.Oops!  I did this before I added my Small Talk quote! I added some Vintage Photo to that, too, because it just looked too bright for this vintage piece.


I chose this couple from Tim's Photobooth; they look like they've just gotten their photo taken for the Church Directory, so I made my tag about looking for Divine moments.  I used Antique Linen, Wild Honey, and Vintage Photo Distress Markers to color the photo. I swiped some Cracked Pistachio ink on my mat, and applied it to her dress using a Detail Water Brush. I don't have anything but the ink in this lovely color, so I found ways to get it on everything! I used a Remnant Rub arrow from the Special Delivery collection.


The pin is from my stash--sorryTim; will pick up some the next time I'm out, but after running to 3 different craft stores to pick up my supplies, I didn't feel like running back out again today!  I had these sweet buttons, too, that really match in real life, but not in the lighting in my photo studio.

My flowers are all hand made using the Tattered Florals and Tattered Flower Garland dies.  I used plain white card for the top flower, inked with Cracked Pistachio and spritzed with Vintage Photo Distress spray and Pewter Perfect Pearl spray.  The other two are cut from Kraft Core and colored with Cracked Pistachio ink and the Pewter Perfect Pearl spray. By the way, flowers make me happy, too!

I used Idea-ology Paper Twine, inked with Cracked Pistachio instead of thread to tie around my upward pointing arrow. I also tied my threads off at the end of the stitching into a little bow.  You can see the Marker spritzer was put to use. Little details like this make me happy!


In place of the Linen ribbon, I used a strip of burlap I slathered with white texture paste, dried, then applied Cracked Pistachio and Vintage Photo Distress inks.  I twirled it up into some cork screw curls for fun. The date of my ledger page is 1945-vintage!


 A Vintage Journey wants us to use our spring colors this time (of course with a Tim Holtz influence), and I can't think of any color more spring-like than this Cracked Pistachio and being more influenced by Tim than by being inspired by his latest tutorial.


 That's it for today!  I appreciate your visits and your comments, and I'm so happy you didn't give up on me!  I read and appreciate every comment you leave, and I try hard to respond to each and every one! (eventually!) Hugs and Blessings!

Sara Emily

I would like to enter this into the following inspiring challenges: