Wednesday, July 22, 2020

A Wedding Wish with Sizzix Layered Winter Flower


Hello and happy Wednesday! Today we start a new challenge at The Funkie Junkie Boutique challenge blog, and this time super talented Suzz is hosting our challenge. She calls it With This Ring, and here's the description...

"Summer is a traditional time for weddings. This year we have seen many of the celebrations become virtual, rescheduled or limited to few people participating. We as craft makers can still share our art with the happy couples by creating something beautiful to celebrate their special occasion. I challenge you to create something celebrating a wedding, it can be anything including: layout, card, decor, or gift."

As always, the winner will earn a chance to be a Guest Designer at a future date at The Funkie Junkie Boutique challenge blog, and everyone who enters and follows the rules will go into the draw for the chance to win a $25 spending spree at The Funkie Junkie Boutique. There are also Top 3 Badges for three additional outstanding entries, chosen by the Design Team. Please see the blog for details.

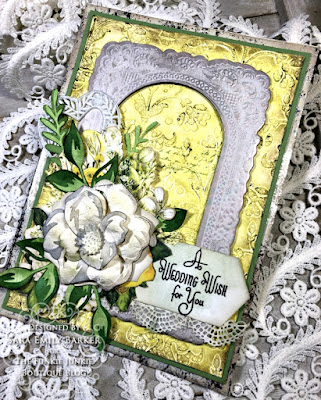
I decided to feature the new Layered Winter Flower by Sizzix Chapter 3 on a wedding card  for this challenge.  I visualized a Gardenia, and went with shades of whites/neutrals for my single flower and layered it over fussy cut flowers from Ciao Bella's Sicilia 6x6 Paper Pad. The white plastic heart from my stash is tied in with swipes of Prima's Old Silver Metallique wax. The die cut greenery is a part of the Layered Winter Flower die set as well (both the leaf variety and long stems). I love how the greenery compliments the layered flower and as well as the greenery of the Sicilia floral bouquet. This die set also includes winter berries and a layered pine cone, which I'm sure I will use often as the Christmas cards start rolling out. I have a brief tutorial on how this card came together below.


Let's get started with the back ground first. I used Prima's Vintage Wallpaper stencil and Crackle paste to lay down a textured background, and when it was dry gave it a good coat of Collage Medium Matte. I had two purposes to do this; First to keep the crackle from chipping off and secondly to prevent the spray I would use next from soaking into the paper.


 After spraying the panel with Squeezed Lemonade, I dabbed at it with a clean paper towel to remove some of the spray.


When it was dry, I scribbled with Distress crayons (Crushed Olive and Ground Espresso) and smudged it with my finger. I did some background stamping with a script stamp from Tiny Toadstools and Peeled Paint Archival ink. I layered this panel over green card stock then over a metallic paper from my stash. To take some of the shine off the metallic paper, I blended it with Pumice Stone Oxide ink.


The Baseboard Frame anchors my wedding bouquet. That lacy texture is easily accentuated with a swipe of Old Silver wax.


Here's how I made the 'gardenia'. I started with cheap old watercolor paper that is pretty lightweight. I chose the lightweight paper so I could easily shape the petals. I blended the small pieces with either Pumice Stone or a combination of Hickory Smoke and Pumice Stone for varying neutral tones. I then spritzed the pieces with water and shaped them with my swizzle stick


I cut a second of the largest to place under the completed flower. Each of the flowers/petal layers were given dimension with foam adhesive and/or bits of chipboard between them. I decided to cut just a portion of a layer to add one more petal to the flower (shown in the completed project).All of the edges were blended with Frayed Burlap ink and some were touched with Old Silver wax.  I very lightly blended the completed flower with Forest Moss ink to tie it in better with the rest of the elements. You can see in the photo below, that the die also embosses lines on each of the pieces for easy placement of all the small shadow bits.


I cut the background portion of the leaves/stems (vertical foliage not shown in photo) with a green card stock and blended with inks so they would tie in with the Sicilia greenery. The inner portions were just cut from designer paper scraps from my stash.


To make the sentiment banner, I used the largest of the Hexagon Stacked Tiles dies as shown below to cut the 'arrow' shape and stamped a wedding sentiment from my stash in Black Soot Distress Archival ink. To do this, I used a scrap of plain white card and slipped it over one side of the die (non-blade side) and under the opposite edge (blade side) before running it through my machine.


I adhered the sentiment over a Crochet die cut. I love this die set; I find I reach for it over and over again!


That's all for me today; I hope you'll take some time to visit the blog to see the beautiful wedding themed projects my teammates have made to inspire you. Then we turn it over to you--I hope you'll join us for this challenge! I can't wait to see what you will create! Have fun crafting! Sara Emily

These products were used and can be purchased at The Funkie Junkie Boutique:

Sizzix Chapter 3 Thinlits Dies - Layered Winter Flower
Ciao Bella - Sicilia 6x6 Paper Pad
Sizzix Chapter 1 Tim Holtz Thinlits Dies - Stacked Tiles, Hexagons
Sizzix Tim Holtz Thinlits Crochet
Prima Stencil - Vintage Wallpaper
Tim Holtz Distress Ink Pad - Bundled Sage, Forest Moss, Frayed Burlap, Pine Needles
Tim Holtz Distress Oxide Ink Pad - Pumice Stone, Hickory Smoke
Tim Holtz Distress Oxide Spray  - Squeezed Lemonade
Ranger Tim Holtz Distress Archival Mini Ink Pad - Black Soot, Peeled Paint
Ranger Tim Holtz Distress Crayons -Ground Espresso, Crushed Olive
Ranger Opaque Crackle Texture Paste
Ranger Tim Holtz Distress Collage Medium Matte
Prima Art Alchemy by Finnabair - Metallique Wax  -Old Silver

Friday, July 10, 2020

Vintage Rose Cards

 
Hello friends! My kiddos are celebrating their 22nd birthday this weekend, and I made this birthday card for my daughter and a second one using the same paint colors just for fun. I chose to use primarily paint, so I could play along with Simon Says Stamp where the prompt is to play with paint.

 I used the Roses 3D Texture Fade by Tim Holtz and the following Distress paint colors: Broken China, Mustard Seed, Peeled Paint, Black Soot and Picket Fence.  I used a secret ingredient--hand sanitizer-- to make the paint more translucent and glaze-like, giving the backgrounds a more water color appearance and allowing stamping to show through.

The background on the Blue Rose card for my daughter is stamped with Peeled Paint Archival ink and the Botanical stamp from Botanical & Batik by Tim Holtz. I did this by inking the stamp and making the impression right onto the flat surface of the embossing folder on the side with the recessed image. Then I transferred the ink to the water color card when I ran it through my die cut machine.


The birthday sentiment (Tiny Text) is heat embossed with Speckled Egg Embossing Glaze over Broken China ink and edged in Princess Gold Embossing powder. This panel is layered over Metallic Kraft Stock.


For the other card, I started with a watercolor panel that I first coated randomly with gesso. It gives even an even more translucent quality to the paints. I colored the yellow gold roses first with Distress Crayons (Dried Marigold, Spun Sugar and Squeezed Lemonade) and gesso, before finger painting with Mustard Seed Distress paint. Foxing is done with Frayed Burlap ink. The panel is layered over old Coordinations card.


Everything else, including the background is done with the Distress Paint mainly using my finger, except splatters of black and white were done with paint and splatter brushes. All the raised areas are touched lightly with Prima's Opal Magic Wax in Vintage Silk. I left off the sentiment, so I could use this card for practically any occasion.

Here's another look at each complete card.


Thank you for stopping by today! Now I need to go make a card for my young man.  I'll leave you with this Bible verse which I think brings comfort and reassurance in these troubling times:

"And the God of all grace, who called you to his eternal glory in Christ, after you have suffered a little while, will Himself restore you and make you strong, firm and steadfast. To Him be the power for ever and ever. Amen." Peter 5:10-11

Challenge shares:
Countryview Challenges - July 2020 - Do What Makes You Happy Making a card with someone I love in mind makes me happy, as does finger painting and making creative discoveries.

These products were used and can be purchased at The Funkie Junkie Boutique:
Tim Holtz Distress Paint - Broken China, Mustard Seed, Peeled Paint, Black Soot and Picket Fence
Tim Holtz Distress Ink - Frayed Burlap, Broken China, Peeled Paint Archival
Ranger Tim Holtz Distress Crayons - Dried Marigold, Spun Sugar, Squeezed Lemonade
Embossing Powder -  - Princess Gold

Wednesday, July 8, 2020

Christmas All Ready??


Sara Emily Barker https://sarascloset1.blogspot.com/2020/07/christmas-all-ready.html Rustic Christmas Card Tutorial #timholtz #yuletide #wreath&snowflake #lumberjack 1

Hello friends!It's time for a new challenge at The Funkie Junkie Boutique and Cec is hosting "Christmas in July"! 

"If you are like me, you are anxious for 2020 to be over and done with. To speed things up let's pretend Christmas is around the corner even though it is only July and get a start on creating shabby chic or vintage inspired cards. This challenge is all about cards so please save other Christmas creations for later."

As always, the winner will earn a chance to be a Guest Designer at a future date at The Funkie Junkie Boutique challenge blog, and everyone who enters and follows the rules will go into the draw for the chance to win a $25 spending spree at The Funkie Junkie Boutique. There are also Top 3 Badges for three additional outstanding entries, chosen by the Design Team. Please see the blog for details.

I embraced this challenge as I'm tired of the heat of the summer and just thinking about Christmas cools me by 20 degrees. Like Cec, I'm also ready for the calendar to turn to a new year, hopefully a better one than 2020 is shaping up to be. But not before celebrating Christmas, so I also welcomed the challenge to get an early start on my handmade cards. Here are the steps I took to create my first Christmas card of the year. This was so fun and easy to make, I may just have to mass produce them. Let's get started...

Create the wood grain back panel by embossing card stock with Lumber 3D embossing folder. This folder is no longer available in the shop, so I've linked to Distress Woodgrain cardstock in the link list below. It will save you a couple steps. (wink, wink) Ink edges with Ground Espresso Archival ink, smudge with a damp finger and Walnut Stain crayon and then blend with Walnut Stain ink to accentuate the grain. Adhere panel to brown card blank.

Sara Emily Barker https://sarascloset1.blogspot.com/2020/07/christmas-all-ready.html Rustic Christmas Card Tutorial #timholtz #yuletide #wreath&snowflake #lumberjack 2

Stamp plaid image from the Lumberjack set in Ground Espresso ink on water color paper using stamp platform. Clean the stamp while it remains in the platform and apply Distress Embossing dabber and repeat impression over first. Remove the inked panel from platform and heat emboss with Walnut Stain Embossing Glaze. When cool, spray with water and then Evergreen Bough Distress Spray Stain. Blend with more water and allow to dry.

Sara Emily Barker https://sarascloset1.blogspot.com/2020/07/christmas-all-ready.html Rustic Christmas Card Tutorial #timholtz #yuletide #wreath&snowflake #lumberjack 3

After it's completely dry, remove shine from the glaze by buffing with steel wool. I added a bit more pressure with the steel wool than I usually do to get more of a distressed look to the panel. Blend edges with Walnut Stain ink.

Sara Emily Barker https://sarascloset1.blogspot.com/2020/07/christmas-all-ready.html Rustic Christmas Card Tutorial #timholtz #yuletide #wreath&snowflake #lumberjack 4

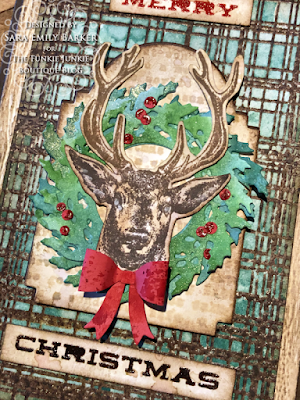
To make the panel behind the deer, I inked the Holiday Type stamp (Tim Holtz Stripes & Holiday Type) with Ranger Resist ink (unused in my stash forever), making the impression on plain card. I sprayed the card with Antique Linen Spray stain and misted with water to blend, drying with my heat tool. Curiously, the ink seems to be attracted to, rather than resisted by the ink. Hmmm...I see possibilities! I cut the panel with one of the Stacked Archway Thinlits dies and cut a second archway from chipboard.  I edged both archways with Ground Espresso ink and adhered the stamped one to the chipboard die cut, offsetting slightly.

Sara Emily Barker https://sarascloset1.blogspot.com/2020/07/christmas-all-ready.html Rustic Christmas Card Tutorial #timholtz #yuletide #wreath&snowflake #lumberjack 5

I  colored card scraps with Mowed Lawn and Evergreen Bough inks and sprayed with Tarnished Brass Distress Mica Spray. I cut two wreaths from the scraps using the Wreath &Snowflake Thinlits set. I cut a few more sections of the holly leaf portion and tucked these in between the two layers to make a fuller wreath. The berries and bow from the same set were cut from an inky red scrap from my stash. I used the Distress Embossing pen and Fired Brick Embossing Glaze to add some dimension and shine to the berries and set the bow aside. I assembled the wreath/berries and adhered everything with Distress Collage Medium Matte and then adhered the wreath to the ink resist panel.

I stamped the deer from the Yuletide set on the stamp platform, inking his antlers in Vintage Photo and the rest of his head with Ground Espresso Archival inks. I blended his antlers with Frayed Burlap and his face with Vintage Photo, both regular inks and used a white gel pen to add some highlights. Lastly I fussy cut him and adhered him and the bow on the wreath.

Sara Emily Barker https://sarascloset1.blogspot.com/2020/07/christmas-all-ready.html Rustic Christmas Card Tutorial #timholtz #yuletide #wreath&snowflake #lumberjack 6

Using the Merry Christmas stencil from mini set 32, I blended Candied Apple ink through the word 'Merry' and Ground Espresso through 'Christmas' onto water color paper I had previously blended with Frayed Burlap ink. 'Merry' was then heat embossed with Fired Brick Embossing Glaze and 'Christmas' with Walnut Stain Embossing Glaze. Both were cut, edged in Walnut Stain and adhered to the card.

Sara Emily Barker https://sarascloset1.blogspot.com/2020/07/christmas-all-ready.html Rustic Christmas Card Tutorial #timholtz #yuletide #wreath&snowflake #lumberjack 7

Sara Emily Barker https://sarascloset1.blogspot.com/2020/07/christmas-all-ready.html Rustic Christmas Card Tutorial #timholtz #yuletide #wreath&snowflake #lumberjack 8

Here's one more look at the completed card. 

Sara Emily Barker https://sarascloset1.blogspot.com/2020/07/christmas-all-ready.html Rustic Christmas Card Tutorial #timholtz #yuletide #wreath&snowflake #lumberjack 9

I hope you will take some time to stop over to the blog to see what wonderful Christmas cards my talented teammates have made. Then why not take this opportunity to get a head start on your Christmas cards and link them up to the challenge. You will be happy to have a few already made before the real rush starts in December. I can't wait to see what you will make! Happy crafting! Sara Emily

Challenge shares:
Countryview Challenges - July 2020 - Do What Makes You Happy Just finding good quality time to craft this week made me happy, but combined with my favorite Tim Holtz products and Christmas card making is the icing on the cake!

These products were used and are available for purchase at The Funkie Junkie Boutique:

Sizzix Tim Holtz Thinlits Die Set - Wreath & Snowflake
Stampers Anonymous Tim Holtz Rubber Stamps - Yuletide
Tim Holtz Cling Stamps - Lumberjack
Stampers Anonymous Tim Holtz Mini Layering Stencils - Set 32
Tim Holtz Distress Woodgrain Cardstock, 4 1/4 x 5 1/2
Tim Holtz Distress Ink Pads - Ground Espresso, Frayed Burlap, Walnut Stain, Vintage Photo, Candied Apple, Evergreen Bough, Mowed Lawn, Peeled Paint
Ranger Tim Holtz Distress Archival Mini Ink Pad - Ground Espresso, Vintage Photo, Peeled Paint
Ranger Tim Holtz Distress Crayon- Walnut Stain
Tim Holtz Distress Spray Stain - Evergreen Bough, Antique Linen
Tim Holtz Distress Embossing Dabber
Tim Holtz Distress Embossing Pen 2pk - Bullet
Tim Holtz Distress Embossing Glaze - Walnut Stain, Fired Brick