Showing posts with label Rust. Show all posts

Saturday, May 16, 2020

Patina Tutorial with Prima's Matte Wax and Sizzix Embossing and Die Cutting


Hello friends! I hope you are doing well during these crazy days that are stretching out into months! I am showcasing Prima Marketing's Art Alchemy Matte Wax over at The Funkie Junkie Boutique Blog today. 


Please pop over to see how I made these cards as well as these other fine patina'd finishes: aged copper, eroded metal and rust. I hope to see you there! Be well! Sara Emily

Challenge shares:

Sunday, November 24, 2019

Steampunk Christmas Ornament


Sara Emily Barker Altered Steampunk Christmas Ornament https://sarascloset1.blogspot.com/ 1

Hello and welcome! Have you ever had something in your possession that almost drives you to re-make it? I've had an ornament in my bin of things to 're-make someday' for years now. When I saw the Recycle challenge at Simon Says Stamp, I felt a little sad I didn't have the time to play along. But I allowed myself a couple of sinful hours to play in my Closet this afternoon, and I pulled this from the top of the bin. How it worked it's way to the top is beyond me, but I do believe it was calling to be re-cycled into steampunk decor from the moment I picked it up.

Sara Emily Barker Altered Steampunk Christmas Ornament https://sarascloset1.blogspot.com/ 2

Here's the drab ornament as it started. My original thought was to give it a quick face-lift with a wreath made with die cuts and a cute Tim Holtz deer. But when I removed the existing wreath and tag, and I saw the maker's stab at RUST. From there the ornament practically re-made itself. I was just a person with the mixed media goodies and the hands to put them on it.


  I pulled out my long neglected gears box, and it chose which ones it wanted to be decorated with.


And a little baggie of mini's salvaged from God only knows what spilled out, and it chose a few items to add.


A little over an hour had passed, and it helped me magically transform this ho-hum ornament into a Steampunk stand-alone decor piece. Prima's rust pastes and some other paint in my stash provide the background for it's chosen elements. I also re-cycled a link from an already rusted length of chain to hang my altered bell with a rusty nail I found in my toolbox. The bell was altered with black crackle paint that doesn't crackle anymore, Steampunk Copper paint and antiquing cream. I used the antiquing cream throughout the design to pull all the random pieces together.
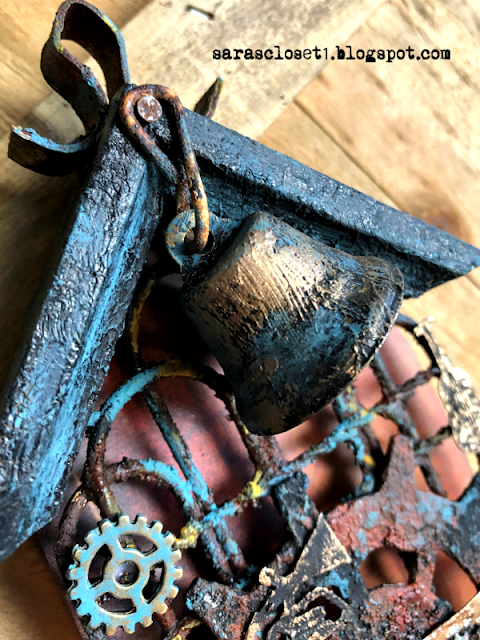
Sara Emily Barker Altered Steampunk Christmas Ornament https://sarascloset1.blogspot.com/ 3

The cog die cut from Tim Holtz Gadget Gears Bigz was leftover from a project I did several years ago, and I don't remember what I used to alter it. The little brass toned instruments were removed from the broken dangly ornament in the mini's baggie and altered with black gesso and more of the copper paint. Merry was a die cut scrap of Metallic Kraft Stock I found in the Holiday Words #2 envelope. I probably used the letters for another project, and thought this might come in handy some day. I embossed it with the Foundry Folder, sanded it and used Rust Alcohol ink and Smolder Alcohol Pearl to color it.

Sara Emily Barker Altered Steampunk Christmas Ornament https://sarascloset1.blogspot.com/ 4

Here's that foursome of tiny nutcrackers from the mini's bag all lined up along the bottom. You can see I backed the ornament with a scrap of Abandoned paper stash I had on my desk.

Sara Emily Barker Altered Steampunk Christmas Ornament https://sarascloset1.blogspot.com/ 5

Sara Emily Barker Altered Steampunk Christmas Ornament https://sarascloset1.blogspot.com/ 6

I hope you like my re-cycled project! Thanks for stopping by and have a great week ahead! Happy Thanksgiving to all those who celebrate! Sara Emily

Challenge shares:


Thursday, March 28, 2019

Good Stuff for Tag Friday at A Vintage Journey


Hello friends! It's that special time at A Vintage Journey when we get free crafty play to make a tag for our Tag Friday feature. 

I was inspired by how beautiful things are starting to look in our yard on these first days of spring, in spite of the hurricane damage from last September. The landscape has changed so much with many  trees missing, and the ones that remain twisted and broken. The fences that have been long overgrown with trees and shrubs are now exposed and are crumpled from the fallen trees. But new growth is emerging, and I see the beauty of God's grace and renewal.

“The steadfast love of the Lord never ceases, his mercies never come to an end; they are new every morning; great is your faithfulness.” Lam. 3:22-23


This was one of my first plays with my new Distress Oxide Sprays, and I really didn't take note of what I was doing. I used Picked Raspberry, and I'm pretty sure that's Cracked Pistachio, even though it appears blue. I like how it turned out, but I'm not a big fan of pink, so I thought of how I could make it more palatable to me with a rusty trellis and a few flicks of watery Rusty Hinge oxide ink.


The Wildflowers Stems and Tattered Butterfly from Tim Holtz are colored with Cracked Pistachio oxide spray with a little Rusty Hinge oxide ink,  brushed straight from the ink pad or watered down and flicked on. The seam binding ribbon was a product of the leftover inks.


The trellis is a die cut I had in my bin that didn't quite cut right. I dabbed on some black metallic texture paste I recently picked up at Tuesday Morning, some Distress Grit Paste and a mix of embossing powders I've had sitting in the embossing powder drawer for a while. I heated all that until it bubbled, and then painted with watery DecoArt Fluid paints -- Q. Gold and Raw Umber, and a drop or two of Caramel alcohol ink. I tore the edges and painted them with Distress Black Soot paint. I brushed the trellis with Prima Sculpture medium, shaped it and allowed it to dry. No matter how I pointed my camera, I couldn't pick up on the dimension of this crumpled rusted 'fence'. I gave the same treatment to the hole reinforcer.


Tim Holtz' Small Talk stickers always have the perfect words.


That's it for me--just a little fun play with my new sprays and some paints. My talented fellow Creative Guides have some wonderful tag inspiration you won't want to miss on the blog. Hope to see you there! Hugs and Blessings! Sara Emily

Challenge shares:
Simon Says Stamp Monday Challenge Play With Paint The trellis and hole reinforcer were colored with paint.
Scrapy Land Challenge #110 Anything Goes I used two Sizzix dies and an old Cherry Lynn die.

Links to products used available at The Funkie Junkie Boutique:


Thursday, April 26, 2018

Rusty Masculine Card with Tim Holtz and Seth Apter


Welcome friends and visitors! I have a 'Creative Cardmaking' tutorial at A Vintage Journey today. I hope you'll stop by the blog to see all the details and learn how I put this masculine card together in less than an hour from idea to the completed photo session.

The new Creative Card monthly feature at A Vintage Journey is where one of the Creative Guides shares some ideas for putting together a card focusing on our preferred genres - vintage; shabby; mixed-media; art journaling; industrial, timeworn or steampunk style.

I'm sharing with these challenges:
Country View ChallengesApril 2018 - Pimp it up! (reuse or alter something) I hope this qualifies--I altered the die cut gears, the papers and Paper Doll. 
Scrapy Land Challenge #88 Anything Goes I used a gears die by Sizzix.
heARTful Stamping Challenge Anything Goes + a stamp April 22 – 29 I used a stamp for the piece behind the man.

Thank you for stopping by and for all your wonderful comments! They really brighten my day!
Hugs and Blessings!
Sara Emily

The following products were used on this card and can be purchased at The Funkie Junkie Boutique: