Welcome! Today the Funkie half of the
Frilly and Funkie team get to present their inspiration pieces for the latest challenge theme 'Dare To Resist', chosen by the super talented Autumn. Please be sure to pop by the
blog to see all of the ir-resistable projects by my Frilly and Funkie teammates!
Autumn says:
"For the next two weeks, as we break away from our Valentine creations, we'd love to see you incorporate a favorite resist technique in your vintage or shabby chic project. There are so many options, perhaps you will try something new. Whether it be gesso resist, Vaseline resist, alcohol resist, embossing resist, or watercolor resist, we dare you to resist!"
Since Distress Micro Glaze is the perfect water resistant sealer for Distress products, I thought I would use it as a resist. I made a sample on water color paper dipping my paper into light Distress Oxides, and drying. When was happy with the colors, and the ink was dry, I laid Tim's Flourish stencil over the panel and applied the micro glaze through the stencil with an ink blending tool and wiped with a soft cloth. I removed the stencil and dipped the paper once more into a watery puddle of Distress Oxide, this time in Walnut Stain for contrast. I dried the panel with my heat gun, and was very pleased with the resist result and those tiny droplets, but the colors were a bit dark to do an entire background with them. I blended with some more ink and added stamping with Potting Soil Archival ink and set it aside to do the same technique in some lighter colors.

For my large back ground panel, I tried the same resist using Peacock Feathers as my final dipping after blending the Distress Micro Glaze through the stencil over a lighter background. I wasn't happy this time, because there wasn't
enough contrast, but did some stenciling with the Flourish stencil in the corner, this time blending with Distress ink. I also did some stamping using both images from the Lattice and Flourish stamp set.
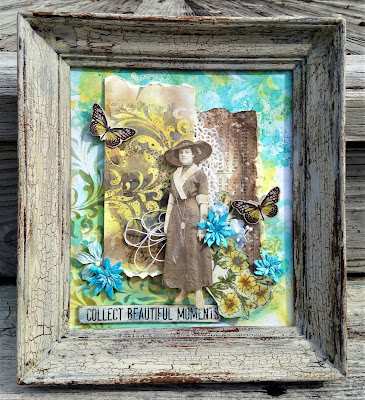
I used the micro glaze as a resist over a stamped and colored flower image. I stamped Tim's Illustrated Garden image in Watering Can Archival ink and colored with Distress inks and markers using a water brush. When dry, I applied the glaze with my finger, wiped with a soft cloth and dipped the panel in Broken China Distress Oxide. It's not so dramatic but it allows the Oxide to form droplets here and there. I fussy cut the flowers and gave it a vintage look by blending with Frayed Burlap Distress ink.
Another resist technique I used involved splattering Gloss Mod Podge on my baseball stats page, allowing to dry and blending with Ground Espresso Distress ink. I wiped with a damp cloth, allowing the splatters to peek through the ink.
I tucked in a Tim Holtz doily die cut, and layered the panels with some lace from my stash, a Found Relative, some wadded string, and hand died Little Birdie and Tim Holtz Bouquet flowers. The bright blue flowers are made with Tim's Tiny Tattered Florals Thinlits die and colored with Distress Spray stain. The sweet butterflies are from the Botanical Layers.
I used a wax crayon, Distress Oxides and chalk paint to alter a Quote Chip. I wiped diluted Oxides on randomly with my finger, dried, and then applied wax crayon over top. Then I painted with chalk paint, allowed it to dry, and wiped vigorously with a clean cloth to remove most of the white paint, giving the quote a shabby look.
Finally I crackled my frame (resist technique) using a crackle glaze and then painting with a contrasting chalk paint. I gave it two coats of Vintage Distress Collage Medium to protect the crackle.

Now I dare YOU to resist! You are invited to play along in this “Dare to Resist” challenge by simply creating a vintage or shabby chic project following the challenge theme and guidelines. Then link your project up at the
Frilly and Funkie before midnight on Tuesday, February 27th.
The Frilly and Funkie team will choose four favorites from your entries, and our favorite artist will be invited to join us as a Guest Designer at Frilly and Funkie. The next three winners will receive Top 3 badges to display on their blogs. Everyone who enters and follows the rules will be entered into the draw to have the chance to win a $25 spending spree at
The Funkie Junkie Boutique.
I'm sharing with these challenges:
Thank you for your visit today! If you have any questions or comments, I'd love to hear from you!
Hugs and Blessings!


