Saturday, February 20, 2021

A Shabby Vignette Tray With Prima and Distress


Hello, and happy Saturday! It's my turn to host the Saturday Showcase feature at The Funkie Junkie Boutique challenge blog, and today I'm shining a spotlight on Prima Marketing Paper Collections, along with Distress mediums.  


I hope you'll pop over to the blog to see more photos of  my springtime Vignette Tray collage and learn how I've used Prima's beautiful Pretty Mosaic collection along with Tim Holtz die cuts and used Distress mediums to give it a wonderfully textured, aged, vintage shabby look. Also, be sure to stop by The Funkie Junkie Boutique soon, because All Prima products in stock are 45% MFRP while supplies last! Enjoy your weekend! Hugs! Sara Emily

I would also like to share my tray in these wonderful challenges:

Simon Says Stamp Wednesday Favorite Technique Making new things look old, mainly with Distress products!


Wednesday, February 17, 2021

Best Day Ever


Sara Emily Barker https://sarascloset1.blogspot.com #timholtz #sizzix #flowery #scribblybutterflies 1

Welcome! I hope you had a wonderful Valentine's Day! Today it's my turn to host the newest challenge at The Funkie Junkie Boutique challenge blog, and I've named it "Mostly Neutral'.

"For this challenge, I would like you to use mainly neutrals, but I will allow you one accent color or use of metallic accents. Let's see how you use beige, ivory, taupe, brown, black, gray or shades of white or any combination of these to make any vintage/shabby chic project you would like."

The Design Team will choose their four top picks, and the overall winner will receive the $25 gift certificate to go on a spending spree at The Funkie Junkie Boutique. All four top picks will receive badges to display on their blogs in recognition of their outstanding contributions. Be sure to stop over to the blog to see all the details of the challenge. While you're there be sure to check out the wonderful neutral creations my talented teammates made to inspire you!

Sara Emily Barker https://sarascloset1.blogspot.com #timholtz #sizzix #flowery #scribblybutterflies 2

There's really not a lot to this card, so I don't have a ton of closeups to share or any process shots, but I did take a few extra full on shots. I really love the simplicity of a neutral palette, but it's hard not to sneak in a tiny bit of color. In absence of a lot of color on my card, I've made up for it in textures and patterns, wouldn't you agree?

Sara Emily Barker https://sarascloset1.blogspot.com #timholtz #sizzix #flowery #scribblybutterflies 3

I started with (--you guessed it!) a background from my stash. It was mainly neutral with what I believe to be a little Iced Spruce mixed in. I really consider Iced Spruce to be an almost-neutral with tendencies toward blue (in my opinion). You might see shades of red and green on the background if you squint your eyes, but that's the magic of Distress at work. The inks seem to take on a life of their own as they blend with those they are next to. The Scribbly Butterfly was already hovering on my desk, so I took a cue from the blueish tint on it and added Speckled Egg to my background and the two circle die cuts I found in my stash. The circles were also blended with Antique Linen, and both the butterfly and circles edged with  Brushed Corduroy. Just the smaller circle is edged with Black Soot.

I adhered the Flowery die cut to the background, wrapped it with a length of dyed seam binding ribbon and layered that panel on a sanded Classic Kraft Stock panel and lastly, to a card blank. The circles are adhered with layers of corrugated card between  each of them and also the background. The butterfly is layered over another I traced on black card with the metal die as my template and fussy cut. The butterfly is adhered to the circle at the body only.

Sara Emily Barker https://sarascloset1.blogspot.com #timholtz #sizzix #flowery #scribblybutterflies 4

I layered a Metallic Quotations sticker to a scrap of sanded classic kraft stock. With that, my card is complete. So easy!

I hope you will take some time to play along and be in the running for some great prizes! I can't wait to see what you will create! In the meantime, I'll be back this Saturday with our Saturday Showcase feature, and I hope you'll stop back then. Happy crafting! Sara Emily

Challenge Shares:

Simon Says Stamp Monday Add Some Texture

Country View Challenges February 2021 - First Signs Of Spring

These products were used on my card and can be purchased at The Funkie Junkie Boutique :

Ranger Tim Holtz Distress Ink Pads - Antique Linen, Brushed Corduroy, Iced Spruce, Speckled Egg, Black Soot

Sizzix Chapter 1 Tim Holtz Thinlits Die Set - Flowery

Sizzix Tim Holtz Thinlits Dies - Scribbly Butterflies

Tim Holtz Idea-ology Quotations Metallic Stickers

Tim Holtz Distress Collage Medium Matte

Rayon Seam Binding

Tuesday, February 16, 2021

Perspective


Welcome! I actually made this card well over a week ago when I first got my Tim Holtz Perspective Butterfly die, but didn't post it. Fortunately, I did snap a couple photos before I sent it off to my sister in law for her birthday. 

Simon Says Stamp's Monday current challenge is to add some texture, and I thought this might fit the bill. Chunky white embossing powder supplies the texture on the butterfly's wings and the brightly sprayed background (Dylusions). A couple of stamped images from Tim's Field Notes set and a splatter of Kitsch Flamingo Distress Spray Stain complete the background to show off this surprisingly large butterfly die cut.

That's it for today, but I'll be back tomorrow with my Design Team project for new challenge at The Funkie Junkie Boutique blog. I hope you'll stop back! Hugs! Sara Emily

Challenge shares:

Simon Says Stamp Monday Add Some Texture

Country View Challenges February 2021 - First Signs Of Spring

Friday, February 5, 2021

Love You

Sara Emily Barker https://sarascloset1.blogspot.com/2021/02/love-you.html #timholtz #sizzix #stampersanonymous #valentinesday #facetedheart 1

Hello and welcome! Today I have a Valentine's Day card featuring Tim Holtz Faceted Heart and another background I pulled from my stash. This is an oldie but a goodie, and I've been saving it for something special. I made it when I had a play date with Autumn Clark, and we had just gotten our first oxide pads. The stamp was Autumn's, and it' an oldie from Tim Holtz called Floral Tattoo. 

Sara Emily Barker https://sarascloset1.blogspot.com/2021/02/love-you.html #timholtz #sizzix #stampersanonymous #valentinesday #facetedheart 2

Today I added some other old Tim Holtz images using the same colors of Oxide inks--Tattered Rose and Hickory Smoke and added a third--Victorian Velvet. Using a smudging technique gives the appearance of old vintage layers. The sets I used are: Heartfelt, Boundless Flight, Mail Art, Etcetera, and Field Notes.

Sara Emily Barker https://sarascloset1.blogspot.com/2021/02/love-you.html #timholtz #sizzix #stampersanonymous #valentinesday #facetedheart 3

I cut the Faceted Heart using paper stamped with one of the Tapestry images in Victorian Velvet oxide, again, using the smudging technique. I blended with Tattered Rose oxide. I did a really bad job of assembling the heart, so I added some Crochet trim to the edges to cover up some less than perfect seams. 

Sara Emily Barker https://sarascloset1.blogspot.com/2021/02/love-you.html #timholtz #sizzix #stampersanonymous #valentinesday #facetedheart 4

Sara Emily Barker https://sarascloset1.blogspot.com/2021/02/love-you.html #timholtz #sizzix #stampersanonymous #valentinesday #facetedheart 5

The flowers are a combination of Wildflower Stems #2 and the new #3 sets. The stamped Love You ticket is blended with Walnut Stain ink and the panel given a splash of the same. The panel is layered over two old Tim Holtz paper stash scraps. 

Sara Emily Barker https://sarascloset1.blogspot.com/2021/02/love-you.html #timholtz #sizzix #stampersanonymous #valentinesday #facetedheart 6

What a great day to use up some leftovers!  And now it's time for some leftovers for dinner. Happy weekend! Sara Emily

Challenge shares:

Simon Says Stamp Monday Love/Hearts

Country View Challenges February 2021 - First Signs Of Spring Our hearts turn to love in the spring and I have some fresh spring flora and fauna!

Simon Says Stamp Wednesday Love Is In The Air

Wednesday, February 3, 2021

Never Stop Exploring Mixed Media Card


Hello friends and visitors! It's time for a new challenge at The Funkie Junkie Boutique challenge blog, and this time Suzz is hosting. She calls her challenge Groundhog Day, and you will want to be sure to read her description completely before tackling this one!

"This challenge is inspired by the movie Groundhog Day.  In the movie Bill Murray is forced to repeat the same day over and over again for 10 years.  This past year has been a little challenging and people have felt like they might be in a little bit of a Groundhog Day time loop.  I am challenging you to create a shabby chic or vintage project that uses a technique, stamp, ink, or any other consistent tool that you find yourself using over an over in your art.  Think of this as your opportunity to share what you find yourself repeating in your art frequently.  Be sure to share with us in your post what it is that you keep repeating in your art!"

The Design Team will choose their four top picks, and the overall winner will receive the $25 gift certificate to go on a spending spree at The Funkie Junkie Boutique. All four top picks will receive badges to display on their blogs in recognition of their outstanding contributions. Be sure to stop over to the blog to see all the details of the challenge and the amazing inspiration shared by my teammates.

Initially Suzz' challenge really stumped me, because quite frankly, I have been all over the place with my makes this past year. But I had a look back and saw that one thing that almost all of my projects had in common was the use of premade backgrounds that for one reason or another were not usable at the time I made them, leftover bits, Tim Holtz products and Distress inks. You will find each of these common items on my simple card. First, I'll share a couple close ups of my card, and further on I'll show how I made it.


 I dug into my backgrounds box and found several panels that caught my eye. I also rummaged in my scraps/bits and came up with a sizable scrap to make my focal butterfly from. By themselves, these 'rejects' can look pretty scary, but I saw potential. This card came together quite quickly from there.


I ended up choosing the darkest background of the three. This panel was originally made when I made this project, and there are instructions there on how to recreate it.
 
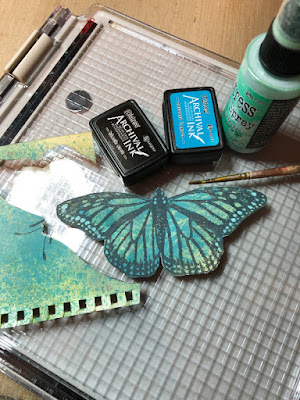
Next, I used my stamp platform and stamped the butterfly from Tim Holtz Specimen on the scrap with Black Soot and Mermaid Lagoon Distress Archival inks. I poured a bit of shaken Cracked Pistachio Oxide spray onto my mat, and using a paint brush, I used the spray to color in some of the spots on the edges of the wings and on the body then dried. I fussy cut the butterfly, cutting off the legs and antennae and set it aside. This is my first time using the Specimen stamps, and I was surprised by the size of this butterfly.

Gosh, I love Cracked Pistachio, especially in the oxide version! Doesn't it just bring this butterfly to life?


I die cut two of the same variety of the Wildflower Stems #3 and one of the older Wildflower Stems #2 from white card. (I could say this also is a repeat in my art, because this set #2 was used quite a bit in 2019.) The wildflower from set #2 is colored with Ground Espresso ink after I glued the little bits in from the back--I wanted a more solid silhouette for relief from the busy background. After stacking and gluing the two new wildflower stems together, I colored it with Fossilized Amber ink and sprinkled  just the 'flower heads' with coordinating Distress Embossing Glaze powder and heated to melt. So there's my second favorite Distress color. What's yours?


After giving my card a layout test, I decided the background needed more blues/greens to balance out the butterfly, so I blended it randomly with Cracked Pistachio ink and dipped it in watery puddles of Peacock Feathers ink.


After gluing down the wildflower stems, I decided where the butterfly would land, and using my stamp platform, stamped it directly on the background in Black Soot Distress ink. Notice that I inked only the edges of the butterfly and made sure the legs and antennae were inked. I did this so I could make a shadow by blending the ink at the bottom with a water pen, thereby making the butterfly die cut stand out more. I also created shadows around the stems with Black Soot ink and a water pen.


Lastly, I heat embossed the sentiment (Tiny Text) with Black Soot ink and black embossing powder, blended the panel with Antique Linen ink and edged with Black Soot. I blended the edges of a kraft panel with Ground Espresso ink and layered the mixed media panel on that. I then glued that to a  sanded blue Classic Kraft Stock panel and that to a card blank. 


Wasn't that easy? Now it's over to you! I can't wait to see what you find yourself using over and over again in your artwork! Big crafty hugs to you! Sara Emily

Challenge shares:

The following products were used and can be purchased at The Funkie Junkie Boutique:

Ranger Tim Holtz Distress Ink Pad - Antique Linen, Black Soot, Cracked Pistachio, Fossilized Amber, Ground Espresso, Peacock Feathers