Saturday, December 26, 2015

Merry Christmas Gift Tag

Hello everyone!  I hope you enjoyed a lovely Christmas with your loved ones, and that the spirit of Christmas is still in your heart and home! I wandered back into the Closet on Christmas Eve to play a little...I needed a quick handmade tag to adorn a package of banana bread I made for a friend.


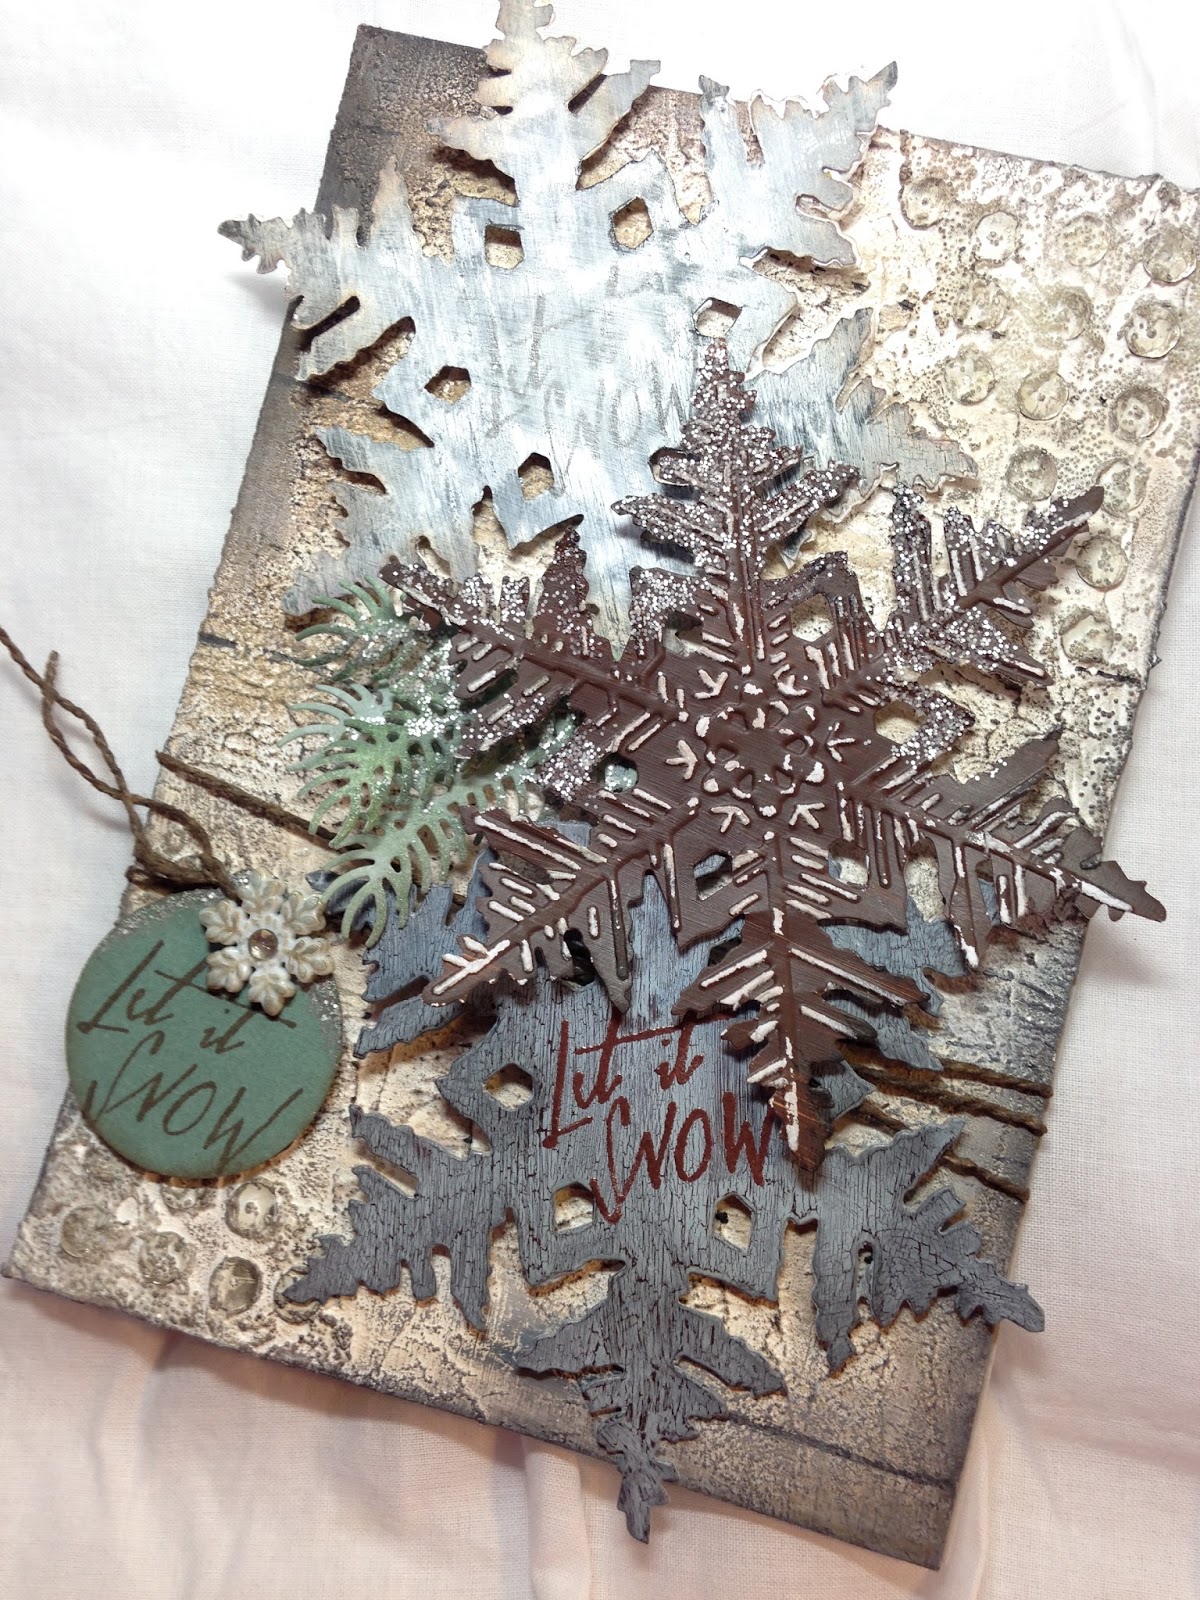
The background is stamped with an unknown maker's stamp from my stash in Distress paint-Picket Fence and dried.  I sprayed my card with water and spritzed with Distress sprays in Evergreen Bough and Fossilized Amber.  I edged in Ground Expresso and flicked on some water and dried.  This is Tim's November tag technique--a real favorite of mine! I colored the back using Tim's technique of inking my craft mat and spritzing with water, then dragging my tag though it. I dried it and blended on additional Distress inks and did the old Spritz and Flick for that vintage look. Colors are probably Vintage Photo, Hickory Smoke, Iced Spruce and Pumice Stone. I failed to make a note, because I was tight for time.


The Woodlands tree (Sizzix die) was cut once in white card, and I had an extra on my work top left from a previous project colored with Distress inks and paints and Perfect Pearls spray. "Merry" was cut twice from two shades of green card using Sizzix Alphanumeric Thinlits and layered up. "Christmas" is part of a Flonzcraft sentiment heat embossed in white.


I used a miniature clothes pin (not a tiny one) to fasten the tag to the bag of goodies, but I forgot to take a photo. I had to get back in the Closet to make two more gifts! Nothing like waiting 'til the last minute, right?  Stay tuned; I will be posting these projects in the next two weeks.


I would like to enter this into the following inspiring challenges:
Scrapy Land Challenge # 32 Holidays I used just two different Sizzix dies.
Crafty Cardmakers and More #154 Snow I hope you can see the snow on my tag; the white tree and white plaid background stamp is supposed to depict snow.
As You Like It Favorite Christmas Colors and Why I love traditional colors for Christmas, because they are unique to the holiday, but I like to change them into a vintage grungy palette.

Thank you for stopping today and for all your lovely comments.  I'm still trying to get around to see you all, and all the wonderful projects you have been working on over the holidays! I do love the inspiration!
Hugs and Blessings!
Sara Emily

Tuesday, December 22, 2015

Wishing you a Merry Christmas and an Enchanted Evening of Lights

Merry Christmas to all of you who have supported me throughout the year! Here is a card I wish I could have sent to each and everyone of you and some photos of a evening walk my friend, my daughter and I shared the other evening.  It was probably the coldest and most beautiful evening we will have before the new year. The cool clear evening made for a delightful stroll through acres of festively  lit gardens along the Intracoastal waterway here in our town. Please take a moment and stroll along with me. Sorry for the poor photo quality--I phone's are not meant for this type of photography, but it's all I have.


Structure made entirely from bottles.


Paper butterflies on trees in the butterfly house. Too cool for real butterflies!


Grape arbor; even more beautiful when it got dark. 


Hyacinths made from lights along paths and in a huge flower bed.


It took us several looks to verify that these are fake trees, all made of beautiful lights.


  This is one of the hundreds of old TALL live oaks (some of them over 300 years old!) lit with huge 3 dimensional stars. Each star is approximately 4 feet across.


  There were many, many of these "trees" about 30 ft. tall in all different colors.


These swans and dragon made of lights are across a lake, so they are actually very large. There are real swans that live in the lake in season--no real dragons that I know of!
.


This last photo did not turn out well, but it is a dock across the lake and some geese hanging out in the glow. Looks spooky and quite beautiful in real life!


Wishing you and your families and/or friends a  lovely Christmas! See you in 2016!
Sara Emily

12 Tags of 2015--December

Hello everyone! With all the hustle and bustle of the last few days and the 7 days before that making Linda's 12 Tags of Christmas, I almost forgot to make my December tag for Tim's 12 Tags of 2015 .  You can read all about the details of how to make this in Tim's wonderfully easy to follow tutorial on his blog. Here is my sparkly vintage version.


Here is Tim's beautiful, rustic original tag.  I drew so much inspiration from his tag, but sadly I do not own so many of the products he used. Again, I was called to improvise.

12 tags of 2015 - December | www.timholtz.com

I am in love with Tim's Vintage Platinum  Distress Glitter Dust, and have found two uses for it on my tag, although my photography does not nearly capture the vintage beauty of this magical dust! I've glittered the daylights out of my foliage and then very discreetly around the edge of my tag. Perhaps a little too discreetly for the camera to pick up! But it's perfectly sparkly vintage goodness in real life!


 I used  the Festive Greenery die, cutting some of my greenery from sanded Kraft Core card and some from white card. I applied the glitter dust to the white card foliage using Ranger Glossy Accents and inked the Kraft Core greenery with Ground Expresso.

The bow is cut out of Ranger Manila card and Tim's Holiday Wreath die.  I colored it using Barn Door Distress and Ground Expresso inks and Festive Berries Distress marker. This is my first time using the bow from this die, and I'm so delighted how easy it is to make a 3D bow using it.

I loved using my new Distress splatter brush with Picket Fence Distress paint for a little snowy effect over the entire tag. The tiny gold and silver jingle bells are from my stash, and I colored three of them with Watermelon Alcohol ink. Crinkle ribbon is colored using Ground Expresso Distress ink.


This would look great with a little stitching around the edges, like Tim did, but my machine was not up for it.  I tried to redeem myself by glittering my edges. Well, that concludes 12 wonderful tags for 2015!  What an inspiration you have been this year, Tim! Thank you, and Merry Christmas! I'm looking forward to 12 more in 2016!

I would like to enter this into the following inspiring challenges:
Scrapy Land Challenge # 32 Holidays I used a Sizzix die over and OVER again! And another two Sizzix just once--I used Tags and Bookplates to cut my tag.
Our Creative Corner Wish Upon a Star
A Vintage Journey Vintage Christmas Tim inspiration is his December tag!

Thank you for stopping by and for all your wonderful comments!
Merry Christmas to you and your families!
Sara Emily
UPDATE: So honored!
Thank You! January 2016 12 Tags of 2015-December

Friday, December 18, 2015

Guest Designer Mixed Media World

Hello, everyone!  Happy Friday!  I'm thrilled to be joining Ingrid and her super talented Design Team as Guest Designer at Mixed Media World today for Deb's December Inspiration challenge. Here is a card I made using the colors on her inspiration image below.


These are the colors of Deb's December Inspiration. Courtesy of Design Seeds.


I started with Ranger Manila card stock and spread Golden crackle texture paste over it.  While it was still wet, I embedded Recollections sequins in the paste in two corners. After it dried, I added Golden Glass Bead Gel and painted the entire thing in DecoArt Americana Titanium White paint. I blended Distress inks in Ground Expresso, Black Soot, and Hickory Smoke. Finally, I wiped some metallic rub on wax in Nubian with my finger. Below is the only in process shot I took; I was so carried away in the making and not in the taking!


The top most snowflake was painted with Distress paint in Weathered Wood using Tim Holtz Paint marbling technique. I added a layer of DecoArt Weathered Wood Crackle Medium, and when dry, added Titanium white. I edged in Ground Expresso Distress ink.


The brown center snowflake is painted with DecoArt Media Burnt Umber, dried, and embossed.  I sanded lightly and used Distress paint, Black Soot to edge. I used Ranger's Embossing Dabber, Sticky Embossing powder and Pumice Stone Distress Glitter for an icy look. I did the same thing to the foliage.


The bottom snowflake is also painted with Burnt Umber, then with Weathered Wood Crackle medium. I topped it with DecoArt Americana Grey Storm and Distress ink, Black Soot. I heat embossed the Tim Holtz sentiment using Stampin' Up Chocolate Brown powder.


My string is painted with Ground Expresso Distress paint and then stiffened with Stiffen Stuff.  The tiny snowflake charm is from my stash and colored with just a touch of Ground Expresso paint and metallic rub on wax in gold.


I used Tim Holtz Sizzix Layered Snowflake die and accompanying Texture Fade to make my snow flakes and La La Land Winter Branches die for my foliage.  The tag is Tim Holtz Sizzix Tiny Tabs and Tags die. The sentiment is Tim Holtz Mini Handwritten Holidays, and it is inked in Archival, Potting Soil and Watering Can (I love those names!).

I would like to enter this card in the following inspiring challenges:
A Vintage Journey Vintage Christmas My Tim influence: his paint marbling technique and using his Distress and other products, as well as his vintage grungy style.
Emerald Creek Dares Celebrations Around the World Because not everyone may celebrate our traditional Christmas, I wanted to create a winter celebration for all to enjoy!
Scrapy Land Challenge #32 Holidays I used two of the 40 brands that Scrapy Land carries: Sizzix and La La Land
Simon Says Stamp Monday Challenge Just a Pinch I used a pinch of Distress Glitter.

Thank you for stopping by today and for all your wonderful comments! I read and appreciate them all! This is more than likely my last post before Christmas, so I wish you all a wonderful Christmas day, full of joy and love!
Hugs and Christmas Blessings!
Sara Emily

Thursday, December 17, 2015

Guest Designer for A Vintage Journey Vintage - Christmas Assemblage Clock

Hello everyone!  I'm thrilled and honored to be Guest Designer at A Vintage Journey today for Annie's challenge Vintage Christmas. Instead of looking for inspiration from Tim Holtz, it found me!  One of his Assemblage Clocks stashed away for a special project fell off my shelf when I was looking through my stash. Since I made a Christmas clock for my family last year, I decided why not start a tradition, so here is my Christmas 2015 version.


It all started in the usual way with a coat of gesso, adding a generous heaping of Crackle paste, then coloring with  Distress paints and inks in blues, Picket Fence and Ground Expresso. I added DecoArt Snow Writer and Glamour Dust and some sparkly flakes from my stash to add a little frosty look. I added some paste through Tim's Layering stencil on the back. In the photo below you can see how I stamped some trees on the inner wall using Tim's old Merry Christmas image. I inked it in Jet Black Archival and added a little Glamour Dust.  Impossible to capture with my little phone camera, but in real life it just sparkles like sun shining on new snow!


My winter scene centers around Tim's Woodland tree and dies, as well as a couple of deer I found at a yardsale.  Passed over by everyone, because of a broken ear, I knew I could give them a good home. I cut my tree and colored them with Distress paints. Then I went back and salvaged all those tiny bits that come out and you throw in the trash.  I added Snow Writer and Glamour Dust to the tipsof them and of the branches of the trees. When they were dry, and my background was done and trees positioned, I carefully laid those tiny pieces back in the negative spaces. What a job, but so worth the effort, don't you think?


 That snowy background was created with Distress paints and Frantage, and the trees were stamped once again. Below you can see my sweet little deer resting in their cozy snowy nest. The Woodland tree is colored with Distress spray in Evengreen Bough--how fitting.  I added some snow using my Snow Writer, Glamour Dust and some sparkly flakes.


To make my topper, I used a few of Tim's Sizzix dies: Tattered Poinsettia, Tattered Pinecone, Festive Greenery and Handwritten Holidays, all by Sizzix. I cut the poinsettias and colored them with Distress ink, then embossed them with the poinsettia Texture Fade. I added Stickles to the centers.  I colored a few leaves with Brushed Pewter Distress paint and sprinkled with rock Candy Distress glitter. The foliage was colored with Distress ink and heat embossed with Stampin' Up Winter Wonderland powder. I added a few grapevines from my garden and heat embossed Merry Christmas with Ranger embossing tinsel. I adhered the sentiment to a piece of clear waste packaging and added it to my spray.


Here's another look at my completed vintage Christmas Clock.


 I would like to enter this in the following inspiring challenges:
Mixed Media World MMW # 10 Inspirational Image I chose a few of the colors from the inspiration image and added a few of my own.
Scrapy Land Challenges #32 Holidays  I used 5 different Sizzix dies.
Simon Says Stamp Monday Challenge Just a Pinch I used just a pinch of my sparkly flakes and a pinch of red embossing tinsel!
Thank you for stopping by today and for all your wonderful comments!  They really make my day!
Hugs and Christmas Blessings!
Sara Emily

HONORED!!!!
Top 3