Thursday, August 29, 2019

Most Delicate Tag Friday and Tutorial for A Vintage Journey

Sara Emily Barker https://sarascloset1.blogspot.com/2019/08/most-delicate-tag-friday-and-tutorial.html  #timholtz #3Dcrackle #batcrazy #halloween Halloween Tag Tutorial 1

Hello and welcome! It's time for Tag Friday over at A Vintage Journey. This is just a fun feature for the Creative Guides to make a tag using whatever products they wish without any constraints or theme in mind. I hope you will stop over to see all the amazing tags my talented teammates created. But before you head off, I've prepared a simple step by step for you, and following that, some close-up photos to enjoy. 

 Let's get started...

1. Blend Wilted Violet then Aged Mahogany Distress Oxide inks through an old Prima stencil over a black painted wooden tag. While the stencil is still in place spray with Distress Mica Spray. Remove stencil and dry the tag. Sand the edges and apply Hickory Smoke paint to edges.

2. Die cut Ornate Frame from silver Metallic Kraft Stock. Color with Slate alcohol ink, Smolder Alcohol Pearls and a bit of Black Soot paint on edges that will extend beyond the tag.

3. Die cut oval from panel of mixed media paper.  Blend with Weathered Wood, Wilted Violet, Seedless Preserves and Dusty Concord Oxide ink.

4. Emboss oval with Tim Holtz Crackle 3D embossing folder,  colored side facing up, so you are left with a spider web appearance.  Lightly blend the ridges with Black Soot ink. Adhere embossed oval to Ornate Frame and adhere to tag with adhesive foam tape.

5. Die cut bats from Classic Kraft Stock using Bat Crazy Thinlits set. Sand the edges and blend with Twisted Citron Distress Oxide ink. Make eyes with Stickles. Adhere to oval with collage medium.

6. Dye seam binding ribbon with Wilted Violet and Seedless Preserves Oxide and stamp with Ledger Script stamps and Dusty Concord and Hickory Smoke Distress Archival inks.

7.  Color a Halloween Word Token with Black Soot paint, allow to dry a minute and wipe off excess. String with Ideaology Jute String and tie with seam binding to tag.

8. Color a bat charm with Smolder Alcohol pearls and Black Soot paint.

9. Blend a Halloween Clippings sticker with Frayed Burlap ink. Adhere to a bat charm and adhere this to tag with collage medium.

And some close-ups...

Sara Emily Barker https://sarascloset1.blogspot.com/2019/08/most-delicate-tag-friday-and-tutorial.html  #timholtz #batcrazy  #3Dcrackle #halloween Halloween Tag Tutorial 2

Sara Emily Barker https://sarascloset1.blogspot.com/2019/08/most-delicate-tag-friday-and-tutorial.html  #timholtz #  #3Dcrackle #halloween Halloween Tag Tutorial 3

Sara Emily Barker https://sarascloset1.blogspot.com/2019/08/most-delicate-tag-friday-and-tutorial.html  #timholtz #batcrazy  #3Dcrackle #halloween Halloween Tag Tutorial 4

Sara Emily Barker https://sarascloset1.blogspot.com/2019/08/most-delicate-tag-friday-and-tutorial.html  #timholtz #batcrazy  #3Dcrackle #halloween Halloween Tag Tutorial 5

I really am enjoying Tim Hotlz' newest 3D embossing folder -- Crackle, to make this spooky background. If you would like some other ways to use this folder, you can visit this Saturday Showcase tutorial.

That's all for me! We always love to see your fun tags that you have been creating and invite you to join the party by linking any tag you have made during the month of August. Just visit the blog and add your link! I hope to see you there! Hugs! Sara Emily

Challenge shares:
Simon Says Stamp Monday ‘S’ is For SPOOKY!
Country View Challenges August 2019 - Texture
Scrapy Land Challenge #120 Anything Goes  I used 2 Sizzix dies and a 3rd unknown one (oval die cut given to me by a friend)


These products were used and can be purchased at The Funkie Junkie Boutique:
Sizzix Chapter 3 Sizzix 3-D Texture Fades Embossing Folder - Crackle
Sizzix Chapter 3 Sizzix Thinlits Die Set - Bat Crazy 
Distress Archival Ink  --Dusty Concord, Hickory Smoke
Distress Paint -- Hickory Smoke, Black Soot, Antique Linen
Distress inks -- Black Soot, Frayed Burlap, Ground Espresso
Distress Oxide Pads --Weathered Wood, Wilted Violet, Seedless Preserves, Dusty Concord, Twisted Citron, Aged Mahogany, Hickory Smoke
Alcohol inks -- Slate,  Smolder Alcohol Pearls
Halloween Clippings Stickers
Rayon Seam Binding
Tim Holtz Idea-ology Jute String


Wednesday, August 28, 2019

Found (and Lost) Relative Vintage Card for The Funkie Junkie Boutique Challenge Blog

Sara Emily Barker https://sarascloset1.blogspot.com Vintage Mixed Media Card Tim Holtz Sizzix Crochet Burst 3D Impresslits 1

Hello, and welcome! It's time for our newest challenge at The Funkie Junkie Challenge Blog, and this time our hostess is the talented Suzz!  She titles her challenge 'Bits and Bobs', and here's what she says:

"Do you have a pile of leftover scraps from projects previously made or even a half finished project waiting for you to get the time to complete it?   This is the challenge for you!  It is time to pull out those scraps, remnants or half finished projects and pull them together into a fabulous shabby chic or vintage project.  Make sure to mention in your post what part of your project was a scrap or remnant." 

As always, the winner will earn a chance to be a Guest Designer at a future date at The Funkie Junkie Boutique blog, and everyone who enters and follows the rules will go into the draw for the chance to win a $25 spending spree at The Funkie Junkie Boutique. There are also Top 3 Badges for three additional outstanding entries, chosen by the Design Team. Please see the blog for details.

Let's get started! Pictured below are a few scraps I salvaged from my bits box and backgrounds file that I thought might work together. In the photo directly below, I've already started to alter the not so perfect background with Forest Moss Distress ink to unify my color scheme. I've put together a little pictorial step by step to show how those little bits got altered. The little piece of Crochet die cut, Ticket Booth ticket and vintage checkbook stub were leftover from previous projects and the burst medallion was an 'oops'; I put the Metallic paper in the Impresslit folder upside down so I was left with a debossed medallion. (But I saved it anyway :):) )

Sara Emily Barker https://sarascloset1.blogspot.com Vintage Mixed Media Background Ornate & Lace

Sara Emily Barker https://sarascloset1.blogspot.com Vintage Mixed Media Tutorial   #timholtzsizzix #crochet #burst3Dimpresslits #ticketbooth

I altered an original Baseboard Frame (I shared a link to the new Halloween Baseboard Frames below, which are similar) following my tutorial. I used Peeled Paint Distress Crayon to highlight the cracks and sprayed with Walnut Stain Distress Oxide Spray. Inside the frame, I've used a Found Relative and followed Stacy's tutorial  to age the photo.  I've used this technique on my witch's cauldron, but I'da never thunk to do it on photos. Stacy, you're a genius--thank you for the inspiration!!! If you have not been to Stacy's blog--Tattered Nest Designs, you will be in for a treat; she can make anything look like it's been discovered in her grandma's attic. While she used Mushroom Alcohol Ink and Smolder Alcohol Pearls to color her witch, I added drips of Slate alcohol ink as well.

I layered over a sanded and inked panel of gold Metallic Kraft Stock and then a sanded panel of old Distress sandable cardstock. I applied a Halloween Remnant Rub to an off cut from another Found Relative.  (I really do save all my bits!) I smeared it with Crazing, dripped with Mushroom and Smolder inks/pearls and brought out the cracks with crayon. The vintage buttons are from my stash, and I tied a bow on one with a short length of thread I had leftover from another project. You never know when you can put these little pieces to use! Save them in a little box, and pull it out when you need a little something.

Here are some close-up photos to show the detail.

Sara Emily Barker https://sarascloset1.blogspot.com Vintage Mixed Media Card Tim Holtz Sizzix Crochet Burst 3D Impresslits 2

Sara Emily Barker https://sarascloset1.blogspot.com Vintage Mixed Media Card Tim Holtz Sizzix Crochet Burst 3D Impresslits 3

Sara Emily Barker https://sarascloset1.blogspot.com Vintage Mixed Media Card Tim Holtz Sizzix Crochet Burst 3D Impresslits 4

Sara Emily Barker https://sarascloset1.blogspot.com Vintage Mixed Media Card Tim Holtz Sizzix Crochet Burst 3D Impresslits 5

Sara Emily Barker https://sarascloset1.blogspot.com Vintage Mixed Media Card Tim Holtz Sizzix Crochet Burst 3D Impresslits 6

Sara Emily Barker https://sarascloset1.blogspot.com Vintage Mixed Media Card Tim Holtz Sizzix Crochet Burst 3D Impresslits 7

That's all for me; now hop on over to the blog to see how my amazing teammates have put their bits and bobs to use! Then it's over to you; how can you use your scraps? I can't wait to see! Hugs and blessings! Sara Emily

Challenge shares:
Simon Says Stamp Monday ‘S’ is For S is for  SALVAGED SCRAPS!
The Artistic Stamper August' Creative Challenge - ANYTHING GOES I stamped my background and the Ticket.
The House That Stamps Built Anything Goes Challenge ~ A2819 I stamped my background and the Ticket.

The following products were used and can be purchased at The Funkie Junkie Boutique:
Sizzix Chapter 2 Tim Holtz Thinlits Crochet
Sizzix Framelits Die Set - Ticket Booth by Tim Holtz
Sizzix 3-D Impresslits Embossing Folder - Burst
Stampers Anonymous Tim Holtz Rubber Stamps - Ticket Booth
Tim Holtz Idea-ology Found Relatives
Tim Holtz Idea-ology Layers & Baseboard Frames, Halloween
Tim Holtz Idea-ology Remnant Rubs, Halloween
Distress Inks --Fossilized Amber, Forest Moss, Black Soot, Vintage Photo, Ground Espresso
Distress Oxide Spray - Walnut Stain
Distress Oxide Pads --Antique Linen, Hickory Smoke
Distress Crayons --Set #2, #3
Distress Collage Medium --Matte, Crazing
Alcohol inks --Slate, Mushroom, Smolder Alcohol Pearls
Prima Art Alchemy by Finnabair-Metallique Wax - White Gold


Sunday, August 25, 2019

The Little Things--Another ATC

Sara Emily Barker https://sarascloset1.blogspot.com/ Mixed Media ATC with Tim Holtz Stencils, Oxides and Transparent Wings 1

Welcome! I have another little mixed media gem to share with you. I am loving seeing all the ATC's over at Simon Says Stamp's ATC challenge. Have you played along yet? My friend down the street inspired me with her butterfly hatchery. Her monarch eggs she's collected from her milkweed are in the chrysalis stage right now, so it won't be long til they turn into butterflies and she releases them.

Sara Emily Barker https://sarascloset1.blogspot.com/ Mixed Media ATC with Tim Holtz Stencils, Oxides and Transparent Wings 2
 
I smeared Transparent Matte Texture Paste through a Tim Holtz mini stencil (set 25) over kraft card. When it was dry, I wiped over the raised areas with Prima White Gold Metallique Wax. Lastly, I painted the background with Distress Oxide Sprays (Faded Jeans and Cracked Pistachio) with a brush from the bottle.

Sara Emily Barker https://sarascloset1.blogspot.com/ Mixed Media ATC with Tim Holtz Stencils, Oxides and Transparent Wings 3

I layered a Transparent Wings butterfly over one die cut (Mini Detailed Butterfly) from crinoline. A tiny transparent butterfly has some watery Picket Fence paint smeared on the back of his wings, and both are splattered with the paint. You can see just how shimmery that background is juxtaposed with the matte finish of the oxides.

Sara Emily Barker https://sarascloset1.blogspot.com/ Mixed Media ATC with Tim Holtz Stencils, Oxides and Transparent Wings 4

More splattering on the panel before adhering the butterflies and a couple of Clippings stickers. I blended the edges with Ground Espresso ink. Pictured below taken in the natural gloomy light of the afternoon; I rather like it.

Sara Emily Barker https://sarascloset1.blogspot.com/ Mixed Media ATC with Tim Holtz Stencils, Oxides and Transparent Wings 5

I wish there were an extra day in this week, so I could make one more...perhaps I'll squeak one more in before the morning! Hub's night to cook! Hugs and Blessings! Sara Emily

Challenge shares:
Scrapy Land Challenge #120 Anything Goes  I used a Sizzix die; Detailed Butterfly
Let's Craft and Create Challenge #150 - AG + Option EnTWINEed No twine, but the butterflies are entwined in the stems of the flower garden.

Merry Christmas ATC Pair


Hello and welcome! I have a very short post to share a pair of ATC's I made to play along in Simon Says Stamp Artist Trading Card challenge. These little 2.5 x 3.5 inch cards are a blast to make and a great way to try new or re-visit old techniques and use up some of those leftovers.

I have a pile of backgrounds that I've binned for one reason or another, and this one happened to be a monoprint using Tim Holtz old Poinsettia stencil and Black Soot ink.  (I don't know why it shows as blue in the photos) Not your traditional Christmas color scheme. It was a real disaster, and the only reason I saved it was because there was a decent monoprint on the opposite side.


I colored in the poinsettias and leaves with Distress inks: Candied Apple, Peeled Paint and Forest Moss. I blended the background further with Worn Lipstick and Shabby Shutters and blended Peeled Paint through another Tim Holtz mini stencil from set 32.

I heat embossed the poinsettia centers (Winter Watercolor stamps) the edges, and Merry (Christmas Classic stamps) on a scrap from the original monoprint panel. I thought the centers looked off, so I dropped in Fossilized Amber oxide around the embossing.


To decorate the backs, I blended white card with Candied Apple ink, and placed the Merry Christmas stencil over it. On one card I blended with Peeled Paint ink and the other, I spritzed the stencil with water, let it sit for a minute and blotted with a paper towel to remove some of the color. The edges were blended with  Forest Moss ink. On the reverse side, I just inked the edges with Candy Apple, and I adhered the painted panel to this.


I think it would be fun to make a bunch of Christmas ATC's  and hand them out randomly to store clerks, include one in the envelope with a bill payment, or drop one in the bank drive through during the Christmas season to spread Christmas cheer. What do you think? Thank you for stopping by today! I really appreciate your support! Hugs and Blessings! Sara Emily

Challenge shares:
Crafty Hazelnut's Christmas Challenge #452 Optional embossing-check!

Saturday, August 24, 2019

3D Crackle Saturday Showcase for The Funkie Junkie Boutique Blog


Welcome to the weekend! It's my turn to present Saturday Showcase at The Funkie Junkie Boutique Blog. I've decided to showcase Tim Holtz' newly released 3D Crackle Texture Fade, and I've paired it with some of his newer Chapter 3 dies and a 3D Impresslit. If you would like to see step by step how each of these came together, then pop over to the blog. I hope to see you there! Happy making! Sara Emily

Sara Emily Barker https://sarascloset1.blogspot.com/2019/08/3d-crackle-saturday-showcase-for-funkie.html Halloween Card With Tim Holtz Crackle 3D Ghost Town Bat Crazy

Sara Emily Barker https://sarascloset1.blogspot.com/2019/08/3d-crackle-saturday-showcase-for-funkie.html Christmas Card With Tim Holtz Crackle 3D Christmas Ribbon

Sara Emily Barker  https://sarascloset1.blogspot.com/2019/08/3d-crackle-saturday-showcase-for-funkie.html Everyday Card  With Tim Holtz Crackle 3D

Challenge shares:
Simon Says Stamp Wednesday Clean And Simple (Christmas card and silver card)

Sunday, August 18, 2019

Be Your Beautiful Self - Tim Holtz Organic and Flutter Dies


Hello and happy Sunday! I made a card for my mother in law just because...She loves blue, so this was perfect opportunity to play along with Simon Says Stamp's current Midsummer Blues challenge.

 I was inspired by the deep blue midsummer skies we've had here since this past Thursday when we've had almost constant thunderstorms, day and night. The colors on my background look like what I see when I look out the window, with the rain beading up on the glass. I applied DecoArt chalky blue paint with a brayer to a watercolor paper panel and blended it randomly with Faded Jeans ink. I splashed it with water and also Seedless Preserves oxide ink.


I die cut Organic Thinlits from watercolor paper and colored it with a paint brush and Distress oxides: Bundled Sage, Peeled Paint, Chipped Sapphire and Seedless Preserves and Ken Olivers Indigo Color Burst. I blended a scrap of watercolor paper with Faded Jeans ink and dipped it in puddles of Seedless Preserves oxide. I die cut three little flowers from the scrap using the Funky Floral #3 Thinlits set and tucked two behind the Organic die cut and adhered one to the top, all with foam adhesive.


The Organic die cut is popped up from the blue background with foam adhesive, giving it a bit of dimension and texture. The Flutter butterfly is stamped in Cobalt and Black Soot Distress archival inks on a scrap I colored with Indigo Color Burst. I shaded it with a paint brush and Chipped Sapphire oxide and die cut it with Flutter Framelits. I finished the card with a Small Talk sticker edged with Chipped Sapphire oxide.

Here are some closeup photos to show the detail.


Thank you for your visit today! Wishing you a wonderful day and a great week ahead! Hugs and blessings! Sara Emily

Challenge shares:

Wednesday, August 14, 2019

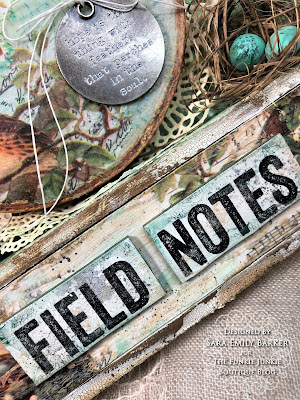
Field Notes: A Vignette for The Funkie Junkie Boutique Blog

Sara Emily Barker https://sarascloset1.blogspot.com/2019/08/field-notes-vignette-for-funkie-junkie.html Mixed Media Vignette Tim Holtz 1

Hello and welcome! Today we start a new challenge at The Funkie Junkie Boutique blog, and it's my turn to host. I'm calling my challenge Let's Do It Again! and here are the details:

Have you ever made something that you wish you could do over? Perhaps it was a technique you tried and didn't get the results you were hoping for. Maybe you didn't have just the right product you wanted to make your project just perfect. Or maybe a friend asked you to make something like it for them. Now's your chance for a do-over. Choose one of your own posted vintage or shabby chic projects and do it over with a bit of a twist. Be sure to link back to the post of the project you are making over and tell us why you wanted to do it a second time and what's different about it this time. We like to see your entry be in the vintage or shabby chic style we prefer. 


I chose to make over my Pretty Little Birds vignette, because a sweet blog friend asked if she could buy my vignette. Since that one had already been spoken for, I promised to make her another as a gift. This one has so many of the same elements and techniques, but varies mostly in color and style. I would say my original is more vintage, while this leans toward being shabby chic. I also had no choice but to design this a little differently, because this was the only box I had that would fit the embroidery hoop.


After applying several coats of gesso, I altered the box to look like real wood with Rusty Hinge and Vintage Photo Distress Spray stains and Walnut Stain Distress Oxide spray. I thought I had taken photos of the process, but they seem to have disappeared. This is a different process than I did on my original vignette box.

I start with a gesso base. Next I apply stain directly from the bottle to a cosmetic sponge and make vertical streaks of the two colors down the boxes outer surfaces. Next I mix a couple drops of oxide with collage medium and apply with my finger. I had to work quickly, because Distress Collage Medium dries very quickly.

Sara Emily Barker  https://sarascloset1.blogspot.com/2019/08/field-notes-vignette-for-funkie-junkie.html Faux Wood Tutorial

In the end, I swiped random areas of the outer edges with Distress Crazing I had left on my fingers and highlighted the cracks with Distress Crayon.

Sara Emily Barker https://sarascloset1.blogspot.com/2019/08/field-notes-vignette-for-funkie-junkie.html Mixed Media Vignette Tim Holtz 2

I crackled the background for the embroidery hoop like I did in my original post, but this time, I sealed it right away with Distress Collage Medium Matte, and then adhered the Aviary Collage Paper with the matte collage medium. 

I wanted to make this one lighter, so while I still used Distress Crayons to color the image, I used Tumbled Glass. I also smeared with a little Cracked Pistachio Distress Oxide Spray that was on my finger. I chose to keep the original patina of the hoop, because it was so pretty.

As before, I backed the hoop with a die cut circle (Stitched Circles) and adhered Crochet die cuts around the edge.

Sara Emily Barker  https://sarascloset1.blogspot.com/2019/08/field-notes-vignette-for-funkie-junkie.htm Crackle Tutorial

Sara Emily Barker https://sarascloset1.blogspot.com/2019/08/field-notes-vignette-for-funkie-junkie.html Mixed Media Vignette Tim Holtz 3

I stuck down three pieces of foam core to fill the opening at the bottom and topped that with a piece of cat food box.I coated the chipboard with gesso, then adhered bits of Aviary collage paper. I coated both the chipboard piece and the Idea-Ology Quote Chips with Crazing, and when dry, smeared with crayon, dipped into puddles of watered down oxide spray and finally, spritzed with Black Soot marker.

 (Just to be clear, no food touches the chipboard; they are just cardboard layered between cans of food within a box. I'm glad I hoarded some of these, because I found out that each can of food is equivalent to a human eating a Big Mac every day. No wonder Roger's so fat! No more Big Macs for the kitty, and no more chipboard to hoard.  :(:( ) 

Inside edges and background paper (Wallflower; thank you to Kathy Clement for her generous gift! She sent me a HUGE stack of Tim Holtz papers and packs of Distress crayons. She sure knows how to spoil a girl!) are covered with leftover bits of collage paper. I coated the edges with Crazing and smears of Ranger Opaque Crackle Paste. When dry, I sprayed lightly with Twisted Citron Oxide spray. The background paper has crackled stenciling and spritzes of Vintage Photo Distress Spray stain and Oxide spray.

The lip of the box is painted with Walnut Stain Distress paint and then crackled with the Ranger paste. To highlight the cracks I smeared with Vintage Photo crayon.

Sara Emily Barker https://sarascloset1.blogspot.com/2019/08/field-notes-vignette-for-funkie-junkie.html Mixed Media Vignette Tim Holtz 4

I didn't have anymore robin eggs, so I had to make my own. I had these cheapo plastic eggs in my stash, and I altered a pair of yellow ones with gesso, oxide sprays, Distress paint and markers.

The Idea-Ology Quote Token is altered with Picket Fence paint.


Sara Emily Barker https://sarascloset1.blogspot.com/2019/08/field-notes-vignette-for-funkie-junkie.html Mixed Media Vignette Tim Holtz 5

Lastly, I made the little stack of field notes with pieces of kraft paper and discontinued Kraft Glassine paper, wrinkled and blended with Walnut Stain ink. I topped with a snip from the Wallpaper stash and tied with cord.

Here are some additional close up photos for you to enjoy.

Sara Emily Barker https://sarascloset1.blogspot.com/2019/08/field-notes-vignette-for-funkie-junkie.html Mixed Media Vignette Tim Holtz 6

Sara Emily Barker https://sarascloset1.blogspot.com/2019/08/field-notes-vignette-for-funkie-junkie.html Mixed Media Vignette Tim Holtz 7

Sara Emily Barker https://sarascloset1.blogspot.com/2019/08/field-notes-vignette-for-funkie-junkie.html Mixed Media Vignette Tim Holtz 8

Sara Emily Barker https://sarascloset1.blogspot.com/2019/08/field-notes-vignette-for-funkie-junkie.html Mixed Media Vignette Tim Holtz 9

Sara Emily Barker https://sarascloset1.blogspot.com/2019/08/field-notes-vignette-for-funkie-junkie.html Mixed Media Vignette Tim Holtz 10

That's all for me today, but if you stop The  Funkie Junkie Boutique blog, my talented teammates will inspire you with their do-overs for the 'Let's Do It Again!' challenge. Then it's over to you! I can't wait to see what you choose to do over! Hugs and Blessings! Sara Emily


The following products were used and can be purchased at The Funkie Junkie Boutique:

Tim Holtz Idea-ology Collage Paper Aviary
Stampers Anonymous Tim Holtz Mini Layering Stencils - Set 27
Sizzix Chapter 2 Tim Holtz Thinlits Crochet
Sizzix Framelits Die Set 6PK - Stitched Circles
Distress Oxide Sprays: Antique Linen, Twisted Citron, Cracked Pistachio, Faded Jeans, Walnut Stain
Ranger Tim Holtz Distress Crayons - 6PC Set #3
Ranger Tim Holtz Distress Crayons - 6PC Set #5
Ranger Tim Holtz Distress Crayons - 6PC Set #7
Ranger Tim Holtz Distress Ink Pad - Walnut Stain
Distress Paint: Walnut Stain, Picket Fence, Cracked Pistachio
Distress Spray Stain: Vintage Photo, Rusty Hinge
Ranger Tim Holtz Distress Collage Medium Matte
Ranger Tim Holtz Distress Collage Medium Crazing
Ranger Opaque Crackle Texture Paste


Thursday, August 8, 2019

Tim Holtz Cutout Blossoms Birthday Card


Sara Emily Barker https://sarascloset1.blogspot.com/ Mixed Media Birthday Card Tim Holtz Cutout Blossoms 1

Hello! I had to drop everything and make a card to celebrate Simon Says Stamp's 9th Birthday! Happy Birthday!

Sara Emily Barker https://sarascloset1.blogspot.com/ Mixed Media Birthday Card Tim Holtz Cutout Blossoms 2

I used Distress Oxide inks to color the two background panels (Chipped Sapphire, Stormy Sky, Antique Linen, Pumice Stone) and stamped the top one with a Fragments stamps. A Crochet die cut underlines the birthday greeting--a Stampin' Up 'birthday' and Tim Holtz Sideorder 'wish' die cut. There are silk flowers from my stash topped with Funky Floral #3 die cut blossoms and a rare sequin. (I was inspired by all the sequins on the SSS DT makes.) And because it's a special birthday, I even got out my sewing machine and stitched around both panels.

Sara Emily Barker https://sarascloset1.blogspot.com/ Mixed Media Birthday Card Tim Holtz Cutout Blossoms 3

The Cutout Blossoms die cut allows that pretty blue oxide background to peek through. The foliage is from the same Funky Florals set. It's rare to see such a short post from me, but it's filled with big birthday wishes for Simon Says Stamp! Hugs! Sara Emily

Challenge shares:


Thursday, August 1, 2019

Tim Holtz Floral Card for A Vintage Journey


Hello! It's time for a new challenge at A Vintage Journey and this time our lovely hostess, Jennie, chose the theme 'A Cup of Tea For Your Art'. Pour yourself an extra cup of tea and use it in your project. In your cup you could dye lace, ribbon, wood, paper and flowers, or use it to create splashes or cup rings on your project. And don't just limit yourself to "ordinary tea" - there's green tea, yellow tea, black tea, herbal teas and fruit teas - whatever you've got in your cup! Just remember to ensure that you create in one of our preferred styles of vintage, shabby, mixed media, art journaling, industrial, timeworn or steampunk.


I found a box of Harvest Spice tea in my pantry, and made myself a cup. Ohhh! Smells so good, but tastes like potpourri (sorry, I'm not a tea drinker, unless it's the southern sweet tea, iced cold!)

I dipped  a waste strip from my mixed media paper pad into the cup, pulled it out and let it dry. I repeated this several times to darken the color. I took the tea bag out, squeezed out the liquid, and swiped it down a panel for the background. While the panel was still a little damp, I dipped it into some DOX and dried it.


I also dipped a strip of fabric into the tea and left it to dry. This made a nice bow for my card. The daisy petals (Wildflower Stems #1) were painted with the tea and Distress Oxides.


I chose one of the brightly colored Idea-Ology Botanical Layers (love this pack; it's got brighter colors than the originals) as my base and hand colored some more die cut flowers--Tim Holtz Funky Floral #2 this time. The greenery is Garden Greens, and I colored it with a variety of long neglected green Distress inks.


Tucked under the flowers is a strip of brightly colored and embossed tissue paper, a failed experiment from a previous challenge here at A Vintage Journey. Also a tea-dyed Crochet die cut. A splattering of Forest Moss ink finishes off the card. I purposely did not add a sentiment as I think this card has plenty going on without it.

I hope you will trust me when I say this card is so much prettier in real life. I had trouble with the lighting; taking photos outdoors was out of the question with thunderstorms all over the place. I hope you will play along with A Cup of Tea For Your Art challenge at A Vintage Journey! I can't wait to see what you will make with your cup of tea! Hugs and Blessings! Sara Emily

Challenge shares:
These products were used and are available at The Funkie Junkie Boutique:
Distress Oxides - Candied Apple, Evergreen Bough, Forest Moss, Black Soot, Peeled Paint, Worn Lipstick, Tattered Rose
Distress Inks - Peeled Paint, Forest Moss, Bundled Sage, Pine Needles, Fossilized Amber, Mustard Seed