Hello! Is it me, or is there something ridiculously funny about that expression-'hocus pocus'? After seeing Tim Holtz' videos for his
Sizzix,
Stampers Anonymous and
Idealogy 2018 seasonal releases, I was really in the mood to start on my Halloween crafting. While I wait to get some of the exciting new products, which are shipping now, I pulled out some of my favorite spooky colors and played with one of my favorite 3D Texture Fades and some older Sizzix Alterations Halloween dies. Feel free to click on any photo to zoom in or to scroll down for the close ups.
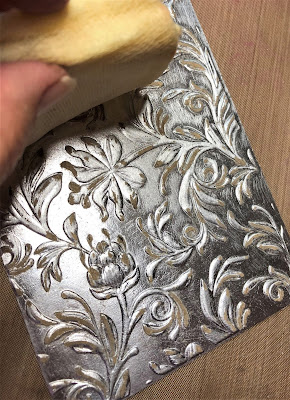
It's really easy to make this eerie textured background. I started with silver Metallic Kraft Stock and embossed it with the Botanical folder, spritzing the back and passing it through my die cut machine three times as per Tim's instructions.
After drying, I sanded the raised areas fairly vigorously to reveal the kraft core and to scratch the flat background, then removed the dust with my tack cloth. Look at that amazing dimension this embossing folder creates!
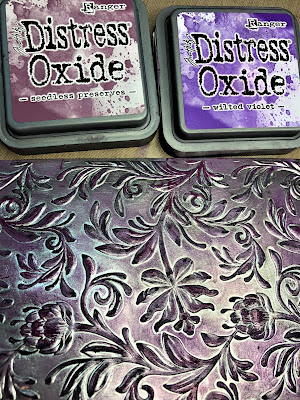
I swiped the Oxide pad over the panel and moved the color around with a clean cloth. Pretty! I would have been pleased if I stopped there, but I wanted more of a creepy vibe than elegant. But wouldn't this be a fabulous background for a wedding or anniversary card? Oh, my! The ideas keep flowing every time I play with this folder!
Next I scribbled Distress crayon over the raised and sanded areas and buffed with a clean cloth. Oops! There goes my Wilted Violet background! But it stayed in the crevasses and on the exposed kraft.
Now to add more color back in. I swiped the two purple oxides over the surface and smeared the inks with my finger, making sure plenty of color made it onto the flat background.
I spritzed the panel with water and dried with my heat tool. This has several effects:you get that lovely oxidation, some blending of colors, and it makes the metallic surface craze a bit. Very cool. Can you see some of that crazing from heating the metallic card in the photo above? Not shown in my process photos, but in the end, I swiped on more of the Black Soot crayon to create more contrast.
The witch and cat die cuts from Tim's Witchcraft die set were sweet and most welcome gifts from my creative and generous blog friend Marty Fishman of
Merry Marty Cards. Thank you, Marty! You don't want to miss how she used this die set on her fabulous
Witchy Pumpkin Latte card. I took the first photo above outdoors in the bright sun, so you can see that great shimmery effect from Distress Resist Spray. The second photo shows off the subtle bumpy texture you get from the spray. I also used the resist spray on the Vintage Spirits die cut. For the record, I'm not usually a 'witch' person and all that it stands for, but something about the Witchcraft set presses all my Halloween buttons.
I blended the witch with Black Soot and Hickory Smoke Distress ink, and smoothed on Black Soot Distress Crayon. I heat embossed the cat, witch's shoes and broom ends with Ranger Emboss It Dabber and Wow Embossing Glitter.
I added some Halloween Remnant Rubs from last year. How about that spider? Eeek! Tim's newly released
Halloween Remnat Rubs have some incredible new features, like jack o lantern faces and epitaphs you can rub right on his Ideaology pumpkins and tombstones. Genius! No more tedious painting! And who wouldn't want a pair of those sparkly shoes and a little glitter on the tips of their broom?
I matted with plain white card I colored with Distress oxides and crayons, giving a nice contrast to the black, gooey edges of the metallic embossed panel. I hope you've found some festive inspiration here today. Tim Holtz products used are listed and linked below.
As always, I greatly appreciate your visits and welcome your comments and questions. I hope you get to enjoy some good crafty time soon!
Hugs and Blessings!
Sara Emily


WHOA! Itchy Witchy Boo! Fabulous background design, Sara Emily, and beautiful composition throughout. I love the special touches in your cards. Knowing you had extra fun making this fabulous creation! Your cat is really scary, too! Wishing you a great week-end! hugs, de
ReplyDeleteOnce again, your details are fabulous, Sara Emily, and make you card extra special.
ReplyDeleteOH MY GOSH, OH MY GOSH, OH MY GOSH!!!!!! I LOVE LOVE LOVE what you did with this, Sara Emily! This is you, my friend and so glad Halloween is approaching so I can see your awesome creations for the season!!! I love how she is silhouetted against the oval panel, and never ever would I have thought to use that gorgeous floral 3-D embossing folder for Halloween (!!), but I see now it can be used for anything. The way you finished it is just gorgeous! I love how you put the cat on top of the word - wish I had thought of that!! I could just go on and on about the colors and textures and everything. PERFECTION OVERLOAD! Also, so sweet of you to mention me and my little blog. So happy to send you happy mail anytime, my friend :-) Hugs!!
ReplyDeleteSnap! I am doing exactly the same whilst waiting for some of the new goodies! I love your fabulous spooky make, the colours look amazing on the embossed background and of course, the witch is superb. LOVE this!!! Hugs, Anne xx
ReplyDeleteOh WOW, what an amazing card!! Gorgeous colours, inspiring use of floral 3-D embossing folder that produces a fab background, I love that witch and the sparkling cat resting on the writing.
ReplyDeleteBeautiful work, as always Sara Emily!
Hugs, Stefi
The card is wonderful and using the botanical background worked so well its great to think outside the box. You have used all the elements with such imagination. I love the glittery shoes and the tiny spider a very sweet Halloween card, thanks for sharing it and all your lovely comments too. x Amanda
ReplyDeleteWOW this is awesome, I love the depth created with the embossing folder and sanding and added colors!
ReplyDeleteSorry I have not been around for a while but I am keeping my eye on you!!
ReplyDeleteYou have always been "FABULOUS" at Halloween makes and I do love this card!
Sandy xx
This is so amazing!! Wow!! I absolutely love the background!! The colors look so beautiful!! All of the details are just fabulous!! Spooktacular, my friend!! You've made me want to dive into Halloween projects!! Love, love this!! Have a great weekend!! Big hugs :)
ReplyDeleteLisa
A Mermaid's Crafts
Stunning Sara! Love what you did with this Witchcraft set. Seriously can see why it would push your Halloween buttons! Love the fact that you didn't go all Black Soot with your witch. The Hickory Smoke really gives this ethereal sense to her. Then that amazing Distress Resist spray ... love the bubbly goodness on your wicked and oval. The dangling spider and that amazing 3D background ... such great details. Can't wait to see what you make with this year's releases! Hugs -- Mary Elizabeth
ReplyDeleteWow!! I am not into Halloween .. we don't really celebrate it in Australia .. but I really, REALLY, love this card you have created Sara! That embossed background is totally amazing!! Fabulous colour and stunning in its detail, and I do adore that tiny spider!! Absolutely spectacular creation!! hugs xx
ReplyDeleteSara Emily, I just love the combination of the 3D embossing folder with the witchcraft dies! Spooktacular! Of course I believe it also has something to do with the way you’ve sanded and it inked up the panel, giving it your special touch! This is oh so fabulous, makes me want to break out the Halloween making supplies and get creative! Lovely work and post, as always! xx
ReplyDeleteI just had to pop over and tell you how fabulous this is! That background is off the charts amazing! And all your elements just POP! Wonderful!
ReplyDeleteMany are eager to see the magic and mayhem of the witch sisters. There will be new faces in Hocus Pocus 2 alongside the Sanderson sisters.
ReplyDeleteI really like this post. You explain procedure in detail. thanks. We offers custom metal stamps. contact us for details.
ReplyDelete