Welcome! It's time for the Funkie side of Frilly and Funkie's Design Team to present their take on the current challenge, 'By Airmail' chosen by teammate Zoe and hosted by Jenny.
Here's what Zoe has to say about the theme: "I just love sending and receiving letters in the mail. And especially love the stamps, airmail stickers and postmarks that these letters pick up along the way. For this challenge, create a vintage or shabby chic postal themed project. Think old fashioned aircraft, airmail stamps, post marks, postage stamps."
When I read Zoe's description, my mind went instantly to my box of old letters, cards, and foreign stamps I've collected over the years. Yeah, right, another collection! Every once in a while, I get the box down and read a couple of the vintage letters. What a wonderful experience to go back in time and learn of others daily lives! I felt some of my favorites needed a special place to spend out their years, so I decorated one of Tim Holtz' Ideaology Small Collection Folios in a junk journal style. Yes, folks, Linda still has a few of these folios in stock at The Funkie Junkie Boutique!
Let's get started! It's gonna be a LONG post, so get comfy, and bring some refreshments!
The kraft Folio measures 7.5 inches by 9 inches and includes cascading tabs to add your memorabilia. You can decorate it in any style you want and it holds a ton of stuff! I chose to cover mine mostly using Tim's Correspondence paper stash adhered with Distress collage medium in matte and vintage.
The elastic that holds the folio together comes attached with two eyelets at the back. I removed the elastic and used it to make a simple belly band closure. I made my embellishment from the smallest of the Stacked Postage dies and one of the small square designs from the paper stack. I applied Crazing medium and when dry, colored with Distress crayons and sealed it with collage medium. To attached the elastic, I simply set two eyelets in the stamp and threaded the elastic through. I topped it with some old Ideaology ephemera.
The elastic that holds the folio together comes attached with two eyelets at the back. I removed the elastic and used it to make a simple belly band closure. I made my embellishment from the smallest of the Stacked Postage dies and one of the small square designs from the paper stack. I applied Crazing medium and when dry, colored with Distress crayons and sealed it with collage medium. To attached the elastic, I simply set two eyelets in the stamp and threaded the elastic through. I topped it with some old Ideaology ephemera.
More die cuts using the Stacked Postage set and more ephemera make a simple collage. I used the denim Textile surface for one of the layers. I inked the circles from the Mail Art set for my focal image and on the background. I don't have any postmark stamps, but a Remnant Rub works just as well. The distressed Quote Chip lets you know how I acquired what's inside.
Each of the four gusseted edges were first stenciled with the Stars stencil and Distress oxide ink. It was too bright for my liking, so I applied Impasto Snow White paint with my finger and gave it a coat of Vintage Collage medium, followed by Distress crayon. I like how there's a hint of the stars peeking through.
Let's open 'er up and see what's inside!
I made a pocket using Anne Redfern's easy to follow tutorial. In fact, her wonderful step by step shows you how to create an entire journal front to back! I used stamps from the following sets to decorate the pocket front: Purveyor, The Journey, Little Things, and Ledger Script and some purposefully messy sewing.
My pocket holds a some of my favorite vintage postcards. My simple closure is velcro.
I used lots of Correspondence Design Tape on the gussets, and bits of Postale Tissue Wrap. I had to include this appropriate notice from one of the Correspondence papers on the opposite flap.
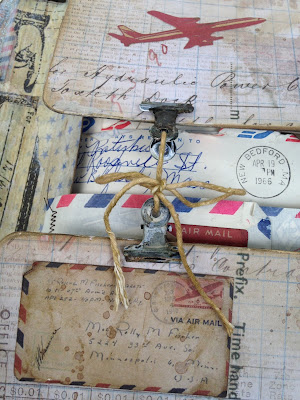
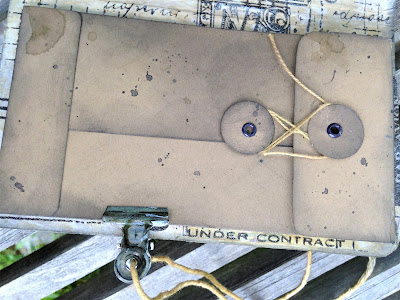
Two altered Hinge Clips tied with postal string dyed with Frayed Burlap hold the top and bottom flaps together and keeps my collection under wraps. There's some old Ideaology ephemera to decorate the outside of the flaps...
...and inside, I've used the clips to hold in place removable homemade coin envelopes made with kraft card and watery inks and oxides. One at the top, and one on the bottom flap. I made them removable so I could easily pour out the goodies.
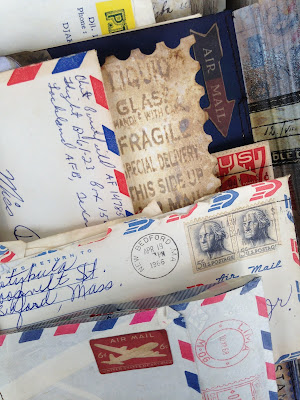
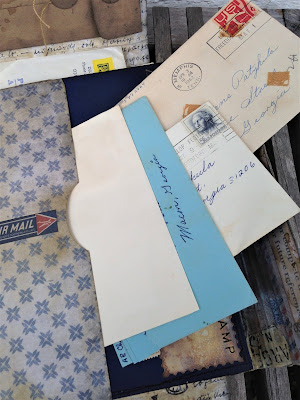
I've used the clips to hold down the pages for the photo, and here's what you see as the top and bottom folio flaps are opened. I've added some ephemera and used my sewing machine to add some stitching to a folded vintage airmail envelope. I adhered that onto the first tab, forming two top load pockets that house even more thin papery airmail envelopes. I love to think what these might have held.
That red 6 cent stamp with the horizontal plane is Tim's ephemera, while the 7 cent vertical place stamp in the background is the real thing...hard to tell what's real and what's not!
I've simply, yet stratigically, adhered another envelope to the second flap, so that it allows just what I want seen beneath it to peek out. The opened letter to the left is what's kept inside. I love pulling out this old letter and feeling the paper--it's a vellum paper embossed with a lovely botanical design.
I had to adhere this envelope vertically, because the back was ugly from where it was taped into a scrapbook. I have the old Bigz postage stamp die and this was the perfect size to adhere to the back side of this tab to cover the yuckies. I stamped a postage related image from Tim's older Little Labels set along the top edge for interest from the 'closed book' point of view. This airmail has special significance for me, because I used to live in San Antonio and have some military buddies who were stationed there at the time. Check out the post script from the sender!
When you turn the page, this is what the reverse side of the postage stamp die cut looks like, along with some ephemera to cover the remainder of the messy envelope back and to help hide a join line. Let's just say there was good planning, but poor execution on this page. I stamped 'received' and one of the circles from Mail Art, and the other two 'coffee stains' are made by partially inking my MicroGlaze lid and twisting it on the panel. The entire panel was blended with MicroGlaze and wiped off to intensify the colors of the Distress Oxide inks that color it.
I had this acetate envelope left from some scrapbooking goodies from a long time ago, and it's perfect to view both the front and back of this card dated October 1927 without being handled. I opened the envelope flap and adhered it under the left side panel, so the card could be removed.
Excuse my nasty fingernails. I am a gardener and they look like this pretty much all the time.
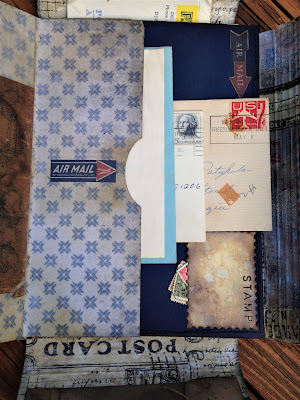
I made thistab into a pocket to hold some more of my favorite vintage correspondence. I used an oval punch to make the thumb hole, and another Ideaology ephemera piece tells us what's in there. I made a pocket from two pieces of cardstock from my stash. Each panel was sewn on my machine and then glued along both long sides and bottom, leaving the top open for yet another pocket from some of my longer pieces of mail.
Another Stacked Postage die cut colored with oxides and labeled with a Remnant Rub serve as a tuck spot for some more vintage stamps from my collection. I glued to the blue panel along the right side and bottom only.
I left the back of the blue pocket open--I have plans to put a special photo and card here, but they are still in storage.
Finally, here we are at the back of the folio, using that last tab as yet another pocket, but not before adding a pair of Stitched Slots die cuts to house some more interesting stamps and postmarks.
When the mail is removed from the pocket, this is what you see. I used Postale Tissue Wrap to decorate this surface. I colored it with oxides in red, blue and browns, but it was too bold for my liking. I gave it a spritz of Distress Spray Stain in Picket Fence to tone it down.
Finally, around back, simple paper stash inked and coated with Vintage collage medium to protect it.
Since there were so many pages to flip through,I've kept the 'talking' to a minimum. If you have any questions on how I made anything, please leave them in the comments, and I will get back to you with an answer.
In the meantime, I hope you'll visit Frilly and Funkie to see what the rest of the team has created to tempt you to play along with our 'By Airmail' challenge. If that's not enough to get you in the mood to play along, there's always that $25 shopping spree to The Funkie Junkie Boutique for a randomly chosen entry. In addition, four favorites will be chosen by the Design Team with the top choice given the opportunity to be our Guest Designer. Please visit the blog for details.
Challenge shares:
Mini Album Makers -- June Mini Album Challenge
Mini Album Makers -- June Mini Album Challenge

Mixed Media Monthly Challenge #49 – "Wrap it Up!" I've wrapped my folio with elastic wrapped string around the circles for closures, and wrapped the kraft folio in papers, tapes and tissue.

Country View Challenges June 2018 - The Written Word
Scrapy Land Challenge #92 Anything Goes 3 Sizzix dies used.
Creative Artiste Challenge #39 Anything Mixed Media Goes
Thank you for stopping by and for hanging in there for my loooong post!
Hugs and Blessings!
Sara Emily









Oh my goodness Sara, you have really knocked it out of the park with this one. This is one of the most amazing folios I have ever seen!! Genius, with so many absolutely brilliant additions, I totally ADORE it!! Superb project for the theme!! Oh and thanks of course for adding it to the Mini Album and Mixed Media challenges too!
ReplyDeleteWow! Wow! and Wow again!! I have to agree with Astrid .. this is one of the most amazing folios I've seen as well. What a gorgeous place to store your vintage letters and keep them safe. So many brilliant tuck spots and pockets and so many amazing details!! Absolutely awesome creation Sara!! You rocked this!! Have a wonderful day! hugs xx
ReplyDeleteAnd it is another WOW from me too Sara, this stunning folio is right up my street, I love the gorgeous papers, postcards and other embellies you used for this jam packed project!! It was very kind of you to give me a shout out too, thank you!
ReplyDeleteThank you too for joining in with us at Mini Album Makers challenge with this beauty! Hugs, Anne xx
Another masterpiece, Sara! Just incredible detail after detail. I love the old letters and I agree with Zoe - sending and receiving letters by mail is treat. It means so much more. And then if you incorporate some of your great ideas in here, the letter becomes a work of art. Thank you for taking the time to show us all of the techniques that you used to make this lovely folio. I'm so glad you posted on the Tim Holtz Addicts page so I could see your project.
ReplyDeleteOh my goodness, this is spectacular, Sara Emily!! Wow!! I don't even know what to say!! The design and details are absolutely amazing!! I love all of the pockets and papers and envelopes and postcards!! This is truly a work of art!! Love, love it, my friend!! Have a great day!! Big hugs :)
ReplyDeleteLisa
A Mermaid's Crafts
Wow wow wow!!! I’m giddy over all the nifty elements in this amazing portfolio! And that hinge clip closure is genius! What a gorgeous way to House all those treasured postcards and letters. There was so much to see here I could not take it all in in one sitting, so I’ll be back! But for now I’ll just say...your attention to detail and your mastery of techniques inspires my socks off! 😘😘
ReplyDeleteThis folio is really amazing! So many fabulous details and vintage postal goodness. I love all the vintage letters and stamps accompanied by that stitching.This is a beautiful piece!
ReplyDeleteKate
Wow - where to start! This is so beautiful, and as you say Sara the new and the old blend seamlessly. It's a really stunning creation, and your attention to detail is just amazing. Thank you so much for sharing with us at Country View Crafts, Sue xx
ReplyDeleteSara Emily, this is fabulous! I have always loved these folios but never knew what I might do with one...well you have really gotten my thoughts churning! I love all the little details and putting that old letter into the acetate for easy handling was so clever! Love this project , you really met the challenge! Hugs!
ReplyDeleteHoly smokes artichokes!! This is truly amazing, Sara Emily! I love how you have added real vintage letters - you have so many cool collections that really contribute so much to your art. There is so much to look at here, I will need to take more time to absorb it all. I just love this, it's so WOW!! Hugs!!!
ReplyDeleteOMGosh! I need to learn how to make one of these! I have my Dad's love letters to my Mom in his ammo box from when he was in the service. What a neat way to keep these to be passed down to my children!
ReplyDeleteWill you come to my house and teach me sometime? I would just love that!
hugs,Jackie xx
Oh boy Sara Emily! I've just sat and drooled my way through each and every photo of this stunning portfolio. It must have taken forever to line up those envelopes to get the perfect overlaps! I love the Anne pocket to hold precious postcards, the stamping and die cuts used to great effect and the clever closure with the clips. In awe!!! xx
ReplyDeleteWow Sara Emily...I'm completely in awe...this folio is absolutely gorgeous! So many details...you can tell you had a lot of fun while making this beauty! Brava! Hugs ❤
ReplyDeleteFirst you used one of my favorites - a folio. Then you decorated it with amazing travel/envelope themes. And to top it off, it's inter-active. Be still my heart! Thanks for joining the challenge at Mini Album Makers.
ReplyDeleteWow, Sara Emily, you have created a wonderful folio! What an amazing collection you have as well. The folio showcases it perfectly.
ReplyDeleteWow, dear Sara, this is utterly gorgeous! I agree with all the comments before - you did such a great job! Love your folio to bits!
ReplyDeleteThank you so much for joining in with our challenge at Country View Craft this month.
Evelyn xx
Wow this is amazing, so much detail awesome! Thanks for joining us at Creative Artiste Mixed Media Challenge Blog :)
ReplyDeleteNot fair - just recovering from an injured knee and now I have a sore jaw from where it dropped and hit my desk when I saw this. This little album is chock full of vintage goodies and a treat to look at.
ReplyDeleteHugs!
Cec
Very beautiful, love it very much! Thank you for sharing with us on Mini Album Makers this month!
ReplyDeletebeautiful.. simply plainly wonderful beautiful project! thanks for playing along with us at mixed media monthly challenge !
ReplyDelete{Jaw on the floor........................}
ReplyDeleteOh my gosh! OH MY GOSH! This is beyond the coolest thing I've ever seen. I mean, when you said you struggled with mini albums - yeah right! This is so very cool and the postal theme really appeals to me and makes me want to start all over with this F&F project! :) You've hit the nail on the head and knocked it out of the park (for lack of better analogies) with this distressed wonder. I'm so in love and am thrilled that you shared with us at Mini Album Makers. And no measuring involved! he he! Hugs, Autumn
Wow - stunning, stunning work, Sara Emily - a piece of mailart genius (yes, I know it's not for mailing, but still!). Brilliant detailing on every page and I just love how you've combined genuine postage ephemera with the crafty versions. Fantastic work! Thanks so much for playing along at Mini Album Makers for June.
ReplyDeleteAlison x
I adore these folios and you went above and beyond in how you created this vintage mail journey! I adore the cover and then you open it up to a world of travel told with letters, postage and all sorts of clever pockets and slots! Fabulous folio!
ReplyDeleteOh Sara, simple stunning work. For the life of me, why doesn't Tim still make these? Even though I have a small stash myself, it makes me sad. xoxo
ReplyDeleteFantastic! How I love all these little corners, flaps and pockets! So much details to see, gorgeous album!
ReplyDelete