Showing posts with label Tiny Text. Show all posts

Wednesday, May 27, 2020

Vintage Pink Inspiration

Sara Emily Barker https://sarascloset1.blogspot.com/2020/05/vintage-pink-inspiration.html Mixed Media Card #timholtz #stampersanonymous #rangerdistress #ideaology 1

Hello, again! It's time for a new challenge at The Funkie Junkie Boutique Blog. This time Maggi is up as hostess, and she chose the theme, Tickled Pink. Here's how she describes it...

Design a vintage or shabby chic project using the color pink. You may use other colors as accents, but, pink must be predominant. There are many shades of pink ranging from fuschia to soft baby pink so let your pink imagination go wild!

 As always, the winner will earn a chance to be a Guest Designer at a future date at The Funkie Junkie Boutique blog, and everyone who enters and follows the rules will go into the draw for the chance to win a $25 spending spree at The Funkie Junkie Boutique. There are also Top 3 Badges for three additional outstanding entries, chosen by the Design Team. Please see the blog for details.

'Tickled pink' is an expression I often use, but I rarely use pink when I make, so this was a bit of a challenge for me. I can't begin to tell you how many failed attempts at backgrounds I made! I had quite a time trying different techniques using the pink inks and sprays I have, but not a one tickled me pink. I did manage to salvage a mop up panel after adding this and that to it. I'm afraid I have no process shots, but I managed to take a few photos before I added my collage to it.


  Basically I used this card to clean up puddles left after my other trials. The purple looking blotches are left from cleaning off a stencil. After determining it would work as my background, I did some multi colored stamping using one of the Faded Type stamps and Oxide ink pads: Pumice Stone, Tattered Rose and Aged Mahogany.


 I added Opaque crackle paste through the Vintage Wallpaper stencil by Prima. While the paste was still wet, I randomly sprinkled with Antique Linen Embossing Glaze. When the paste had dried, I heated the glaze powder to melt and added two tone vintage shimmer here and there with Ranger Foil Transfer Sheets.


I finished off the card with splatters of Walnut stain ink and Abandoned Coral and Walnut Stain Crayons. I adhered with foam tape and layered this over sanded Classic Kraft Stock, scuffed Metallic Kraft Stock and old Distress card blended with Walnut Stain ink.

Sara Emily Barker https://sarascloset1.blogspot.com/2020/05/vintage-pink-inspiration.html Mixed Media Card #timholtz #stampersanonymous #rangerdistress #ideaology  2

 I love this little butterfly from the Field Notes Ephemera pack. I gave the Found Relative even more age with help of Embossing Glazes and crayon.

Sara Emily Barker https://sarascloset1.blogspot.com/2020/05/vintage-pink-inspiration.html Mixed Media Card #timholtz #stampersanonymous #rangerdistress #ideaology  3

A pair of Field Notes tags were stamped on inky scraps and tucked around a torn scrap of one of my pink technique trials. We don't like to waste a thing in the Closet.

Sara Emily Barker https://sarascloset1.blogspot.com/2020/05/vintage-pink-inspiration.html Mixed Media Card #timholtz #stampersanonymous #rangerdistress #ideaology  4

Sara Emily Barker https://sarascloset1.blogspot.com/2020/05/vintage-pink-inspiration.html Mixed Media Card #timholtz #stampersanonymous #rangerdistress #ideaology  5

Sara Emily Barker https://sarascloset1.blogspot.com/2020/05/vintage-pink-inspiration.html Mixed Media Card #timholtz #stampersanonymous #rangerdistress #ideaology  6

The flowers from Illustrated Garden were stamped in Archival inks--green and brown on another of the attempts at a pink background. Sometimes these failed attempts are the perfect thing to stamp something else on or perhaps use for die cutting. I colored the flowers and stems with crayons. Scribble them on your mat, and use them like watercolor with a water brush. I tucked a Wildflower Stem die cut from set 2 for contrast.

Sara Emily Barker https://sarascloset1.blogspot.com/2020/05/vintage-pink-inspiration.html Mixed Media Card #timholtz #stampersanonymous #rangerdistress #ideaology  7

Sara Emily Barker https://sarascloset1.blogspot.com/2020/05/vintage-pink-inspiration.html Mixed Media Card #timholtz #stampersanonymous #rangerdistress #ideaology 8

 Love you (Tiny Text) is stamped on yet another unsatisfactory attempt to do pink. I stamped it and edged the tag in Ground Espresso Archival ink and layered it over a scrap of dyed Mummy Cloth.

Sara Emily Barker https://sarascloset1.blogspot.com/2020/05/vintage-pink-inspiration.html Mixed Media Card #timholtz #stampersanonymous #rangerdistress #ideaology  9

So that finishes off another card for my Mom--I hope she likes it. Now it's your turn! Let's see those vintage or shabby chic projects that are sure going to tickle us pink! But before you get started, be sure to visit the blog; you will be 'Tickled Pink' by my teammate's diverse pink inspiration! Happy crafting! Sara Emily

Challenge shares:
Simon Says Stamp Monday We’re Going Around In Circles I hope this is ok; I took this from a figurative view as I went around and around in circles, trying out different techniques to make my background.  But I did include a circle tag, too, for the literal view!
Creative Artiste Challenge #60
Simon Says Stamp Wednesday Recycle I recycled all my failed attempts to make a pink background and even used my cleanup paper to make the actual bakcground.
Crafty Cardmakers #257 Butterflies
Bleeding Art May Challenge - Anything Goes

These products were used and can be purchased at The Funkie Junkie Boutique:
Tim Holtz Idea-ology Classic Kraft Stock
Tim Holtz Idea-ology Metallic Confections Kraft Stock
Tim Holtz Sizzix Thinlits Die Set - Wildflower Stems #2
Stampers Anonymous Tim Holtz Stamp Set - Faded Type
Stampers Anonymous Tim Holtz Stamp Set - Tiny Text
Stampers Anonymous Tim Holtz Stamp Set - Field Notes
Tim Holtz Idea-ology Mummy Cloth
Tim Holtz Idea-ology Ephemera, Field Notes
Tim Holtz Idea-ology Found Relatives
Ranger Foil sheets -vintage
Prima Stencil - Vintage Wallpaper
Tim Holtz Distress Embossing Pen 2pk
Tim Holtz Distress Embossing Glaze Weathered Wood, Antique Linen
Distress Ink  -  Walnut Stain, Frayed Burlap
Distress Archival ink - Peeled Paint, Ground Espresso
Distress Oxide ink - Tattered Rose, Victorian Velvet, Aged Mahogany,  Pumice Stone, Vintage Photo, Twisted Citron
Distress Crayons - Crushed Olive, Vintage Photo, Black Soot, Spun Sugar, Abandoned Coral, Walnut Stain, Twisted Citron
Distress Oxide Spray - Spun Sugar, Victorian Velvet
Distress Opaque Crackle Paste
Distress Collage Matte Medium

Wednesday, April 1, 2020

Finding Joy With Tim Holtz Distress Embossing Glazes

Sara Emily Barker https://sarascloset1.blogspot.com/2020/04/finding-joy-with-tim-holtz-distress.html Mixed Media Card #TimHoltz #StampersAnonymous #Ranger 1

Hello friends! I'm praying you and your loved ones are all staying healthy and making the most of your stay at home time where ever you are in the world.

It's time for our newest challenge at The Funkie Junkie Boutique blog and the talented Maggi is our hostess. She calls her challenge theme 'April Showers Bring May Flowers',  and her description follows:

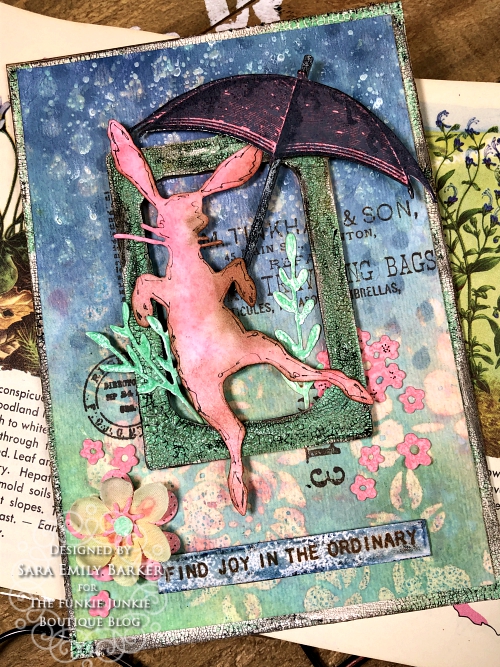
 Design a vintage or shabby chic project that incorporates a wet "something" with flowers. Examples: Stenciled or doodled raindrops, water distressed or crumpled paper,  Tim Holtz's Umbrella Man, you get the idea, just have something that represents wet. Then, add some flowers to your project.

Sounds simple enough, but I can tell you this is one of those projects that was headed to the scrap bin more than once. The background just wasn't coming together, but I'm not one to give up. I decided to embrace the creative journey. In the end, I'm not displeased with it, and I think this card might bring a smile to my daughter's face when she receives it.

Sara Emily Barker https://sarascloset1.blogspot.com/2020/04/finding-joy-with-tim-holtz-distress.html Mixed Media Card #TimHoltz #StampersAnonymous #Ranger 2

First, here are some additional close ups, and following I will outline my steps. Sorry, I didn't take photos, but my steps are pretty straight forward.

Sara Emily Barker https://sarascloset1.blogspot.com/2020/04/finding-joy-with-tim-holtz-distress.html Mixed Media Card #TimHoltz #StampersAnonymous #Ranger 3

Sara Emily Barker https://sarascloset1.blogspot.com/2020/04/finding-joy-with-tim-holtz-distress.html Mixed Media Card #TimHoltz #StampersAnonymous #Ranger 4

Sara Emily Barker https://sarascloset1.blogspot.com/2020/04/finding-joy-with-tim-holtz-distress.html Mixed Media Card #TimHoltz #StampersAnonymous #Ranger 5

Sara Emily Barker https://sarascloset1.blogspot.com/2020/04/finding-joy-with-tim-holtz-distress.html Mixed Media Card #TimHoltz #StampersAnonymous #Ranger 6

Sara Emily Barker https://sarascloset1.blogspot.com/2020/04/finding-joy-with-tim-holtz-distress.html Mixed Media Card #TimHoltz #StampersAnonymous #Ranger 7

Inspired by Stacy's (Tattered Nest Designs) tag here, I got out my inks, Oxide Sprays, Tim Holtz Florals and Prima's raindrop stencils and Distress MicroGlaze and started to play. I didn't follow Stacy's wonderful tutorial to the letter, preferring just to play and see what happens. I guess I didn't use enough of the microglaze through the drops stencil in places, and I would guess that stencils with bigger openings function better with this technique. My raindrops lost their form or got lost completely once I sprayed with Oxides. But I was quite happy with the flowers, so here are the steps I took to salvage the panel and to complete my card.

 Background:
1. Dip a panel of water color paper into watery puddle of Tattered Rose Distress Oxide, drying and re dipping until happy with color.
2. Place Floral stencil over bottom and blend microglaze with blending tool. Place raindrops stencil over top portion and repeat blending. (I did not layer mine like Stacy did.)
3. Spritz with water and then Broken China Oxide spray. Dry. This is when I realized I wasn't happy with the raindrops.
4. Blend the sky portion with Stormy Sky ink.
5. Blend a darker blue ink (Chipped Sapphire) through the drops stencil.
6. Spray a scrap of bubble wrap with Victorian Velvet Oxide spray. Spray card with water and tap inked bubble wrap randomly. Dry.
6. Flick the top portion of the panel with water, sprinkle with Glistening Glass Molten Dimensions powder and heat to melt, forming little raindrops. 
7. Smudge Picket Fence crayon over 'drops'. (I know it looks more like a hail storm, but that is something that represents wet, right?)
8. Stamp images from Field Notes and Distinguished using Ground Espresso Archival ink. I did manage to snap a shot before I added my details.

Sara Emily Barker https://sarascloset1.blogspot.com/2020/04/finding-joy-with-tim-holtz-distress.html Mixed Media Card #TimHoltz #StampersAnonymous #Ranger 8

Move onto the details:

1. Alter an older Baseboard frame with Cracked Pistachio and Peeled Paint Distress Embossing Glazes, Crackle Paste and crayon. (I plan to have a tutorial on Distress Embossing Glazes in a couple of weeks time for our Saturday Showcase at The Funkie Junkie Boutique, so be sure to check back for details on how I altered this.)
2. Repeat using the glaze powder on edges of a card blank.
3. Die cut a bunny (Bunny Hop) from white card, color him with Worn Lipstick and Walnut Stain inks and doodle a bit.
4. Die cut some tiny flowers from a scrap of pink Oxide sprayed card and embossed some 'grass' with Cracked Pistachio Distress Embossing Glaze.
5. Stamp the umbrella from Distinguished stamps set in Black Soot Archival also on the pink scrap and fussy cut.
6. Using the Distress Embossing Pen, scribble to 'wet' the umbrella and heat emboss with Weathered Wood Embossing Glaze.
7. Paint a portion of a used cotton swap stick (we do NOT want to waste our supplies!) with Black Soot paint, heat emboss with more Weathered Wood Glaze powder and smudge with Picket Fence crayon.
8. Attach umbrella image to stick with Distress Collage Medium Matte.
9. Stamp quote from Tiny Text on white card scrap in Ground Espresso Archival ink and adhere to scrap of chip board.
10.Heat emboss quote with Weathered Wood Embossing Glaze and add more color with Chipped Sapphire crayon.

Assemble card:

1. Trim chip board from a canned cat food box and adhere to panel to provide dimension.
2. Adhere panel to prepared card blank.
3. Adhere embellishments to card with collage medium.

Sara Emily Barker https://sarascloset1.blogspot.com/2020/04/finding-joy-with-tim-holtz-distress.html Mixed Media Card #TimHoltz #StampersAnonymous #Ranger

That's it for me today. I'm off to try Stacy's technique this time following her directions! LOL! I hope you will dig into your supplies and create a project for our April Showers Bring May Flowers challenge.  I can't wait to see what you'll make!

As always, the winner will earn a chance to be a Guest Designer at a future date at The Funkie Junkie Boutique blog, and everyone who enters and follows the rules will go into the draw for the chance to win a $25 spending spree at The Funkie Junkie Boutique. There are also Top 3 Badges for three additional outstanding entries, chosen by the Design Team. Please see the blog for details.

Sending out big virtual hugs! Stay safe, stay in, stay healthy!
Sara Emily

Challenges I'd like to play along with:
Country View Challenges April 2020 - Animal Magic
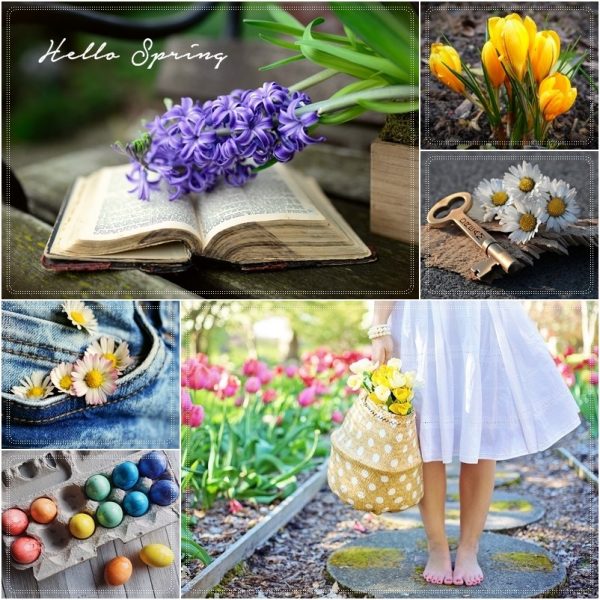
Simon Says Stamp Monday Spring Mood Board -Inspired by flowers and pastel eggs.

The following products were used and can be purchased at The Funkie Junkie Boutique:

Sizzix Chapter 1 Tim Holtz Thinlits Dies - Bunny Hop
Stampers Anonymous Tim Holtz Layering Stencil - Floral
Stampers Anonymous Tim Holtz Stamp Set - Field Notes
Tim Holtz Cling Stamps - Distinguished
Stampers Anonymous Tim Holtz Stamp Set - Tiny Text
Tim Holtz Distress Texture Paste 3oz Crackle
Ranger Tim Holtz Distress Collage Medium Matte
Ranger Distress Micro Glaze
Tim Holtz Distress Embossing Dabber
Tim Holtz Distress Embossing Pen 2pk
Tim Holtz Distress Embossing Glaze - Cracked Pistachio, Weathered Wood, Peeled Paint
Tim Holtz Distress Crayons -  Walnut stain, Picket Fence, Chipped Sapphire
Distress Oxide Pads - Tattered Rose
Distress Oxide Spray -  Victorian Velvet, Broken China
Distress Paint - Black Soot
Distress Ink  - Walnut Stain, Worn Lipstick, Broken China, Shabby Shutters, Cracked Pistachio, StormySky, Chipped Sapphire
Distress Archival Ink - Black Soot, Ground Espresso
Eileen Hull Molten Dimensions -Glistening Glass


Wednesday, March 18, 2020

Artist Trading Coins With Tim Holtz Distress Embossing Glazes

Sara Emily Barker https://sarascloset1.blogspot.com/2020/03/artist-trading-coins-with-tim-holtz.html ATC's Field Notes Distress Embossing Glazes 1

Welcome friends! I pray that wherever you are in the world that you are safe and healthy! It's a crazy time for all of us right now, but I am full of hope that we will all come out better people for this on the other side.

It's time for our new challenge at The Funkie Junkie Boutique Blog and with our talented Jenny as the hostess, our theme this time is 'Little Things'. Here's how Jenny describes her challenge:

"Sometimes it can be the littlest of things that can mean the most. For this challenge create a small vintage or shabby chic project (or if you're feeling adventurous even a set!) It could be an Artist Trading Card/Coin, a tag or a little card for example, or you may have something else in mind - we can't wait to see them."

As always, the winner will earn a chance to be a Guest Designer at a future date at The Funkie Junkie Boutique blog, and everyone who enters and follows the rules will go into the draw for the chance to win a $25 spending spree at The Funkie Junkie Boutique. There are also Top 3 Badges for three additional outstanding entries, chosen by the Design Team. Please see the blog for details.

I recently received my order from The Funkie Junkie Boutique containing among other things, Tim Holtz new Distress Embossing Glaze Powders and the Field Notes Ephemera Pack. I thought making a few little Artist Trading Coins would give me the opportunity to try out the Glazes and use a few of the beautiful ephemera pieces. First, I'll show you the details on the coins, and following I'll give a brief description about how I made them.

Sara Emily Barker https://sarascloset1.blogspot.com/2020/03/artist-trading-coins-with-tim-holtz.html ATC's Field Notes Distress Embossing Glazes 2

Sara Emily Barker https://sarascloset1.blogspot.com/2020/03/artist-trading-coins-with-tim-holtz.html ATC's Field Notes Distress Embossing Glazes 3

Sara Emily Barker https://sarascloset1.blogspot.com/2020/03/artist-trading-coins-with-tim-holtz.html ATC's Field Notes Distress Embossing Glazes 4

Sara Emily Barker https://sarascloset1.blogspot.com/2020/03/artist-trading-coins-with-tim-holtz.html ATC's Field Notes Distress Embossing Glazes 5

Reverse sides:

Sara Emily Barker https://sarascloset1.blogspot.com/2020/03/artist-trading-coins-with-tim-holtz.html ATC's Field Notes Distress Embossing Glazes 6

Here are the steps I took. I started taking photos, but got distracted at the end and forgot to record the rest on camera. I think the instructions are pretty straight forward though.

1. Punch 3 circles from scrap (front of coin) and Bristol board (back of coin). The scrap is an old book page I had stamped with a Fragments stamp, first and second generation in practice for another project a while back. I also used it to clean off a stencil making a ghostly monoprint. I knew this panel would come in handy someday. I was tickled pink to see Leland from Hendersonville, NC or some other person long ago wrote the word 'distress' for some odd reason on the reverse side. How appropriate! (I can promise it was not me!)


2. Color Bristol board with Frayed Burlap oxide; set aside to be used as the backs later.

3. Choose ephemera from Field Notes pack, keeping in mind scale. So many little things in this pack begging to be used!


Sara Emily Barker https://sarascloset1.blogspot.com/2020/03/artist-trading-coins-with-tim-holtz.html ATC's Field Notes Distress Embossing Glazes 7

4. Stamp ephemera and one coin with Field Notes stamps and archival ink.


Sara Emily Barker https://sarascloset1.blogspot.com/2020/03/artist-trading-coins-with-tim-holtz.html ATC's Field Notes Distress Embossing Glazes 8

5. Adhere coin fronts to Bristol board backs with Distress Collage Medium Matte.
6. Blend coins fronts and ephemera with Frayed Burlap and Walnut Stain inks.
7. Paint skinny edges of coins with Ground Espresso paint.
8. Using Embossing Dabber, heat emboss each coin front with various Embossing Glazes. Repeat on back edges.
9. Using Embossing pen, outline the bees wings and emboss with glaze, to give the wings a more translucent quality.
10.  I buffed the embossing with steel wool to take the shine off, except on the bee and bee coin front, because that was supposed to look like sticky honey. LOL I was skeptical about taking this step, thinking what is the point of using the glazes, then. But, I was pleasantly surprised with the effect. You still get a unique texture and appearance of depth because the glaze sits on top of the stamping. Bravo on this amazing product, Ranger and Tim Holtz!
11. Stamp Tiny Text on the book page scrap with Ground Espresso archival and cut out with scissors. Blend edges with Walnut Stain ink.
12. Adhere all ephemera and text with collage medium and sit back and admire these Little Things.

That's all for me today. I hope you'll pop over to the blog and see all the "little things" my talented teammates have made to tempt you to join in the challenge. Then link up your own project HERE to be in for a chance to win one of the wonderful prizes! I can't wait to see your little things! Hugs and blessings! Sara Emily

The following products were used and can be purchased at The Funkie Junkie Boutique:

Distress Embossing Glazes -  Antique Linen, Broken China, Peeled Paint, Vintage Photo, Walnut Stain
Distress Embossing Dabber
Distress Embossing Pens
Distress Oxide - Frayed Burlap
Distress Ink - Frayed Burlap, Walnut Stain
Distress Paint - Ground Espresso
Distress Archival ink - Faded Jeans, Ground Espresso, Black Soot
Distress Collage Medium Matte
Tim Holtz Idea-ology Ephemera, Field Notes
Tim Holtz Cling Stamps - Fragments
Stampers Anonymous Tim Holtz Stamp Set - Tiny Text
Stampers Anonymous Tim Holtz Stamp Set - Field Notes

Wednesday, March 4, 2020

Beautiful Moments Mixed Media Panel for The Funkie Junkie Boutique Blog

Sara Emily Barker https://sarascloset1.blogspot.com/2020/03/beautiful-moments-mixed-media-panel-for.html Mixed Media Tag 1

Hello and welcome! It's time for a new challenge at The Funkie Junkie Boutique Blog, and Cec is hosting. She calls the challenge, 'Aquamarine', and here's what she says about it:

 "Aquamarine, the birthstone of March, has a rich color and has long been a symbol of youth, health and hope. Its mesmerizing color ranges from pale to deep blue and are reminiscent of the sea."  The challenge is to create a shabby chic or vintage project using the colour aquamarine in any of its shades along with one other colour (it could be white or brown or whatever you wish).  The definition has lots of other prompts you could also use in your creation but the colour requirement is the main focus.


As always, the winner will earn a chance to be a Guest Designer at a future date at The Funkie Junkie Boutique blog, and everyone who enters and follows the rules will go into the draw for the chance to win a $25 spending spree at The Funkie Junkie Boutique. There are also Top 3 Badges for three additional outstanding entries, chosen by the Design Team. Please see the blog for details.

This was really a fun challenge, and I knew right away I wanted to make an ombre background and to use Tim Holtz Geo Frames die cuts. I don't have much in the way of step out photos, but I can give you some details and show you lots of photos of how I made this tag.

Sara Emily Barker https://sarascloset1.blogspot.com/2020/03/beautiful-moments-mixed-media-panel-for.html Mixed Media Tag 2

I included the shot below (even though it's a little washed out from the bright daylight), because it shows off  that gorgeous prism.

Sara Emily Barker https://sarascloset1.blogspot.com/2020/03/beautiful-moments-mixed-media-panel-for.html Mixed Media Tag 3

I started with the Organic die and cut it from water color paper. I adhered the die cut to a water color panel with Collage medium and swiped on some crackle paste around the edges with my finger. Once the cracks started forming, I gave it another coat of collage medium. I allowed that to dry to touch and sprayed with Distress Oxide Sprays, starting with the lightest and working to the darkest. These are the colors I used: Cracked Pistachio, Salty Ocean, Mermaid Lagoon and Blueprint Sketch. I spritzed with water and and allowed the colors to blend, coaxing some of the color here and there while I dried with my heat tool.


Sara Emily Barker https://sarascloset1.blogspot.com/2020/03/beautiful-moments-mixed-media-panel-for.html Mixed Media Tag 4

 I adhered the colored panel to a Baseboard with Collage Medium and sanded the edges when dry. I blended Vintage Photo and Walnut Stain crayon around the edges and splattered some watery ink with a limp paintbrush. Inspired by the definition of aquamarine being a symbol of hope, I chose the word from one of the phrases included in Tim's new Tiny Text stamp set. I stamped it in Vintage Photo and Ground Espresso archival inks first and second generation on a scrap.

Inspired by the photo, I colored four tiny 'gems' and a plastic prism from my stash with alcohol inks: Lettuce, Citrus, Sailboat and Mermaid.

For my focal point, I cut the Scribbly Butterly from water color paper colored with Tumbled Glass Distress Oxide and heat embossed with Glistening Glass powder. I layered this over a Tattered Butterfly die cut colored with brown Distress inks,  sandwiching a perfectly coordinating bow made from the ribbon Linda's Mom dies and wraps up our little thank you goodie bags with. If you shop at The Funkie Junkie Boutique, you already know that Linda includes a wonderful little gift bag in each of her orders, filled with crafty goodies and her Mom hand dies all those seam binding ribbons!

Sara Emily Barker https://sarascloset1.blogspot.com/2020/03/beautiful-moments-mixed-media-panel-for.html Mixed Media Tag 5

The butterfly is resting atop  a trio of Geo Frames cut from Metallic Kraft Stock. I transformed silver card into a rusty brown with alcohol inks: Rust and Teakwood.

The quote is another from the Tiny Text set; this time I used all of the quote. I used some blue sequins and some shell sequins from my stash, again taking inspiration from the definition of aquamarine, and including something from the sea.

Sara Emily Barker https://sarascloset1.blogspot.com/2020/03/beautiful-moments-mixed-media-panel-for.html Mixed Media Tag 6

The Field Notes stamps got their first inking with Vintage Photo Archival on a scrap, and I fussy cut the labels tucked in around the frame.

Sara Emily Barker https://sarascloset1.blogspot.com/2020/03/beautiful-moments-mixed-media-panel-for.html Mixed Media Tag 7

Well, that finishes up another project! Here's one last look at my take on Aquamarine.

Sara Emily Barker https://sarascloset1.blogspot.com/2020/03/beautiful-moments-mixed-media-panel-for.html Mixed Media Tag 8

I hope you found some inspiration here, but there's still plenty of inspiration over at The Funkie Junkie Boutique blog from my talented teammates. I hope you'll hop on over and have a look at their wonderful Aquamarine projects. Then link up your own vintage or shabby chic project using the colors and theme as your guide. Happy Crafting! Sara Emily

Sharing with:
Simon Says Stamp Monday: Tag It  I used a Baseboard in place of a tag, because I'm out of the thickboards. Also, by definition, labels are the same as tags, and I have three labels. :) I hope this is Ok for the challenge.
Bleeding Art February Challenge - Anything Goes
We Love 2 Create at Polkadoodles Challenge #3 - Anything Goes Mixed Media Creative Challenge
Crafty Card Makers #251 Embossing I embossed the butterfly, and the background, by definition, is embossed.

These products were used on my panel and can be purchased at The Funkie Junkie Boutique:
Sizzix Chapter 1 Tim Holtz Thinlits Dies - Scribbly Butterflies
Sizzix Chapter 1 Tim Holtz Thinlits Dies - Geo Frames
Tim Holtz Sizzix Thinlits Die - Organic
Tim Holtz Sizzix Bigz Die - Tattered Butterfly
Stampers Anonymous Tim Holtz Stamp Set - Tiny Text
Stampers Anonymous Tim Holtz Stamp Set - Field Notes
Tim Holtz Idea-ology 8 x 8 Metallic Confections Kraft Stock
Tim Holtz Idea-ology 8 x 8 Metallic Jewels Kraft Stock
Tim Holtz Idea-ology Salvaged Baseboards
Distress Oxide Spray - Mermaid Lagoon, Cracked Pistachio, Salty Ocean, and Blueprint Sketch
Distress Oxide - Tumbled Glass
Distress Ink -Walnut Stain and Ground Espresso
Distress Archival Ink -Ground Espresso and Vintage Photo
Ranger Tim Holtz Distress Crayons - 6PC Set #3
Ranger Tim Holtz Alcohol Ink - Lettuce, Citrus, Sailboat, Mermaid, Teakwood, and Rust
Emerald Creek Eileen Hull Molten Dimension Embossing Powder - Glistening Glass
VersaMark Watermark Ink Stamp Pad