
Hello and welcome! Today starts a new challenge at The Funkie Junkie Boutique challenge blog and Jenny is hosting 'Home is Where the Heart Is'. Here's how she describes her challenge theme:
"What does 'home' mean to you? Maybe it's a place of safety, somewhere you live with family or friends, or a place that holds treasured memories. It may be somewhere you can be yourself or a place from where you can grow and thrive. Whatever 'home' means to you create a project of your choice that represents it."
As always, the winner will earn a chance to be a Guest Designer at a future date at The Funkie Junkie Boutique challenge blog, and everyone who enters and follows the rules will go into the draw for the chance to win a $25 spending spree at The Funkie Junkie Boutique. There are also Top 3 Badges for three additional outstanding entries, chosen by the Design Team. Please see the blog for details. While you are there, be sure to check out all the amazing inspiration by my talented teammates.
Home means a lot of different things to me, but mostly I would say home is where I am. It's been different places throughout my life, and I've decided to represent different stages of my life on some wood block house ornaments. I'll start with a photo of the original blocks as I found them at a yard sale followed by closeups of each of the ornaments. Finally, I'll take you through the steps on how these came together. There were lots of steps and lots of photos, so grab a good drink and snack. This will be another long post.

These were hand crafted by a nice old man who seems to have better woodcrafting, than spelling, skills. He insisted the blocks spelled out HOME, while I smiled, handed him my dollar bill, and nodded my agreement. Uh huh. LOL

Some of my fondest and clearest memories of living in this home are the snowy winters, building great igloos and snow forts out of the massive snowdrifts formed after the snowplow had been through a time or two. Winter was a time of fun for us kids, while the more temperate months on our dairy farm were spent working in the fields and gardens--not so memorable. Although building tunnels out of hay bales in the hay barn was pretty amazing! But that was after the hard work of bringing in the hay was done.

My other two brothers, one older than me, and one younger pose around back. I selected the trading stamps from the Christmas ephemera pack, because I do remember pasting those stamps into a book when I was a kid--such fun!


I start by applying Dina Wakley's White Gesso over the sides and bottom of each 'house'. The roofs are painted right over the existing color with Distress Paints: Barn Door, Fired Brick and a dry brushing of Black Soot on the red roofs and Black Soot and Hickory Smoke on the other two.

I painted the reverse side of a couple of lengths of the collage paper, after determining what portions I wanted to show on my houses. I set that aside to dry while I continued to work on the blocks themselves. Some of the photos may seem a little out of sequence (or as you'll see later on--non-existant). I am constantly working on one part while allowing another part to dry, and lots of other business happens around the house between steps, so photos get forgotten, but I believe I can walk you through the process.

I stroke on one more light coat of Fired Brick paint on the red roofs and sprinkle with Fired Brick Embossing Glaze powder. I dry with my heat tool to melt the powder. You'll notice I also painted the chimney with Black Soot paint at some point. After the roofs are fully cooled, I scuff with steel wool; I want texture but not shine.

Each of the houses is wrapped in bits of the prepared Collage Wrap, making sure the desired images were in place. I do this by applying collage medium to the block, laying the desired portion of collage wrap over the wet medium and burnishing with my finger, not being particular about any wrinkles. Once the adhesive dries, I trim with scissors then lightly sand the edges to remove excess paper.


Here's my two sisters, both older than me. I still remember a plaid dress similar to these, in green, handed down from sister to sister to sister. Even though there's a 25 on the ephemera, there's no other mention of Christmas on this one, since we did not celebrate Christmas when I was a kid. Sad, yes, but I make up for it now; throughout the year in fact, as I have a small vintage Santa collection I keep out year round.
I chose this block with the big chimney, as one of the highlights of my childhood is the fire that started from the wood stove in the kitchen, one of two wood stoves which heated the house. My mom didn't live with us then, and my dad was in Europe visiting family. My oldest brothers and sisters had to grow up fast and managed to keep everyone safe and the house standing.

I skip ahead to when I was an adult, living on my own. After a series of other homes, this one was an important one to me, as it was my first home I saved up to purchase on my own. No more crazy roommates or rentals for this girl!

The younger version of myself looks ahead to see what's around the corner. It's 'good will to men' (and women and kids), as a I continue to work on my career as an LPTA helping others rehabilitate after neurological accidents like strokes, spinal cord injuries, and brain/head injuries. What a rewarding career that makes you thankful for your own health.

Here's my current 'home' status: Married with two kids. My kids are grown now, but back under the family roof once again, thanks to all the craziness going on with the pandemic. Nothing says 'home' like arguing over who ate the last of the frozen waffles, the extra clutter of three households now under one roof, or (on the good side) the family dinners we share or the occasional board game marathons we have.
Around the side I chose the horizontal 'Christmas' from the Collage Wrap, as seen in the final photo below.

Next I take a glimpse into the future, when my husband and I might someday be empty nesters. I visualize a smaller home, and perhaps the kiddos will have families of their own, leaving us to celebrate most of Christmas on our own. Perhaps we might get a letter or card from them (See the letter and stamp ephemera?) and a quick visit, special delivery.


Now let's take a look at how these little wood homes were made. They really are quite simple with the help of Tim Holtz Holly Ideaology Collage Wrap, a handful of mixed media supplies and very few details. I'm very fond of tiny things, and I was lucky to have enough of the smallest Paper Dolls from last year's Christmas pack to tell my 'home' story on these little blocks of wood. I was a little saddened to see this year's pack didn't cater to my specific wants. (Tim?) On the up side, there's a whole new wonderful cast of characters! I've linked to the new Christmas Paper Dolls below.


I repeat this process with the darkest roof with Black Soot paint and Walnut Stain Embossing Glaze powder. I think I used the Embossing Dabber and Walnut Stain Embossing Glaze on the snowy roof. At various points in my process, I smeared on some Distress Grit Paste sprinkled with Distress Glitter to make the snow on the farmhouse roof and in drifts around the base. ( All of these process photos apparently were deleted or not taken--apologies.)

I smeared on Distress Crackle paste randomly on each house and allowed to dry. I later decided to apply some stencil work, using the festive repeat stencil from Mini Stencil set 21 and Candied Apple ink. In hindsight, I should have used archival ink, so my final layer of collage medium wouldn't smear the ink. But I embraced the imperfection...


After the wrap and crackle was in place and dried, I coated each of the houses with Vintage Collage Medium. When that dried, I smeared with Walnut Stain Crayon to accentuate the cracks. (not pictured) As predicted, the ink smeared under the collage medium, but I decided it lended a vintage quality to these already vintage houses, which I love. You might notice I chipped off the snow on the farm house when it got dirty from my stencil work and replaced it with some new. One thing we did not have on the farm was dirty snow!


I decided to break from the red pattern and switched instead to brown for my non-Christmas homestead. Red would be too Christmas-y a color for this home.


At this point, I decided I wanted to 'frost' the three remaining roofs, so I swiped them with the Embossing Dabber randomly and sprinkled with Ranger Sticky Embossing Powder. This powder is heated just until melted and then immediately sprinkled with Clear Rock Candy Distress Glitter. Heat it once again to 'lock in' the glitter. Above you can see what the sticky powder looks like before it's heated.

Here's the drone shot of each of the houses. Brrr! It looks cold from this view!

I chose a scrap of green ink mop up paper from my stash and add to it inks (Iced Spruce, Mowed Lawn and Pine Needles and Frayed Burlap Distress Oxide Spray splatters. I used one of the tiny dies from the Sizzix Foliage Wrap set to cut little pine boughs to tuck in behind my paper dolls. Each of the die cuts is then dipped front and back into puddles of watery Pine Needles ink and dried with a heat tool before adhering.

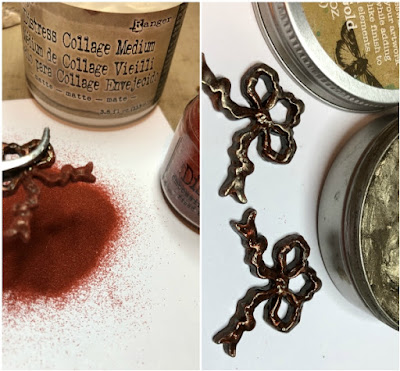
I altered a pair of bow adornments from the Ideaology Ribbon and Bows set, first by brushing with collage medium and then covering with Fired Brick Embossing Glaze Powder. I heat to melt, and when completely cooled, I smudge with a bit of Prima Metallique Wax. These are adhered to the ends of two of the houses with collage medium.
All of the Paper Dolls are colored with Distress Embossing Glazes: Fired Brick, Tattered Rose, Cracked Pistachio and Speckled Egg were used. I use the embossing pen to apply the ink in one desired area and sprinkle with one color at a time, heating each color before moving onto another area. When they are all cooled, I buff with steel wool. All ephemera and paper doll edges are blended with Frayed Burlap ink.

As you can see from my little ornaments, home will always be where I am. I'm looking forward to seeing how you interpret what home means to you when you enter our challenge! Happy crafting! Hugs! Sara Emily
Challenge shares:
These products were used and can be purchased at The Funkie Junkie Boutique:
Tim Holtz Distress Embossing Glaze - Tattered Rose, Fired Brick, Cracked Pistachio, Speckled Egg, Walnut Stain
Tim Holtz Distress Ink Pads - Candied Apple, Evergreen Bough, frayed Burlap, Iced Spruce, Mowed Lawn, Pine Needles
Ranger Tim Holtz Distress CrayonsWalnut Stain
Tim Holtz Distress Paint - Barn Door, Black Soot, Fired Brick, Hickory Smoke
Tim Holtz Distress Oxide Spray - Frayed Burlap


