Wednesday, September 28, 2016

One Lucky Day

 Hello friends and visitors! Oh, my goodness! I almost forgot it's the anniversary of our wedding coming up this weekend, so I had to take a quick visit to my Closet  this morning to make my husband's card. Here is my rustic/grunge card for the week!


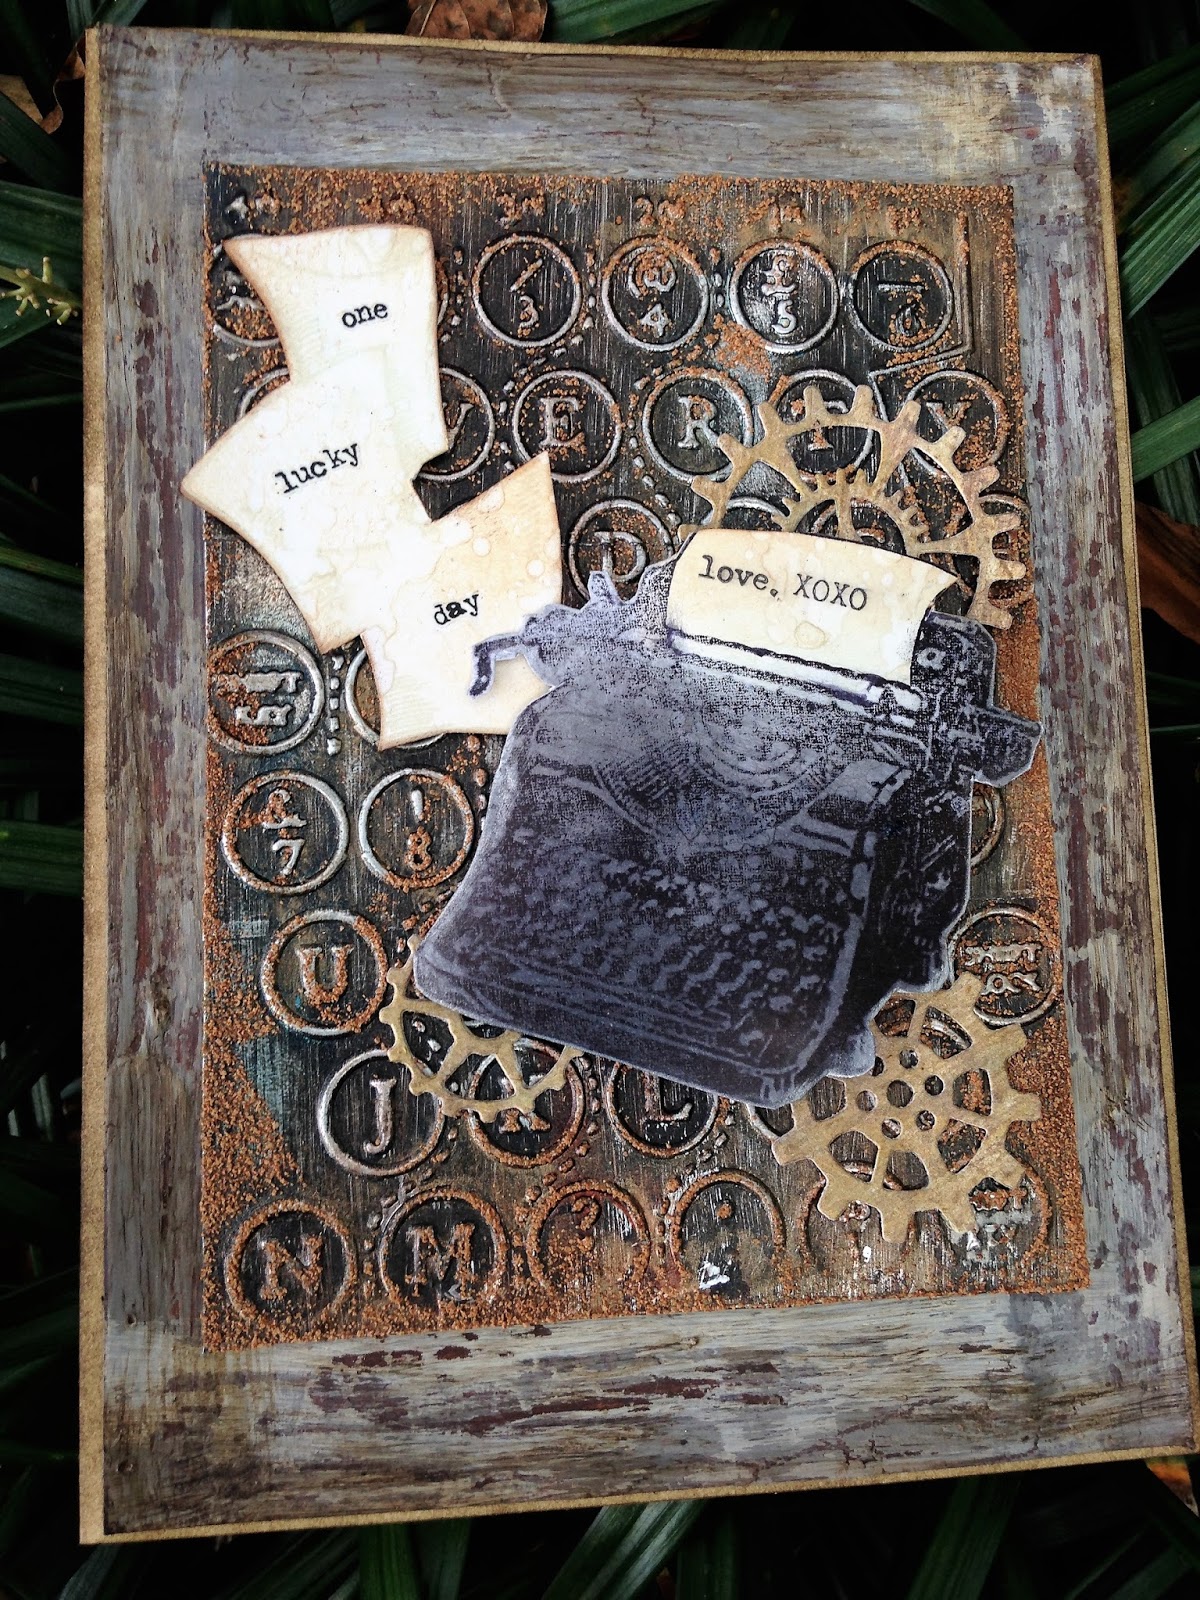
I made another one of my foil panels for this card, and a step by step tutorial is on it's way the beginning of October. This time, I added some rust! After 21 years of marriage you might expect a little rust!

I saved this photo from the cutting room floor because it showed some of that beautiful patina I was aiming for. It's pretty elusive from the camera. Paints used on this panel include Prima's Alchemy Acrylic in Metallique Steampunk Copper, Twinkling H2O's in Teal Zircon and Chestnut.


The stamped images were fussy cut, and Tim's Words Remnant Rubs spell out part of the message.


An old Tim Holtz expressions stamp spells out the rest. The die cut gears are given a touch of gold, and of course, the papers are aged.


Now let's have a closer look at that wooden frame. This is made with a piece of manila file folder cut to size. I painted just the edges with DecoArt Raw (correction- that's Burnt) Umber, and laid on a coat of DecoArt Weathered Wood Crackle Medium in random thicknesses. When dry I laid on a thin coat of DecoArt American Zinc paint followed by a wash of thinned DecoArt Titan Buff Media paint. Next I lightly stroked on Distress paint in Ground Expresso, and finally gave it a coat of DecoArt Ultramatte Varnish, because I don't think shiny wood is rustic. You can see my crackle didn't quite crackle as expected, but it added a nice touch here and there.


Often times I get comments like 'I can't believe that was a ---- before you painted it', so I thought I would show an ugly shot of what this layer looked like before the foil layer was adhered. Pretty bad, huh? See all those colors around the inside edge? And that swipe of paint in the center? I always do my testing of colors in some out of the way place. You can see the Q. Gold and Teal didn't make the cut, nor did the Antiquing Cream look good to me. If you ever get a card from me PLEASE don't disassemble it! It's very messy under there! 


Products used: Die: Tim Holtz Thinlits-Gearhead; Embossing Folder: Tim Holtz Keyboard;  Stamps: Stampendous, Tim Holtz;  Tim Holtz Words Remnant Rubs;  Distress paint:  Ground Expresso; Distress inks: Old Paper, Vintage Photo, Ground Expresso; Jet Black Archival ink; Versamark embossing ink;  Prima Alchemy paint: Metallique Steampunk Copper;  Twinkling H2O's: Teal Zircon, Chestnut;  DecoArt: Burnt Umber and Tital Buff Media paint, Americana Zinc, Matte Medium, Weathered Wood Crackle medium, Ultramatte Varnish Other from my stash: manila file folder, card stock, contractor's foil tape, black gesso, embossing puffs, metallic wax rub-ons.

I had to share these last two shots with my card posing with the wood that provides my inspiration.


And on the rocking chair that's getting grungy and mildew-y just in time for Halloween! I can't wait!


I'm sharing my card with my husband and these wonderful challenges:
Frilly and Funkie-Going Round in Circles! I think my circles might finally not need pointing out! Ha! Ha!

Thank you for stopping by and for all your amazing comments! I sure do appreciate each and every one of them!
Hugs and Blessings!
Sara Emily

12 Tags of 2016-September-Version Two As a Card

Hello crafty friends and visitors! I haven't made a second version of Tim's tag in a long time. This one had me a little stumped, so I had to practice on different substrates. I don't have the Yupo paper, but I thought I'd give it a try on the old Ranger alcohol ink paper. This was actually the first version I tried, but wanted to wait until the card reached it's destination before posting it.


For all the details on how to do the techniques used on this card and to see his inspiring September tag, please visit Tim's blog. I really must get the Yupo paper, because his magic technique to get that ghostly look just doesn't work on the glossy paper.

I pretty much followed Tim's tutorial, but chose a few different products. I only have the black Distress archival ink, so my undertaker (Tim'[s Undertaker set) was inked in that and did Tim's magic trick. I guess it's the magic only of Yupo, because all of my facial features disappeared at this point.  I inked again and stamped the details back in. I could still see the x-ray effect behind it, so I carried on. I masked him off and and stamped the advertisement stamp from the same set in Ranger Potting Soil ink. This worked better on this type of paper as you can see. I might just try another time using just the Ranger archival inks and see what happens. I think I used the Potting Soil on the spiders, too, but then over stamped with Picket Fence Distress ink.


I used the bats stencil for the alcohol ink resist technique, and did some stamping with Distress Picket Fence ink.


I hand stitched the alcohol inked pen nib and film strip ribbon onto the card with copper metallic thread and added one of my new Remnant Rubs to the strip. This covers up a somewhat failed first attempt at the alcohol resist technique, but I thought I would put the blob of white to good use to show off the Remnant Rub.


The Alpha Parts I chose are from the Wicked set, and the bats on the Vial Label are also from Tim's newest Halloween Remnant Rubs set. I did my paint patina  technique on black card stock for my back panel and got a completely different look. I like it, but wanted to get a little more of that metallic look Tim was featuring this month, so I added a little Cloisonne Crystals and splattered on Black Soot Distress ink.  You can see the reflection in the glossy card stock (I took this shot outdoors in the dappled shade); something I think would be pleasantly eliminated when using the Yupo paper. It looks like I'm going to have to order some of this magic paper, because I love this technique.


I am entering this into the following challenges:
A Vintage Journey-September Challenge-Create Within a Frame I framed my main panel, the 31 and the bats on the vial label.
Mixed Media Monthly Challenge #28-RusticI was going for a little different rustic look this time--the focal panel has my attempt at a rustic wood grain. I was also inspired by the hanging lights on almost all of the mood boards.
and
Happy Little Stampers September Mixed Media Challenge-Distress I used Distress paints on my background and on "Boo", Distress Picket Fence ink, Distress ink on the batty label, Distress Archival ink, and I distressed the edges of the back panel. Overall, it's pretty distressing.

Thank you for stopping by today and for all your lovely comments! I really, really appreciate them! 
Hugs and Blessings!
Sara Emily

Tuesday, September 27, 2016

Vintage Rustic Autumn Card

Hello friends and visitors! Today I'm sharing a vintage rustic card with lots of my favorite fall colors. It's still "summer" here by the weather, although we did have some lower humidity yesterday. I cannot wait for the cooler days! Here is my card, filled with deep fall colors and rough textures.


My mixed media background panel is done with Distress paints, Twinkling H2O's, and embossing powder on foil. I was going for a rusty tin roof look.  I will have a list of supplies used at the end of this post and a step by step tutorial on how I did a version of this in  a post the first week of October. 


I gave my Recollections paper flowers a new look with Distress inks and seed beads. The Tim Holtz Halloween ephemera and  Pocket card were shabbied up with Distress ink, marker, and Distress tool.


I embossed the edges of my background panel with Frantage copper powder and 'antiqued' with Distress crayon.

-

Products used:  Distress products:  Paint-Wilted violet, Carved Pumpkin, Mustard Seed, Mowed Lawn  Ink-Vintage Photo, Scattered Straw, Mustard Seed  Crayon-Walnut Stain; Marker-Walnut Stain;   DecoArt products: Matte Medium; Twinkling H2O's-Orange Peel;  Stampendous Frantage- Aged Copper;  Versamark embossing ink;  Recollections paper flowers;  Tim Holtz Ideaology Pocket Cards and Curiosity Ephemera; Tim Holtz Tattered Leaves Texture Fade;  Other:  contractor's foil tape, manila file folder, card stock, burlap, twine, seed beads from my stash.


I am sharing this with the following challenges:
Frilly and Funkie-Going Round in Circles! My flowers, flower centers, pumpkin, the 'O', the zero,  and each little seed bead is a circle!
Simon Says Stamp Monday Challenge-Powder Power I used Aged copper Frantage to frame my panel.
and

Thank you so much for popping in a leaving your lovely comments! I sure do appreciate them!
Hugs and Blessings!
Sara Emily
UPDATE: Yippee!

Monday, September 26, 2016

Remember...

Hello everyone! I'm excited to post my very first project as Design Team member for Emerald Creek Dares! Fall is  my favorite crafting season, so with an Anything Goes theme, I chose to make an Autumn card. I chose the sentiment "Remember" because I'm fondly remembering my first entry into Emerald Creek Dares last October for their Tricks and Treats Dare. I was so excited to see my creepy creation had won, and it was the start of a friendship with blog and shop owner, Kim Evans! Kim's first challenge was in September 2015, and I've rarely missed one. Happy 1st Anniversary, Emerald Creek Dares!

I hope you enjoy this card, and if you wish to read through this post, I've included my step by step process.


For the base, I started with kraft card. I pounced with Ranger Embossing Dabber through Tim Holtz Lattice Layering stencil just around the edges. I covered with Burnt Copper Leaves Embossing Powder and heated 'til bubbly in some areas, and smooth in others. I love this powder, and it will be on my work table through out the season. Lastly, I blended with Black Soot Distress ink.


For the next panel, I started with manila file folder cut to size. I blended with Distress inks in Squeezed Lemonade, Fossilized Amber, Mustard Seed, and Spiced Marmalade and edged with Ground Expresso. I spritzed my hand with water and flicked, let it sit a minute and dried for those lovely age spots. 

Next I knifed Ranger Transparent Matte texture paste  through Tim's mixed media stencil. While the paste was still wet, I added clear micro beads and  Soft Fallen Snow embossing powder. Once the paste was completely dry, I heated with my heat tool to melt the powder.
                 

 I blended with Vintage Photo and Ground Expresso Distress inks. I carefully wiped the ink from the stenciled areas with a damp clean cloth, then spritz and flicked and dried again.  


It's hard to see that gorgeous texture without zooming in, so here are a few blurry closeups. Gotta love that Soft Fallen Snow on the matte paste for a frosty look!


To finish the panel, I dabbed some random areas with the embossing dabber through Tim's Speckles stencil, sprinkled on  more Burnt Copper Leaves and then heated.


The frame is Tim's Ornate frame die cut from Grungeboard. I covered it with gesso and painted with Ground Expresso and Tarnished Brass Distress paints. I quickly sprayed the paints with rubbing alcohol to blend the inks and sprinkled with Burnt Copper Leaves. I heated 'til bubbly, and while it was heating I noticed it curl up. I liked the look, but it flattened back out. To keep the curved look, I attached the frame to the panel with Ranger foam adhesive. I edged the frame in Tarnished Brass paint and Ground Expresso ink. The fussy cut butterflies were on a scrap in my stash, and I believe are a Tim Holtz image colored with Dylusions spray.


The large butterfly is Martha Stewart inked with Jet Black Archival and colored with Distress Markers in Spiced Marmalade and Rusty Hinge. I spritzed with Walnut Stain using my Ranger marker spritzer and gave him a Burnt Copper Leaves body.

"Remember" is a Nicole Wright sentiment from her Fallen Blossom set inked in Potting Soil Archival on a Tim Holtz Labels Thinlits die cut. The die cut flowers are also Tim Holtz--Wildflowers Thinlits.


I hope you enjoyed this post. Please be sure to visit Emerald Creek Dares to see what amazing projects my talented teamies have made for you! I hope you will enter this month's Anniversary challenge which is an easy one--"Anything Goes"! There's a whopping $50 gift voucher to Emerald Creek Supplies for the winner and badges and store discounts for the runner's up, so you don't want to miss out!


Emerald Creek Products Used:

Other Products Used Available at Emerald Creek:


Hugs and Blessings!
Sara Emily
UPDATE: Yippeee!


Wednesday, September 21, 2016

Halloween Inspiration

Hello friends and visitors! It's time for some more Halloween Inspiration! I made a card for my daughter who still needs a little more inspiration as she begins her new life as a college student. She loves Halloween as much as me, so I thought a little Halloween craft was in order to bring some extra sunshine into her life.


Frilly and Funkie's theme these next two weeks is 'Going Round in Circles', so I was sure to include lots of circles in my layout. We can start with the background, where blood spatter and splatter makes circles. The Undertaker's eye socket look circular to me, as do the concentric circles of the embossed spider web. A stamped clock also serves as a circle as well as the spots on the ghostly hand die cut. You might even see some circles in the stamped hand writing that appears as if by magic on the spider web panel.


Of course, I had to use a printed paper with a circle pattern to stamp my Undertaker on.


A twig wreath circles over the death notices. Inspired by the mood board and the quote  "Stay patient and trust your journey" at Mixed Media Place, I wanted to use just shades of black and white and the teensiest bit of brown from Vintage Collage Medium for that vintage look. I loved the quote provided, but simply put "Inspire Yourself", because my daughter seems so uninspired by her classes.  Life is what you make it; enjoy the journey.


More circles on the tag, the ribbon, stenciled card, and the fishtail banner.


A coat of Distress Rock Candy Crackle paint, Distress stain and a sealant of Vintage Collage medium for the clock.

Supplies used:
Dies:  Memory Box (skeleton hand), Impression Obsession (twig wreath) Stamps: Tim Holtz Undertaker, Inkadinkadoo (blood splatter), Altered Pages (clock), A Stamp in the Hand Background Text  Stencil:  Tim Holtz Dot Fade  Embossing folder: Tim Holtz  Ranger products: Transparent Matte texture paste, Multi Matte medium, ink: Archival Jet Black Distress:  Vintage Collage medium, Hickory Smoke spray stain, Inks: Hickory Smoke, Black Soot, Frayed Burlap, Ground Expresso, and Picket Fence Paper: My Minds Eye and black and white card stock from my stash. Ribbon/twine: stash


Since I did not do a step by step tutorial, please feel free to leave any specific questions you may have, and I will try to answer them. This was a quick card, so I may not have the exact steps committed to memory.

I will be sharing this card with the following challenges:
Southern Ridge Trading Company-Your Favorites Need I say it again--Halloween! Tee Hee! Mixed Media! Crackle and of course, my daughter!
Mod Squad Challenge-Celebrate Your Inner Splat I used a stamp to create my blood splat(ers).

Thank you for your visit and for your comments! I read and appreciate each and every one of them!
Hugs and blessings!
Sara Emily