Wednesday, May 25, 2016

12 Tags of 2016-Technique Remix-May-Tissue Tape Resist/Tattered Florals

Hello friends! It's so hard to believe it's almost the end of May, and Memorial Day is upon us again if you live in the United States. Precious summer days lie ahead. So the end of the month can only mean one thing--it's time for me to get a move on with my tag for Tim Holtz's monthly tag challenge! He's mixing up a couple of past techniques to make one brand new one. Please visit Tim's blog for all the details. Here is my version of Tissue Tape Resist/Tattered Florals, inspired by the master himself and my very own perennial garden full of purple coneflowers, butterflies and bees!


Here is Tim's inspiring tag.

2016TAG

These stamps are new to me; I do have the larger version of the butterfly, but the size of this one is just perfect for cards and tags. They came in a kit with watercolor paper, archival ink, Distress crayons, and other goodies at my local craft store. I can't remember the cost, but it seemed like quite a crafty bargain considering all the necessary goodies that came in the kit. And I've been eyeballing these coneflower stamps for a very long time, so invest I did!


I used a heavy watercolor paper for my background, because I wanted a watercolor effect, full of splotches and flowing color. I used Distress stains in Blueprint Sketch and Wilted Violet (2 of my favs!) and Distress inks in the same colors as well as Tumbled Glass and Shaded Lilac. I love how the violet fades out to pink with heavy spritzing. I even brought out my sewing machine to add some crazy stitches! My machine is under the weather, and I had to tape the back so the stitches didn't come out. Time for a new machine!


The ruffled trim is Ideaology and probably 10 years old! I accordion folded it as I sewed it down, but it's pretty much covered with the vial. A Souvenir Adornment colored with Picket Fence Distress Crayon and a tiny vial with an appropriate Remnant Rub embellish further. The bee is a Remnant Rub also.  I cut my Tattered Florals with both white card and Frosted Film on white card and inked with Wilted Violet. The pretty shimmer will just have to be left to your imagination, because Mr. I phone wouldn't pick it up. My choice for a metallic splattering is Brushed Pewter flicked on direct from the inside hose, because I never seem to get the right pressure for a light spritzing.


I used  Layering stencils both in the standard size and in the new mini version (Flourish). I chose to do some additional stamping with the coneflower  over the texture paste for some additional depth.


I almost skipped this month's challenge due to what I felt was an inadequate stamp supply, but I was inspired by Tim's words "allow yourself to play, discover, and experiment with different techniques, but stay true to your style throughout the creative process..." and I did! Here we are in the garden next to those purple coneflowers; it's almost dark so looking pretty washed out all around.


I would like to enter my tag in the following inspiring challenges:

Thank you for stopping in today and for all your amazing comments! I read and appreciate each and every one of them. 
Hugs and Blessings!
Sara Emily

UPDATE: Yippee! So honored!

Wednesday, May 18, 2016

Scrapy Land Guest Designer--Lots of Layers

Hello, friends! Today marks the start of another new challenge at  Scrapy Land.  This time the challenge is "Lots of Layers" plus use any brand die Scrapy Land sells in the shop. I made a layered card for my friend's twin sister who recently was involved in a serious auto accident. Thankfully she had no life threatening injuries, but will have many months of rehab to recover from her multiple broken bones.  I wanted to make a card to cheer her up as she begins her stay in a rehab hospital.


I was inspired by my pink climbing rose out my back door. As you can see, I have lots of layers--eleven in all, excluding the embellishments and base card. Following is a list of dies used; all are brands Scrapy Land carries:

Sizzix Tattered Flower Garland
Spellbinders Lacy Oval Dies
Spellbinders Labels Eight Dies
Spellbinders D-Lites Garden Gate
Tattered Lace Ornate Leaves


For the base layer, I chose a piece of embossed paper from my stash and colored it with Distress inks in Victorian Velvet, Peeled Paint and Frayed Burlap. The next three colored papers are from a Basic Grey paper collection. It's so easy when the papers coordinate! I die cut each layer two times with the Spellbinders Labels Eight die--one from the colored papers and one from white card.  Then I cut around each  a third time leaving a margin on more white card and layered them up! The Spellbinders Lacy Oval is cut from another paper from that same set. The Spellbinders Garden Gate is cut two times and layered.


The roses were handmade using Sizzix Tattered Flower Garland and colored using Picked Raspberries Distress stain. These are so tiny I could barely see to make them! The foliage is die cut from my favorite Tattered Lace die and colored with Shabby Shutters and Mowed Lawn Distress inks. I used only the flourishes from the Heart Flourish die, and the lace is from my stash. Get Well Soon (Inkadinkadoo) was stamped and handcut into a tiny banner.


I would like to enter my card into the following inspiring challenges:


Please pop by Scrapy Land to see all the inspiration the talented Design Team has made for you, and if you can make time, please enter your layered project into Lots of Layers at Scrapy Land.  All you have to do is use at least one brand of die Scrapy Land sells, and you might win a $15 gift certificate to Scrapy Land!

Thank you for stopping by today and for all your amazing comments! I read and appreciate each and every one!
Hugs and Blessings!
Sara Emily

UPDATE: Yippeee!
Top 3


Tuesday, May 17, 2016

Opposites Attract

Hello friends! I have a quick post for you tonight.  I just finished a card that is totally out of my usual style, but I just could not resist making a Graphic 45 card when I found the Transatlantique Collection in my stash today.


I thought it would be fun to walk in another's shoes for a change. I would like to say it's in the style of my blog friend, Kathy Clement of Kathy By Design, but I admit, it doesn't come close! Please be sure to pay her a visit and see what a fabulous, prolific artist she is.  I have a much deeper respect for her beautiful work, because this was not at all easy, and mine doesn't have one tenth the detail she puts on her makes! But it was fun piecing together all those yummy papers! I just can't figure out how she gets so much on such a small card! One thing I always admire about Kathy's cards is her perfect stitching, so I tried to duplicate that on mine. My machine is not feeling well right now, so I resorted to some faux stitches. I was going to forgo the bow, but Kathy never misses putting some ribbon and at least one charm on her projects, so these were added at the last minute. The sentiment is Tim Holtz Simple Sayings.


Oh, of course, Kathy's cards would not be complete without the inside fully decorated and with a little pocket or something to hold tags or a gift card or perhaps an inch of fifties! So, I decorated the inside of my card in her style. And there's the ribbon!


The little tags and these sweet little railroad "buttons" were in the collection, so I had to pop up the buttons--isn't it so cool the way everything matches and goes together in these collections?!


I stamped a tag with Tim's Here and There railroad stamps. Everything is edged in Frayed Burlap--just a hint of distress, like Kathy would do! No torn papers here!


Like I said, short and sweet. Just less than an hour before the door closes at Frilly and Funkie for their Opposites Attract challenge!

I would like to enter my card in the following challenges:

Thank you for stopping by today and for all your lovely comments! I read and appreciate each and every one!
Hugs and Blessings!
Sara Emily


Friday, May 6, 2016

Guest Designer--Southern Ridge Trading Company--Lace and Pearls for the Ladies

Hello everyone!  I'm happy to again join the talented Design Team at Southern Ridge Trading Company for the day as Guest Designer! I have made a vintage panel using two of Southern Ridge Trading Company's most delicate and feminine chipboard pieces.


My design came together with inspiration from a stash of wedding dress lace pieces adorned with the prettiest pearls and the dressmaker form from the Dressmaker Mix.  No, the lace is not from my wedding dress, but found in a box of other goodies at an estate sale. All I had to do was cut out appropriate pieces.


All chipboard was given a coat of gesso and dried. Next the body of the dressmaker form and the flourishes (end pieces cut from the Swirl Corners) were painted with Distress paint, Antique Linen, and the remainder of the pieces with Weathered Wood. Once dry I coated the body only with Distress Crazing medium, using wide strokes to give a linen look.  The "wooden" parts of the form and the frame, which is the outer frame holding all the Dressmaker Mix pieces together, were coated with DecoArt Crackle Medium, and all left to dry. I swiped on Distress crayons in neutral colors to show off the cracks and texture. Pearls were added to the flourishes.


The background was created using vintage book paper adhered to card. I splattered with watered down Gloss Modge Podge and left to dry. This was a technique my good friend Pamellia of My Little Craft Things used on the beautiful birthday card she so lovingly made and sent to me. Be sure to pay her a visit regularly, if you haven't already! You will be forever inspired not only by her lovely artwork, but her fabulous photography! When dry, I blended with Distress ink in Victorian Velvet and heat dried. Lastly, Golden crackle paste was applied thinly through a Tim Holtz mini stencil. I love how the color bled through in a lighter shade--I knew this would happen from previous experience, and was intentional.

All I had to do now is to arrange my lace and chippies, add some additional bits of lace, a piece of tulle and some vintage buds, and I have a tag so feminine and perfect to adorn a wedding, Bridal shower, Mother's Day, or even a birthday gift.


I would like to thank Karen and Katelyn and the rest of the Design Team at Southern Ridge for allowing me to craft along side them today! It was such fun! 

I would like to enter my vintage tag into the following inspiring challenges:
Stamps and Stencils Think Pink Just one stencil used this time!
Mixed Media Mojo May Flowers With Twist of Stitching My flowers are not homemade, but there are quite a few of them: stenciled, lace and vintage buds. Stitching is on the lace--all of those beads are beautifully stitched on there (not by me!)
Mixed Media Place April Challenge Creative Gym #18 Be Patient. The Best Things Happen Unexpectedly.  It took patience to cut out all those little bits of lace and have them work for my design.
A Vintage Journey Sew Special I hope lace from a wedding dress qualifies!
Thank you for stopping by today and for all your amazing comments! I read and appreciate each and every one!
Hugs and Blessings!
Sara Emily

Thursday, May 5, 2016

Anything But Cute Challenge #13--Celebrate Your Style!

Hello crafty friends! It's time for our new challenge at Anything But Cute where the challenge theme is Celebrate Your Style! I'll give the challenge details in a minute, but first here's my mixed media make in my favorite grungy style.


As we celebrate our First Anniversary at Anything But Cute, we want you to celebrate what you do best...mixed media! This is your chance to do it your way, in your favourite style...so pull out those inks and paints and show us what you're made of! You can make anything you want, in any theme you want and any style you want, just as long as it has some mixed media products on it and no cute images. HAVE FUN!


We have some special treats for you this month at Anything But Cute! Along with all of our Design Team projects, we will also be featuring projects by several Favourite Artists from this passed year that we have invited back to celebrate our first anniversary with us. You will not want to miss the incredible line up of inspiration they have made just for you! We also have an amazing array of prizes from three wonderful and generous sponsors...Lots of chances to win some goodies, so don't miss out!

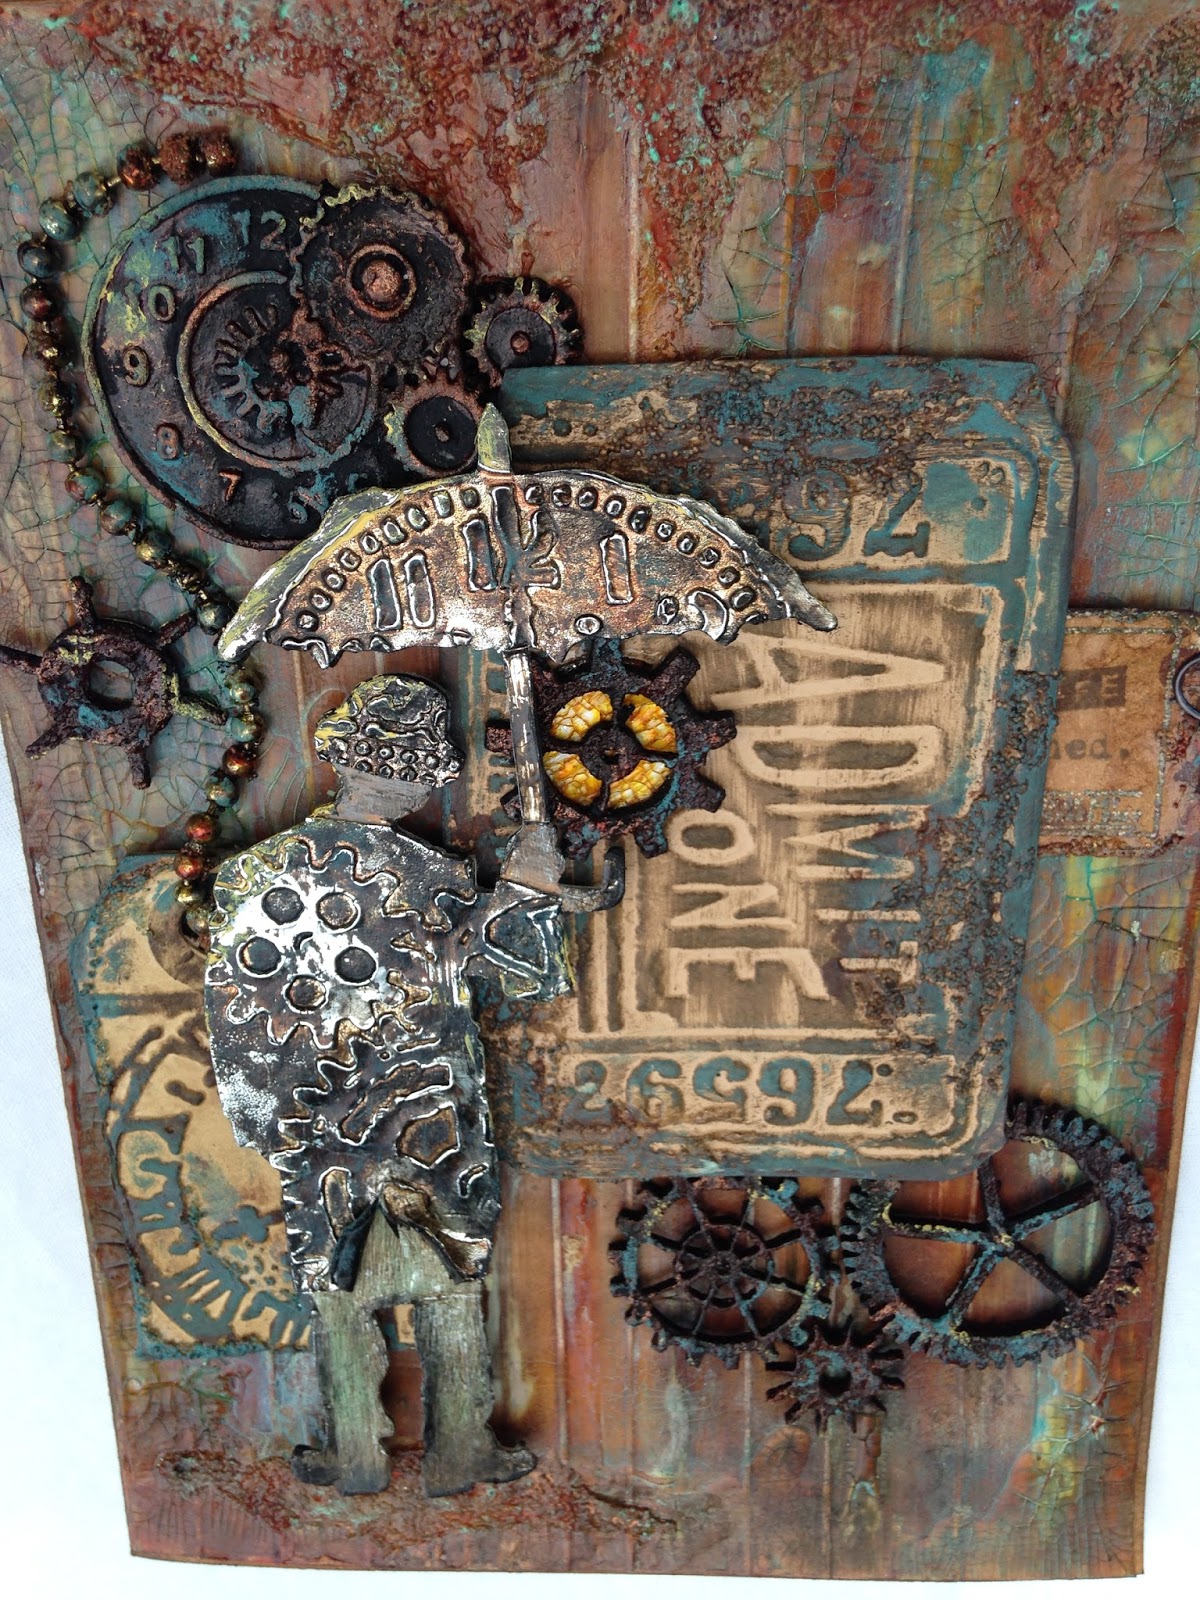
Well, I sure did have fun making this grungy steampunky card for my friend and teamie, Niki's birthday! I used 9 12 different mixed media products (not including different colors,) and that's just for the background panel! The colors look just a little different taken under the Ott light as opposed to outdoors on an overcast day.


Here are some close ups of the background panel, and I will list the steps  for making this below them. This is not my own recipe, but I read it somewhere on the internet at some point.  I did add some of my own steps to personalize it, however. Sorry, I didn't take an process shots for this, but if you scroll down I do have some step out photos of how I made the gears.


 Background panel
1. Apply Elmer's glue randomly and let dry.
2. Mix white acrylic paint with a few droppers of Antique Linen Distress ink refill and apply with a foam brush.  Let dry.
3. Swipe with Distress inks directly from the pad: Weathered Wood, Rusty Hinge, Walnut Stain. I do this vertically so it resembles wood grain or perhaps a copper roof. (Which do you think it should be?)
4. Wipe with dry paper towel to blend colors, again, vertically.
5. Turn panel over and score vertical lines; I did mine randomly.
6. Coat with watery gesso and heat dry.
7. Swipe on additional Distress ink: Rusty Hinge, Ground Expresso.
8. Wipe once more with a dry paper towel.
9. Add Distress Crazing medium thickly, like peanut butter, over entire panel and let dry.
10. Add DecoArt Crackle Glaze thickly around edges and let dry.
11. Apply DecoArt media paints (forgot what colors), Antiquing Creams and  Distress Crayons-neutrals on midsection until happy with color.
12. Add Glass bead gel at top and bottom where man will stand and let dry.
13. Add DecoArt Quinacridone Gold, Cadmium Orange paints and Distress paints: Rusty Hinge, Cracked Pistachio and Ground Expresso over dried bead gel.
14. Apply DecoArt Ultra Matte varnish over entire panel. Sit back and be amazed at how it finally turned out, because it looked terrible every step of the way!


I cut two of Tim Holtz' Umbrella Man  from grunge paper covered with foil tape. I cut the umbrella, hat and coat from one and embossed the pieces with Artful Muse (gears), Pocket Watches and Love (lace) embossing folders . I added alcohol inks in Mushroom, Ginger, and Caramel, drying between colors. Next, I added Copper Mixative and let dry. I painted with Ground Expresso and Black Soot Distress paints. I dried partially and buffed to get the grungy metal look. For the background man, I  sanded then painted with Rusty Hinge, Cracked Pistachio, Hickory Smoke, Ground Expresso and Black Soot Distress paints. As before, I partially dried and buffed between colors. I adhered the  pieces and edged with Black Soot Distress paint. I saw the Umbrella man with his jacket flapping in the wind somewhere in blogland, and I just had to borrow that! How fun!


Here's how I made the ticket: I embossed card with Tim Holtz' Playing Games embossing folder and fussy cut. I swiped with Walnut Stain Distress ink, added Glass Bead gel randomly and dried. I added DA media paints in Burnt Umber and Antiquing Cream in Patina Green. I punched a hole and used Tim Holtz' cracked glass technique for the gear's aperture. I backed it with white paper to show off the color.


The small tag was cut freehand and embossed with Tim Holtz Patchwork Texture Fade. I swiped it with Ground Expresso Distress ink and blended with Frayed Burlap. I used Glass Bead Gel and paints as per the ticket.


Small ticket: I stamped with Tim Holtz' Odds and Ends stamp and heat embossed with Ammo Camo  powder, blended with Vintage Photo DI and edged with Ground Expresso. I fussy cut, distressed and stamped the quote in Archival Potting Soil. I made it into a little interactive feature on the card.

Now it is time to make my gears; my favorite part! I made some of the gears with paper clay and a mold and some are chipboard.


I covered with Sand paste and dried.


I gave them a coat of black gesso.


And as if by magic they became rusty! I simply used all of the paints and alcohol inks listed above. I used alcohol inks and sand paste on the chain as well.


In the end, I added a tiny bit of Buttercup acrylic paint to the gears and umbrella man to add some light amongst all that dark.


I would like to add my grungy card to the following inspiring challenges:
Mixed Media Place April Challenge Creative Gym #18 Be Patient. The Best Things Happen Unexpectedly I had to be patient to wait for the results of my 14 steps to make my background!What a pleasant surprise!
Emerald Creek Dares B's Buttons, Brads, Bears, Butterflies... Use a B thing. Ok, I'm getting silly here, but how about ball and chain? And Gears rhymes with Bears, doesn't it??
Die Cut Divas May Day Photo Inspiration I was inspired by the colors and shapes of the buttons.
Cards Und More Challenge #157 Focus on Die Cuts My stamping is on the ticket and the ticket itself, Die cut is Umbrella Man.
Thank you for stopping by today and for all your wonderful comments! I do hope you will visit us at Anything But Cute for our birthday celebration!
Hugs and Blessings!
Sara Emily

UPDATE: I'm so honored!
So Excited! November 2015 Peace On EarthFAB 3Top 3 badge

Top5 badge