Hello friends and visitors! Can you believe we are already well into the first week of October? Today the Funkie half of the team at
Frilly and Funkie get to unveil their inspiration for the lovely Autumn's chosen theme 'Show Us Your Stamps'. Since this is the month for Halloween, I couldn't help but make something in the spirit of one of my favorite times of the year!
Here's what Autumn says about her theme...
Our challenge this round can be summed up with one word - STAMPS! We want to see you break out those stamps and get inky. There are so many ways to use stamps, and you probably have a few you have never even used - so come play along! We cannot wait to see your stamped vintage or shabby chic creations.
My little handmade journal was on it's way to the yard sale box when I was inspired by Autumn's altered journal cover
HERE, so I quickly rescued it and gave it a new life. Sorry, but I don't have any before photos--it was wheat colored with a brown faux croc spine (probably tape).
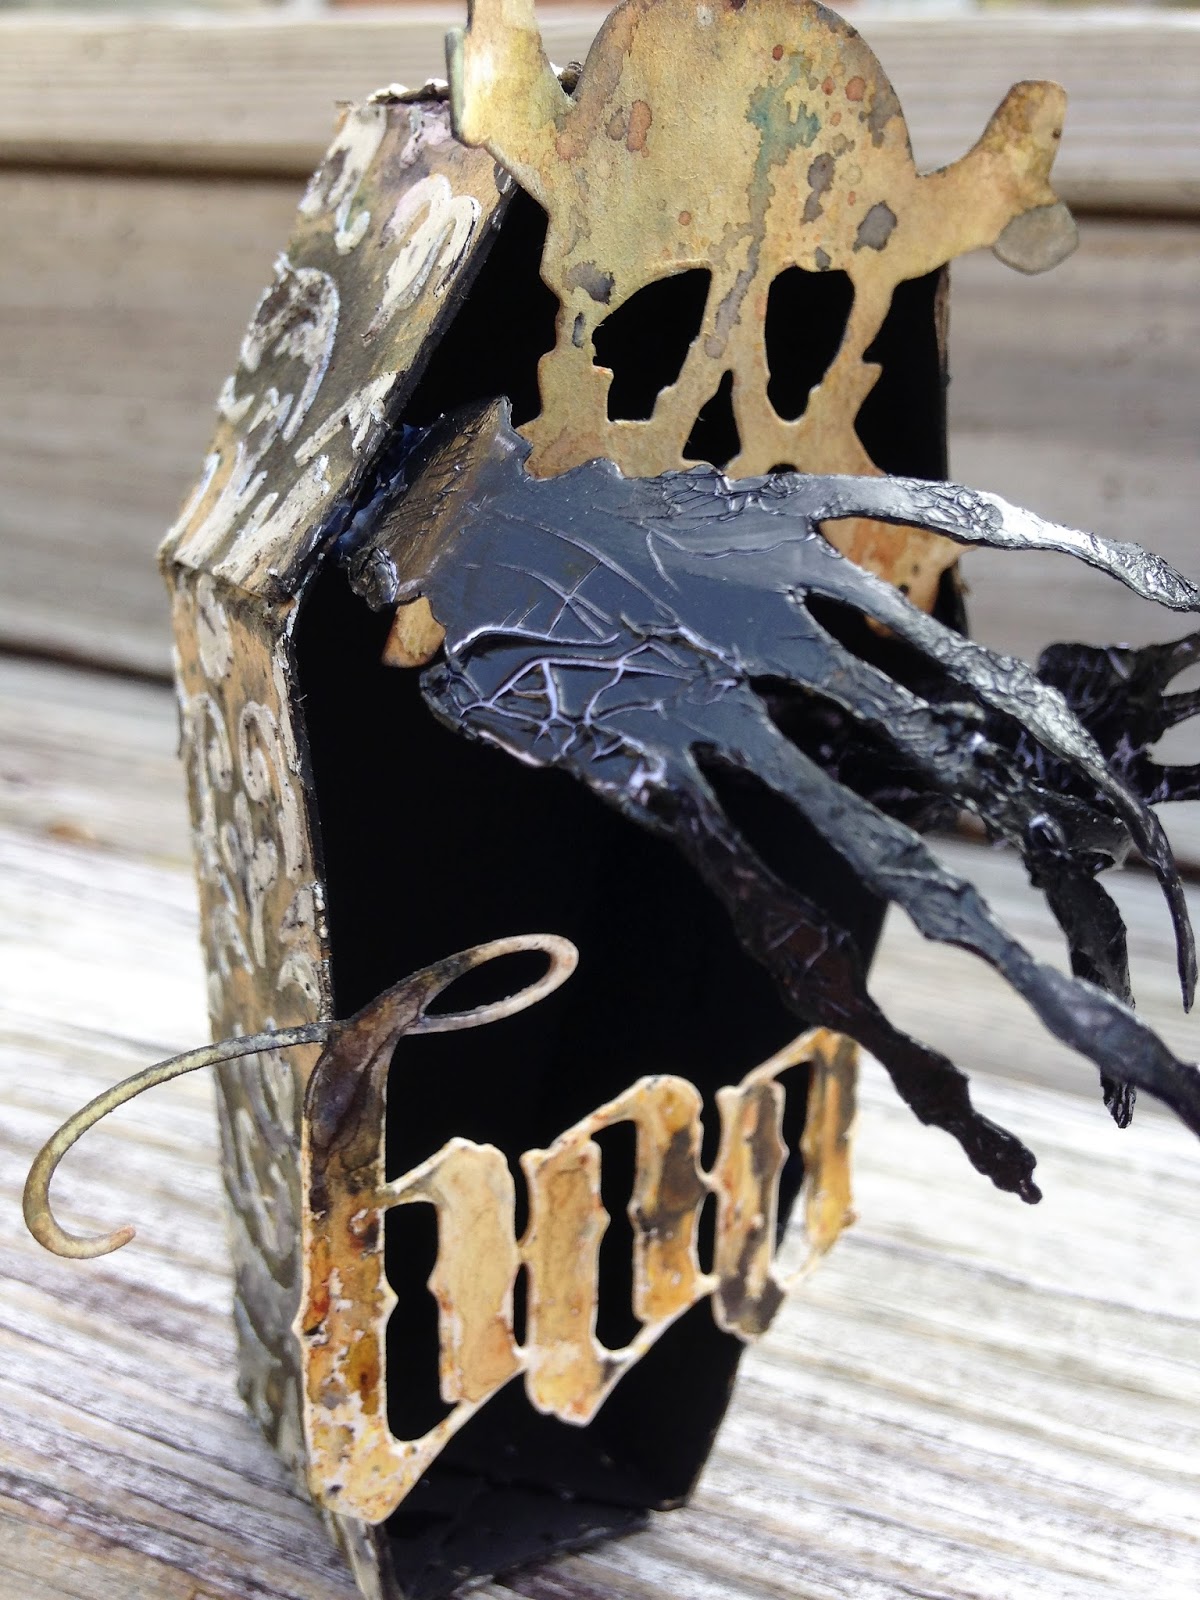
To start, I painted the spine and edges with black gesso and prepared my covers. Tim's Gothic Cling stamps spell out Good Treats. I used my Wendy Vecchi stamps to make the embossed pattern over my stamped title. I stamped two of Tim's sweet spiders in archival ink and doodled their eyes with a Recollections pen. I'll have a step by step tutorial on this metallic technique at Frilly and Funkie on October 21. I hope you'll stop by to check it out.
'Wicked' is cut twice; once out of black card and the second-- metallic kraft stock, using one of my favorite new Halloween Tim Holtz dies. I used Distress crayons to add the color. The bat is one of Linda's sweet silvertone bat charm pendants (love these!) colored with Black Soot paint and Seedless Preserves Distress Crayon. I cut off the bail so he could fly un-tethered. Adhering metal is no problem with Ranger Multi Medium Matte. I'm so happy Linda carries this super strong adhesive in her shop.
If you have a look around back, you'll see I left my embossed cover unadorned, since this will be sitting on a table.
Here's a closer look at that texture and mercury glass look.
I carried my stamping to the inside covers. I used a couple of old favorite stamping techniques-masking and a form of ghosting to make my matching inner covers (otherwise known as 'pastedowns').
My steps are documented in the photos below and followed by a brief written step by step. I used Tim's Heavy Stock on the front panel. While the back inside panel was created using identical steps, I wanted to compare the Heavy Stock to some 110# card I picked up at a yard sale. I have to say it was much easier to blend the Distress inks on the Heavy Stock, but the inks seem much bolder on the 110# yard sale card. I think they both have their redeeming qualities, and I will definitely be purchasing more of the Heavy Stock.
1. Stamp image in Jet Black Archival ink. Dry.
2. Blend Chipped Sapphire Distress ink over hat, (Try to color in the lines) Antique Linen over skull, and Bundled Sage over shadowed area of skull.
3. Place mask over stamped image. (I cut mine out of regular card stock. You can see I've used it a lot.)
4. Blend Hickory Smoke and Wilted Violet Distress inks around image.
5. Leaving mask in place, spritz with water, slowly pull trigger on spritzer for droplets. Remove mask. Allow to sit for a moment and then heat dry. (Middle photo shows those great water droplets.)
6. Replace mask and ink up script stamp with embossing ink. Stamp over mask.
7. Remove mask and heat powder just until it turns clear. You can see spots where I got less than desirable results due to overheating. But I went with it for the old time worn effect.
8. When powder is fully cooled, blend entire panel with Black Soot and Wilted Violet Distress inks.
9. Place clean plain white paper over panel and iron quickly with a HOT iron. You can see the used paper in the last photo.
10. Sit back and enjoy you handy work.
Before adhering the inner panels, I glued down some seam binding I colored with Distress Oxides. I attached a Halloween typed token with a loop pin. The token is colored with Distress paint and crayon.
I hope you're inspired to dust off those stamps and put them to use in our current 'Show Us Your Stamps' challenge. But first, do visit the
blog to see all the amazing projects both my Frilly and Funkie teammates have created just for you!
Then it's over to YOU! Create a vintage or shabby chic project following the challenge guidelines and link up at
Frilly and Funkie before midnight on Tuesday, October 10th.
The Frilly and Funkie team will choose our top four picks with the winner being invited to join us in a Guest DT spot at Frilly and Funkie. The next three will receive badges to display on their blogs. Everyone who enters and follows the rules will be entered into the draw to have the chance to win a $25 spending spree at
The Funkie Junkie Boutique.
I can’t wait to see what you make!
Thank you for stopping by today and for all your lovely comments! I really appreciate them!
Hugs and Blessings!