Thursday, March 10, 2016

A Vintage Journey Guest Designer-- Rusted Porcelain

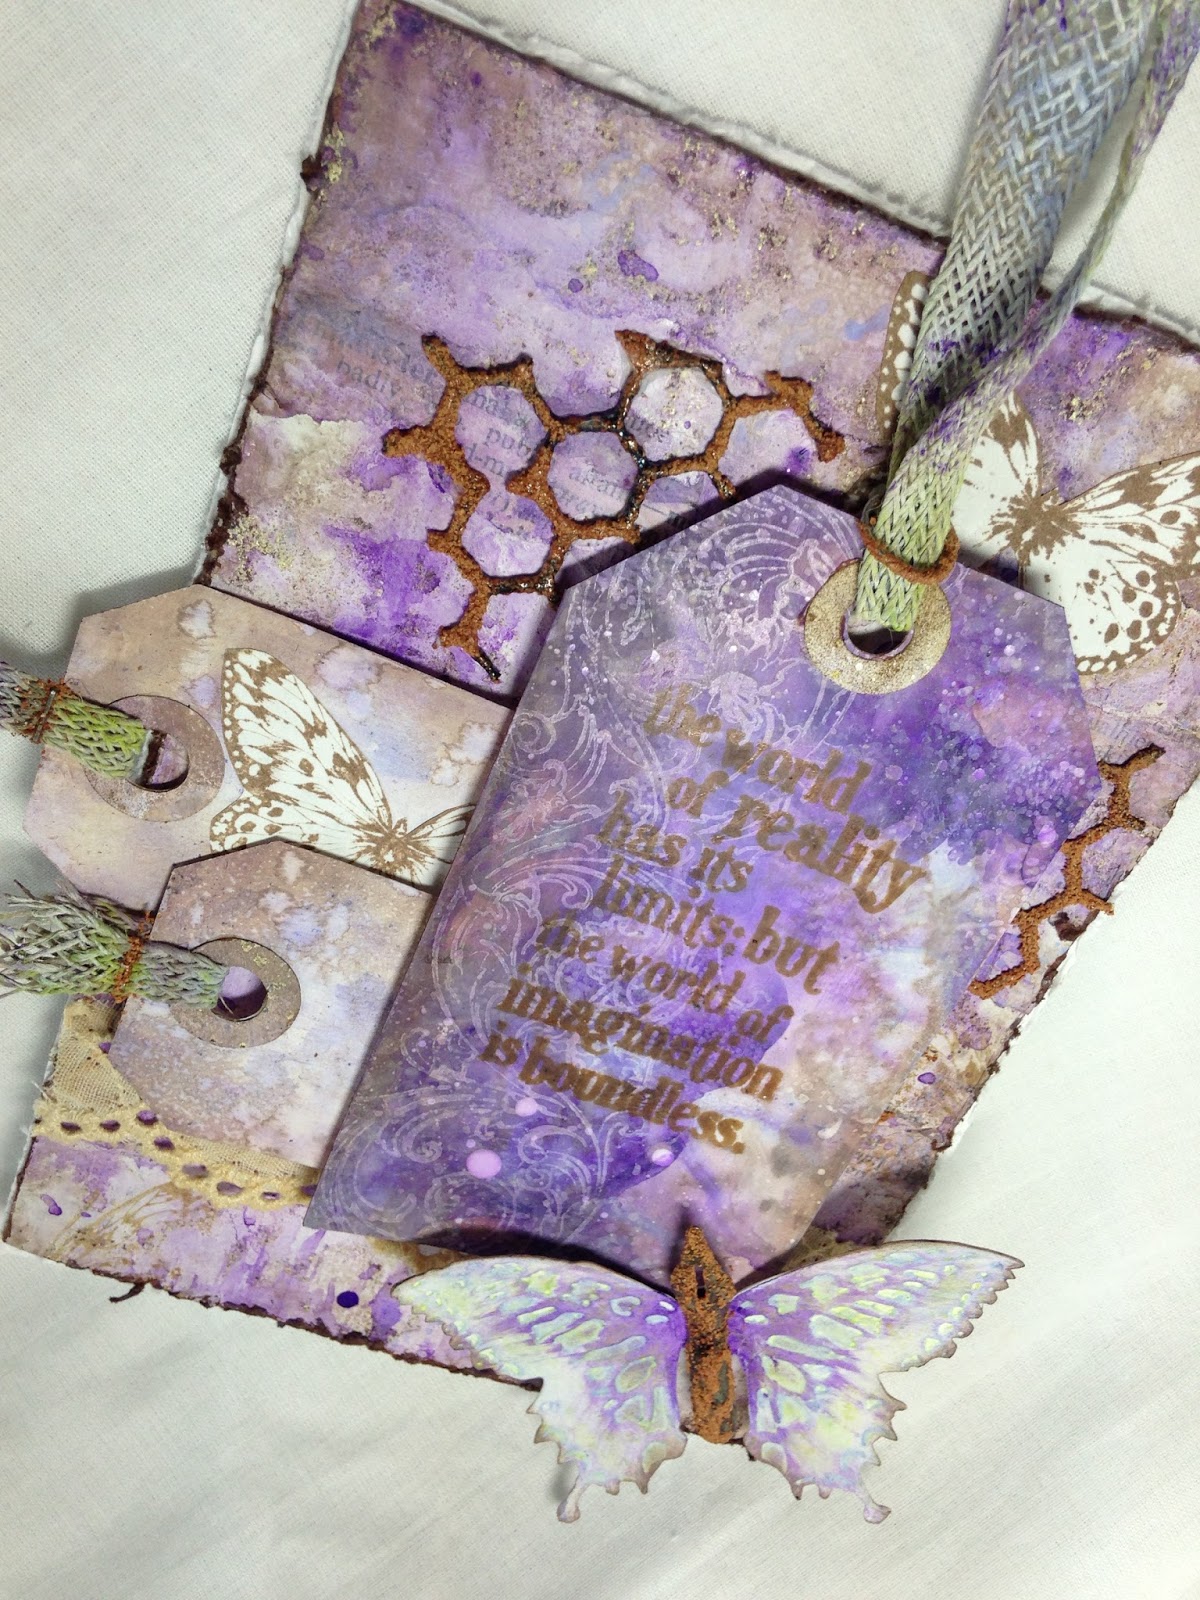
Hello, friends!  Today I am honored to be invited back as Guest Designer at A Vintage Journey. The theme this month is to use the contents of the Creative Guide's Travel Bag which consists of a Substrate-board, a Main Color-lilac or pale purple,  a Technique-rust effects, and a Product-metal. I decided to make a tag using some rust techniques I was working on. I was hoping to get a look of rusted porcelain, and pretty happy with my outcome.


I started by using my Tim Holtz Tag and Bookplate die to cut the cardboard from a steno pad backing.  I added some torn vintage book pagees and gesso and colored it using Shaded Lilac, Wilted Violet and Rusty Hinge Distress paints.  I added Glass Bead Gel and DecoArt Crackle Glaze and allowed to dry over night.I applied DecoArt Raw Umber Antiquing Cream to the crackled area and wiped off with a paper towel to allow the cracks to show.

To get the rusted look, I dabbed on Rusty Hinge and added a little Walnut Stain Distress paint, then dried. After that, a dab of DecoArt Media Quinacridone Gold paint and DecoArt Americana Cadmium Orange, followed by Ginger alcohol ink. It was too glossy, so I painted on DecoArt Dura Clear Ultra Matte Varnish.  Once this dried, I patted on a little more Walnut Stain paint. I added some stamping using Tim Holtz Attic Treasures in Potting Soil Archival ink. It was a too dark, so I patted on Picket Fence Distress stain with a cosmetic sponge to lighten the stamping a bit. I blended on Ground Expresso Distress ink, spritz and flicked, and dried.  I painted over the crackle with Ultra Matte varnish to take back the gloss.


The silver metal flower from my stash was given the same rust treatment.  I layered up two of the butterflies from Tim Holtz' Butterfly Duo.  I added Rusty Hinge Distress paint and spritzed with water before embossing with the enclosed embossing folder, then proceeded with the same rusting technique as used on the tag and flower. The rusty nail is authentic and from my stash--isn't it grungy???


The rusty chicken wire is left over from a previous project and is made using Tim Holtz Mixed Media Thinlits and "rusted" with a homemade concoction of powders and embossing puffs.


To balance out all those hard surfaces, I added a little hand dyed vintage trim and seam binding.  I used Distress sprays in Wilted Violet and Ground Expresso to color them.


Here's what my finished tag looked like, but I felt like it needed a little something, so I added "rusted steel" backing. I thought it balanced that tiny piece of "chicken wire".  It's actually some cardboard packing material I found in the trash. To make the crusty rust, I swiped on Soft Gel Medium and sprinkled it with a mix of cinnamon and instant coffee.


I would like to enter my tag into the following inspiring challenges:
-Mixed Media Place Creative Gym # 17 Coffee
SanDee and Amelie's Steampunk Challenge March 2016 Anything Goes Steampunk/Industrial
Our Creative Corner The Return of the Challenge Oct. 2014 Go Rustic!
Word Art Wednesday Challenge # 221 Anything Goes
Die Cut Divas Something Spring I used a Tim Holtz Butterfly Duo die.
Simon Says Stamp Monday Challenge Make Your Own Background
Time Out Challenge # 51/ 2nd Birthday Easter and/or Spring I'm thinking butterfly against a spring sky.
Country View Challenges March Industrial
Creative Artiste Challenge 12 Anything Goes
Card and Scrap Challenge # 113 Shabby Chic/Vintage
-Altered Eclectics March Altered cardboard from steno pad, waste packaging and packing material, trim and metal piece from my stash.
Through The Craft Room Door Challenge March 8-14, 2016
Scrapy Land Challenge #37 Anything Goes I used 3 different Sizzix dies.
Craft Stamper Make It Take It Challenge March Anything Goes I used Tim Holtz Attic Treasures stamps on my background.

Thank you for stopping by today and for all your wonderful comments!  I read and appreciate each and every one of them!
Hugs and Blessings!
Sara Emily

Guest Designer for Frilly and Funkie--Three of a Kind

Hello, my crafty friends!  I'm so happy you are here today, because that means I was able to post this  on time!  I've had a few-- er--computer issues lately.  How can 3 computer hard drives go bad in 3 days??? Like Rodney Dangerfield would say, "If I didn't have bad luck, I wouldn't have no luck at all"!, which is just bad English!

I'm doubly happy because the lovely and talented girls over at Frilly and Funkie have invited me back to be Guest Designer with them today!  Here is my card for  Sue's  theme "Let's Make It a Trio!".  I hope you will be inspired to join in this fun challenge!


I started by making two base layers by blending Distress inks on my papers--Worn Lipstick for the bottom layer and Peeled Paint and Mowed Lawn for the green layer and flicking them with water to get those lovely watery spots.  I added some Frantage in pink to the green layer, and of course, heated from the bottom so I didn't blow all that gorgeous powder all over the Closet.


The background is paper from Basic Grey. I second generation stamped a bird image from 7 Gypsies Conservatory set in Potting Soil Archival on tissue and adhered it to the background, distressed and inked the edges with Ground Expresso Distress ink.

The image within the frame is cut from 7 Gypsies paper,and again I stamped second generation bird images on tissue and adhered.  I blended on Worn Lipstick ink to unify the paper with the background paper.


The frame itself is Tim Holtz Ornate Frame die cut from cardboard covered with vintage book page. I added crackle paste randomly and sprinkled with pink Frantage, which I heat embossed when the paste dried. I edged the frame in Ground Expresso Distress ink. The little Avian tag is cut from the 7 Gypsies paper.

I cut an additional frame from white card inked with Peeled Paint and Ground Expresso inks and cut it in half.  I  tucked it underneath the focal frame, offsetting it just a bit.  I also tucked in some tree branches (Impression Obsession) as well as Tim Holtz Mixed Media Thinlits colored with Peeled Paint ink.

The three chipboard birdcages are from my stash--I think they are Paper Studio.  I painted one with gesso, DecoArt Titanium White acrylic paint, and edged in Ground Expresso Distress ink, and the two others are covered with Prima Art Sugar in Antique Silver and the little birds and highlights painted in Titanium White.


The two larger flowers and the bud are from my stash.  I edged the petals with Ranger Multi Matte medium and iridescent glittter.  The small flower is made with a punch, colored with Peeled Paint Distress marker and a water brush. Before adding the center, I added some iridescent glitter. The flower center is a half pearl embossed with embossing powder over texture paste.


I would like to thank the Design Team at Frilly and Funkie for inviting me to create with them today. It was a blast!


I would like to enter my card into the following inspiring challenges:
-Scrapy Land Challenge # 37 Anything Goes I used Sizzix and Impression Obsession dies.
-Our Creative Corner Return of the Challenge Sept. '13 Forgotten Things--I've forgotten about my decorated papers--I found a box full of them at the bottom of my bookshelf! Yippee! Good Stuff! Believe it or not, I also forgot about my birdcage chippies!

Thank you for stopping by today and for leaving your amazing comments!  They are inspiring and uplifting; I read and appreciate each and every one of them!
Hugs and Blessings!
Sara Emily


Tuesday, March 8, 2016

I'm Honored!


Hello, crafty friends!  I'm excited to share the news with you!  My husband's grungy Valentine's Day card is featured on Marjie Kemper's Tuesday's Tutorials today! Yippee!

mixed media canvas by Sara Emily Barker via Marjie Kemper's Weekly Tuesday's Tutorials Blog Series, Week 37


Tuesday's Tutorials Weekly Mixed Media Blog Series (Marjie Kemper)


Please visit Marjie's Tuesday' Tutorials Facebook Group to see a wide variety of artsy tutorials.

A huge thank you to Marjie for the lovely post and shout out and for all her hard work in bringing us together to share our artwork and ideas.  Big Hugs, Marjie!

I apologize for the late posting, but I've got limited computer use right now.  Thanks to my good friend Niki of Pawsitively Creative  for keeping me in the loop! Big hugs to you, Punkin'!

Thank you for stopping by today and for any of your wonderful comments!  I'll be back at some point to read each and everyone of them!  Please know I will be visiting with you soon!  My commenting capabilities are quite limited right now.
Hugs and Blessings!
Sara Emily


Saturday, March 5, 2016

Anything But Cute-Challenge # 11-Crazy For Colour

Hello!  It's time for our new challenge at Anything But Cute, and this time it's our lovely talented Branka who is our hostess.  She chose Crazy For Color as her theme this month. I was completely out of my comfort zone using bright colors, but admit I had a blast putting together this  tiny colorful canvas.


Spring is coming-a time of year that brings amazingly beautiful colors! To celebrate it, we would like you to create a mixed media project using vibrant colors! It can be a tag, a card, an art journal page or anything else! Just be sure it's vibrant!


I started by applying  gesso to my canvas and spritzed with Dylusions spray in Bubblegum Pink  and water to blend. When dry, I used Ranger transparent matte texture paste and Tim Holtz Dot Fade stencil and let that dry.  Once dry, I blended on Lumin Arte Silks Acrylic Glaze in Boysenberry. Since there is mica and other minerals within the glaze, it glows with a beautiful sheen, of course, unable to be picked up by the camera. Because they are a glaze, they are somewhat translucent. You can layer up these colors once dry and get beautiful effects. I'll be pulling these out more in the future!


To create the butterflies I started with waste packaging,  and for the purple one, added Dyslusions sprays in Fresh Lime, Cut Grass, Vibrant Turquoise, and London Blue. I allowed this to fully dry, and then added the transparent paste through a TCW Ledger stencil and also Distress paint in Picket Fence. Once the paste dried, I randomly swiped on the Silks glazes in Boysenberry and Key Lime and wiped off the texture paste with a damp towel to reveal the underlying color. So shimmery in real life!


I proceeded somewhat in the same way with the greenish-blue butterfly except I used just the green sprays and added an additional Silks glaze in Teal Zircon. I die cut and embossed them using  Tim Holtz' Butterfly Duo set. I embossed a few bright yellow and pink dots using fluorescent embossing powder I picked up at a yard sale--sorry, no brand on them.  The butterflies are fluttering in toward the central heart on Spellbinders arrows which I also embossed (triple) using the fluorescent powder. The colorful butterflies are popped up with foam squares, after I carefully shaped their wings.


To finish off the canvas, I simply added a few bits of bling from my stash and Chit Chat stickers edged in Black Soot Distress ink.


What fun it was to just play with color!  I hope this inspires you to get out your bright crafty supplies and enter our Crazy For Colour (color if you're from my neck of the woods) challenge! You have an entire month to enter!

I would like to enter my fun little canvas into the following inspiring challenges:


Saturday, February 27, 2016

Rusted Reality

Hello, friends!  I have a card to share with you today. I was playing around with my embossing powders and paints and just generally trying this and that. Even though Valentine's Day has come and gone, I couldn't resist using those romantic colors once again.


I started with a cardboard base--the backing of a discarded steno pad.  Did anyone else take stenography in school? I guess I'm dating myself by asking that, but I still use these paper notebooks to write everything down.  I have one for every aspect of my life; I guess they would be an un-glorified diary. I digress...

I found a sheet of brown cardstock which I had embossed with a Recollections damask stamp and Antique Linen Distress powder. It didn't emboss well, but I thought I might have a use for it some day. Today was that day.  I tore it into strips which I layered on the board. I gave it a coat of gesso using a credit card and then scraped over it with the card before it completely dried. This gives a nice worn texture, and the gritty embossed areas show through. Next I layered with some strips of vintage book pages randomly and gave them a wash of watery gesso.


I dabbed some distress paints in Shaded Lilac and Wilted Violet and teensy bit of Chipped Sapphire in different areas of my craft mat, spritzed with water, and dragged my card through the puddles, spritzing with water to allow it to drip and blend, then drying and repeating until I came up with what appealed to me.  I love it when the paint is reduced to just dots of color.  I turned my card face down into those drops to get these lovely droplets on the background.  When completely dried, I distressed the edges and blended with Ground Expresso. Finally I stamped randomly with a Kaisercraft butterfly in Potting Soil Archival ink.


The larger tag is hand cut and covered first with gesso and dragged through puddles of Distress paints, spritzed to blend and dried.  I repeated until I was happy with the outcome. I stamped with a Tim Holtz flourish in Picket Fence Distress paint. I dried, blended with Ground Expresso ink, and spritz and flicked . Lastly, I splattered with diluted Picket Fence paint. The quote is Tim Holtz stamped in Potting Soil Archival ink.


The two smaller tags are Tim Holtz tiny Tags and Tabs, cut from more paper I colored with Distress inks and paints.  Again I stamped two Kaisercraft butterflies on a separate piece of paper and fussy cut. I adhered one on the tag, and another to peek out from bhind the large tag. The eyelet trim is a gift from my talented and super hilarious friend Niki of Pawsatively Creative Crafts.  Be sure to pop by her blog and see what amazing creative things she has put together--you will be so happy you did and leave with a great big grin on your face!  I stained the trim with some sort of spice tea, and I have to say my Closet smelled wonderful while it was drying.


The rusted chicken wire is Tim Holtz Mixed Media Thinlit embossed with my own mix of  powders and Embossing Puffs. I used the same rusting technique on the jump ring and staples which fasten my hand colored (Distress piant in Twisted Citron, Shaded Lilac, Picket Fence, and Wilted Violet) Linen Ribbon trim on the tags, as well as on the Ideaology pen nib. The pen nib was colored first with Mushroom and Pitch Black alcohol inks.


The die cut butterfly is Tim Holtz Butterfly Duo. Before embossing with the enclosed folder, I dabbed the folder with Twisted Citron Distress paint and spritzed with water. Once embossed, I dabbed the raised areas with Shaded Lilac paint and wiped while it was still wet.  With Wilted Violet paint on a damp baby wipe, I applied it to the body and wiped it out toward the wings. Finally, I edged with Ground Expresso ink.


I hope you enjoy my card as much as I did creating it!  I would like to enter it into the following inspiring challenges:
-Mixed Media Place Creative Gym # 17 Coffee I used tea to die the trim, and perhaps a little Ground Expresso counts too! :)
-Vintage Stamping Challenges # 41 Splatters and Drips See bold text for splatters and drips. My stamps include those by Tim Holtz and Kaisercraft.
Mixed Media World MMW # 11 Love is in the Air I was inspired by Georgie's make--although there's no mention of love in either project, we both used colors associated with romance and love. And I do love butterflies and rust!

Thank you for stopping by today, and for all your amazing comments!  I read and appreciate each one of them!
Hugs and Blessings!
Sara Emily

Tuesday, February 23, 2016

Spring...

Hello again, crafty friends!  I hope you are doing well and that you might be seeing some signs of spring where you are!  We are seeing daffodils blooming, purple blossoms on the magnolia trees, greening grass and bluebirds! Sure signs that spring is right around the corner!  These things inspired me to make a little spring card full of blue skies, blooms and butterflies!


My blue sky background is colored with Dylusions sprays in Vibrant Turquoise, London Blue, and White Linen and water color paper. I topped that with a French Lattice die from Cherry Lynn, some handmade flowers and little fluttering butterflies.

The two delicate white  handmade blossoms are a gift from my sweet, generous, and hugely talented friend Samra of Paper Talk with Samra!  Aren't they lovely? Thank you, Samra--I really love playing with my stash of Samra blooms!  Please be sure to pay Samra a visit at her lovely blog soon for a real treat!  She works magic with Shabby Chic and is a real inspiration to me!  The two larger roses (well, they are supposed to be roses!) are made using Tim Holtz Tattered Florals and given just a hint of color with Distress ink in Tumbled Glass. The whimsical flower spray is Memory Box Chloe Stem with some added bling. The leaves are cut from Tattered Lace Ornate Leaves and colored with Perfect Pearls Spray Mist in Sour Apple. This adds just a hint of shimmer in real life.


My butterflies were cut from hand colored paper and Tim Holtz Butterfly Flight die.  A real bugger to cut, because my paper was really too thick with all the medium applied.  I started with watercolor paper, sprayed with Dylusions Bubblegum Pink, textured with a Tim Holtz Dot Fade stencil and texture paste, and colored again with Lumin Arte Silks Acrylic Glaze in Boysenberry. Because there is mica in the paint, these little flutters really catch the light in real life.

I added a stamped sentiment from Stampin' Up, inked in Watering Can Archival, and blended with Tumbled Glass.  It is framed with Spellbinders Twisted Metal Tags and Accents, which I edged with Tumbled Glass and added some bling. My crinkly bow is made from my vintage seam binding colored with Silks Glaze in Jasmine.


I would like to enter my card into the following inspiring challenges:
Scrapy Land Challenge # 36 Tie One On (include a bow-die cut or ribbon) I used the following brands of dies:  Cherry Lynn, Tattered Lace, Sizzix, Memory Box, and Spellbinders.
Happy Little Stampers February Mixed Media Challenge Paint I used paint on my butterflies and bow. One stamp-sentiment.
Simon Says Stamp Wednesday Challenge Shake It Up! I shook up my Dylusions sprays to get my blue sky and snappy butterflies and Perfect Pearls to get some shimmer!
Simon Says Stamp Monday Challenge Inspired By a Song I was humming 'What a Wonderful World' by Louis Armstrong the entire time I was making this card recalling these verses:  (I didn't see where we had to include the words on our project.)

"I see trees of green, red roses too
I see them bloom for me and you
And I think to myself
What a wonderful world
I see skies of blue and clouds of white
The bright blessed day and the dark sacred night
And I think to myself
What a wonderful world"

Thank you for stopping in today, and for all your lovely comments! I read and truly appreciate each and every one of them!
Hugs and Blessings!
Sara Emily