Wednesday, February 5, 2020

Love Is All Around Us With Tim Holtz Geo Frames


Welcome friends! It's time for a new challenge at The Funkie Junkie Boutique blog. Super talented Jenny is our hostess, and she calls her challenge Love Is All Around Us. Here's how she describes her theme:

 With Valentines Day approaching it's time to share a little love. Create something vintage or shabby chic featuring hearts. Here's a few ideas to get you started;


As always, the winner will earn a chance to be a Guest Designer at a future date at The Funkie Junkie Boutique blog, and everyone who enters and follows the rules will go into the draw for the chance to win a $25 spending spree at The Funkie Junkie Boutique. There are also Top 3 Badges for three additional outstanding entries, chosen by the Design Team. Please see the blog for details.

 Instantly, I was drawn to the lacy bow on the package and the roses from Jenny's beautiful mood board. To get started on my non-traditional Valentine's Day card, I found this wonderful rose themed paper in Tim Holtz Halloween Worn Wallpaper collection. I think it works equally well for Valentine's Day, don't you? I used my sewing machine to stitch it to white card and then mounted on Classic Kraft Stock which I sanded and blended with Vintage Photo Distress ink. This is glued to a white card blank. Finally, I splattered with Picket Fence paint and set it aside to dry.

I cut a Crochet 2 Thinlit from a scrap of card that mopped up Hickory Smoke Oxide some time ago. These dies have no blades on the ends, so you can cut a continuous die cut from any length of paper you might have. I cut this one a little longer, because initially I was going to run it vertically. I just trimmed the ends with my scissors to make it fit horizontally.


I die cut a variety of flowers and greenery from Funky Florals Large (and #2, #3 sets) from papers I had colored with Distress Oxide Sprays. I used Fired Brick (blended with Vintage Photo ink) for the flower centers, Iced Spruce for the twigs and flowers and Peeled Paint and Shabby Shutters combined with Kraft stock for the greenery.

The white paper hearts and silver toned heart charm came from the sweet thank you baggie of goodies Linda includes with every purchase from her shop. I blended the hearts with Antique Linen ink and painted the charm with Distress paints -- Picket Fence and Antique Bronze.


The little red dots on the background and on the flower center are actually waste from one of the Large Funky Florals, and I couldn't resist using them.


I  cut a Geo Frame heart from Rose Gold Metallic Kraft Stock 2 and patted it with a little Picket Fence paint. I backed it with vellum and splattered it with watery Picket Fence paint. I stamped and embossed a scrap of vellum with the Love stamp from my stash to see how it would look on the heart, but ended up cutting it out and adhering it to the background.  Sometimes I just don't trust myself to emboss directly on my background. LOL


I hope you've picked up some ideas to use on your Love themed makes. There's a whole bunch more hand crafted Love over at The Funkie Junkie Boutique blog, prepared by my talented teammates, so hop on over! And then, I hope you'll link up your own vintage or shabby chic project to be in for a chance to win one of the awesome prizes! I can't wait to see what you will create! Happy crafting! Sara Emily

Challenge shares:

These products were used on my project and can be purchased at The Funkie Junkie Boutique:
Sizzix Chapter 1 Tim Holtz Thinlits Dies - Geo Frames
Sizzix Chapter 1 Tim Holtz Thinlits Dies - Crochet #2
Tim Holtz Sizzix Thinlits Die Set 6PK - Funky Floral Large
Tim Holtz Idea-ology Metallic 2 Kraft Stock
Tim Holtz Idea-ology 8 x 8 Classic Kraft Stock
Tim Holtz Idea-ology Worn Wallpaper, Halloween
Distress Oxide Spray: Fired Brick, Iced Spruce, Peeled Paint, Shabby Shutters
Ranger Tim Holtz Distress Oxide Pad - Hickory Smoke
Distress Paint: Picket Fence, Antique Bronze
Distress Ink: Vintage Photo, Antique Linen
Distress Collage Medium Matte
Heart charm
Versamark
White embossing powder

Saturday, January 25, 2020

Tim Holtz Bouquet -- A Mixed Media Tutorial for The Funkie Junkie Boutique Blog


Hello friends! I'm sharing some cards I've made using Tim Holtz Bouquet Thinlits bie by Sizzix and a  step by step tutorial on how I made my Candy Box  featuring the Bouquet die at The Funkie Junkie Boutique Blog today.


 Won't you join me to see how versatile this die is? Enjoy your weekend and happy crafting! Hugs! Sara Emily

I'm sharing my cards with these challenges:

Simon Says Stamp Wednesday Besotted With Our Pets Yellow card was made for my daughter, celebrating her bunny, Nugget.
Country View Challenges January 2020 - Love Butterfly card only, although I do love Nugget.
Die Cut Divas New Things I used my new Bouquet and Bunny Hop dies.

Thursday, January 23, 2020

Winter Cards - A Tutorial with Tim Holtz Ice Flake


Hello! I can't seem to shake the snowflakes! Perhaps it's the balmy 80 degree January we've been having here in the south. (Editor's note: It's now officially winter here with highs in the 30's!) I welcome you to join me at A Vintage Journey where I am sharing a tutorial on this pair of simple any occasion cards. I hope to see you there! Hugs! Sara Emily

Challenge shares:

Wednesday, January 22, 2020

Repeat Performance at The Funkie Junkie Boutique Blog

Sara Emily Barker https://sarascloset1.blogspot.com/2020/01/repeat-performance-at-funkie-junkie.html Candy Box Tim Holtz Sizzix Bouquet Curio Box 1

Hello and welcome. It's the start of a new challenge theme over at the The Funkie Junkie Boutique Blog. It's my turn to host, and I've named my challenge 'Repeat Performance'.

 A popular New Year's resolution is to save money. I challenge you to save money (and the environment) by using at least one thing you would normally throw out on your vintage or shabby chic project. Please be sure to let us know what that one (or more) item is.

As always, the winner will earn a chance to be a Guest Designer at a future date at The Funkie Junkie Boutique blog, and everyone who enters and follows the rules will go into the draw for the chance to win a $25 spending spree at The Funkie Junkie Boutique. There are also Top 3 Badges for three additional outstanding entries, chosen by the Design Team. Please see the blog for details.

Honestly, this was an easy challenge for me, as I'm always saving everyday trash to use on my projects, from computer parts to bread crumb containers, and pretty much everything in between. But I challenged myself to use something directly from our trash cans for this project.

For my DT project, I chose to make a candy box using Tim Holtz newly released Curio Box Bigz/Thinlits  die set and his gorgeous Bouquet Thinlits die--just in time for Valentine's Day gift giving.  If I were giving it to me, here's what it would look like filled with my favorite candy.

Sara Emily Barker https://sarascloset1.blogspot.com/2020/01/repeat-performance-at-funkie-junkie.html Candy Box Tim Holtz Sizzix Bouquet Curio Box 2

Pictured below are my 'trash' items: one is the plastic wrap from the extended cutting plates my daughter just gave me for my birthday, and the other are some fairly inflexible plastic ties from who knows what. I spotted them in our kitchen trash this morning and gave them a good washing before I decided what to do with them. I used one of the Thinlits dies that comes with the Curio Box to cut a 'window' from the plastic wrapping for my box. The ties were both twisted up like the one on the right. I used my heat tool to warm them just until they started moving, and then held them taut until they cooled to make them straight (like the one pictured on the left).


 I was able to incorporate both the plastic wrap and plastic ties to create and decorate a 'window' in the box top.

Sara Emily Barker https://sarascloset1.blogspot.com/2020/01/repeat-performance-at-funkie-junkie.html Candy Box Tim Holtz Sizzix Bouquet Curio Box 3

 I'll be sharing a tutorial on how this all came together this coming Saturday on The Funkie Junkie Boutique Blog. For now, please enjoy some close ups of my candy box.

Sara Emily Barker https://sarascloset1.blogspot.com/2020/01/repeat-performance-at-funkie-junkie.html Candy Box Tim Holtz Sizzix Bouquet Curio Box 4

Sara Emily Barker https://sarascloset1.blogspot.com/2020/01/repeat-performance-at-funkie-junkie.html Candy Box Tim Holtz Sizzix Bouquet Curio Box 5

In the following photos, I'm lifting the lid up a little to show the box bottom. The lid actually covers the entire bottom box portion.

Sara Emily Barker https://sarascloset1.blogspot.com/2020/01/repeat-performance-at-funkie-junkie.html Candy Box Tim Holtz Sizzix Bouquet Curio Box 6

Sara Emily Barker https://sarascloset1.blogspot.com/2020/01/repeat-performance-at-funkie-junkie.html Candy Box Tim Holtz Sizzix Bouquet Curio Box 7

And here is a shot of the box bottom by itself, turned upside down.

Sara Emily Barker https://sarascloset1.blogspot.com/2020/01/repeat-performance-at-funkie-junkie.html Candy Box Bottom Tim Holtz Sizzix Bouquet Curio Box 8

If you want to know more about how all of this came together - how I constructed the box top and painted the bottom to look like copper, as well as how I made the simple embellishments, please join me over on The Funkie Junkie Boutique Blog this coming Saturday, January 25, 2019, to see my step by step Saturday Showcase tutorial. I'll also be sharing a few more ideas on how to use the versatile Bouquet Thinlits die in that post.

For now that's my take on my theme 'Repeat Performance' for the current The Funkie Junkie Boutique Blog challenge. My talented team mates have created the most amazing projects for this challenge so take some time to hop on over and see them out HERE. Remember to link up your own shabby chic or vintage projects using your throw-aways to be in for a chance of winning one of the fabulous prizes. Happy Crafting! Sara Emily

Challenge shares:

These products were used on my box and can be purchased at The Funkie Junkie Boutique:
Sizzix Chapter 1 Tim Holtz Thinlits Dies - Bouquet
Sizzix Chapter 1 Bigz XL Die w/Thinlits Die by Tim Holtz - Curio Box
Tim Holtz Metallic 2 Kraft Stock
Distress Paint - Black Soot
Alcohol Pearls - Celestial
Alcohol Ink - Mushroom
Dina Wakley Black Gesso
Prima Opal Magic Wax-Vintage Silk
Tim Holtz Mirrored Hearts
Tim Holtz Typed Tokens
Chrome Precision Base Plate for Thinlits
Sizzix Mini Tool Kit

Wednesday, January 8, 2020

Mixed Media Layered Card


Sara Emily Barker https://sarascloset1.blogspot.com/2020/01/mixed-media-layered-card.html #timholtz #mixedmedia #wreath&snowflake #lumberjack 1

Hello and welcome back after a nice long break! I hope you all are doing well, and having a crafty start to 2020! Today starts a new challenge at The Funkie Junkie Boutique blog hosted by Cec. She calls her theme 'Let's Play Tic Tac Toe!', and here is how she describes it:

Let's play a game of Tic Tac Toe for this first challenge of the year. Choose any vertical, horizontal or diagonal line from the graphic below and create a vintage or shabby chic project using all three items on your chosen line. In addition to using all three items you must include a copy of the graphic in your post and tell us which line you chose.


As always, the winner will earn a chance to be a Guest Designer at a future date at The Funkie Junkie Boutique blog, and everyone who enters and follows the rules will go into the draw for the chance to win a $25 spending spree at The Funkie Junkie Boutique. There are also Top 3 Badges for three additional outstanding entries, chosen by the Design Team. Please see the blog for details.

I'm sharing one of my thank you cards I've made and sent as a special message of gratitude for wonderful Christmas gifts I've received. I used the top horizontal line: Layers, Winter, Heat Embossing. Here are a few close up's of my card and a brief tutorial follows.

Sara Emily Barker https://sarascloset1.blogspot.com/2020/01/mixed-media-layered-card.html #timholtz #mixedmedia #wreath&snowflake #lumberjack 2

Sara Emily Barker https://sarascloset1.blogspot.com/2020/01/mixed-media-layered-card.html #timholtz #mixedmedia #wreath&snowflake #lumberjack 3

Sara Emily Barker https://sarascloset1.blogspot.com/2020/01/mixed-media-layered-card.html #timholtz #mixedmedia #wreath&snowflake #lumberjack 4

Here's how it came together. Please forgive me for leaving off a few photos, but I think you get the idea.

Click on any image to zoom in.
Sara Emily Barker https://sarascloset1.blogspot.com/2020/01/mixed-media-layered-card.html  Mixed Media Tutorial #timholtz 1

1. I found this winter themed designer paper in my stash, and blended the edges with Chipped Sapphire Distress ink to make it work with my other layers

Sara Emily Barker https://sarascloset1.blogspot.com/2020/01/mixed-media-layered-card.html  Mixed Media Tutorial #timholtz 2

2.  I heat embossed a water color paper panel with my new Wrought Iron Boho Blends powder by Gwen Lafleur using Tim Holtz Lumberjack plaid stamp. I ended up dipping this into watery puddles of blue inks/oxides left over from the next step and allowing it to dry on it's own. After this panel was completely dry, I splattered it and the previous snowflake patterned paper with Picket Fence Distress paint using my Splatter Brush.

Sara Emily Barker https://sarascloset1.blogspot.com/2020/01/mixed-media-layered-card.html  Mixed Media Tutorial #timholtz 3

3. I die cut some snowflakes using Tim Holtz Wreath and Snowflake Thinlits set. I colored a couple with Distress oxides (Faded Jeans, Chipped Sapphire), and one I heat embossed with the Wrought Iron powder. I layered up a few to give them dimension and rigidity. I ended up blending the embossed one with Chipped Sapphire ink, because it had some remaining white areas.

Sara Emily Barker https://sarascloset1.blogspot.com/2020/01/mixed-media-layered-card.html  Mixed Media Tutorial #timholtz 4

4. I cut one of the colored ones in half and layered it as above. Distress Collage Medium Matte is the best adhesive for making these finely cut layers, because you have a little bit of open time to get everything lined up, and it STICKS! I heat embossed the top layer with Versamark and Fractured Ice by Emerald Creek. I love how adds an icy look and allows the colors to show through.

Sara Emily Barker https://sarascloset1.blogspot.com/2020/01/mixed-media-layered-card.html  Mixed Media Tutorial #timholtz 5

5. (Not pictured.) I matted some of the layers with white card and dipped another panel in the blue inks to serve as a background to my central snowflake. I saved one of the snowflake centers and blended it lightly with Chipped Sapphire ink and then blended more of the ink through the snowflake stencil from Tim Holtz Mini Stencil set 45. I heat embossed a 'thank you' die cut as my sentiment.

Lastly I layered everything up using fun foam sheets to add dimension to my layers without adding too much bulk or weight. I'm really trying to focus on cards that can be sent inexpensively through the mail, since that is where most of my cards go.

Sara Emily Barker https://sarascloset1.blogspot.com/2020/01/mixed-media-layered-card.html #timholtz #mixedmedia #wreath&snowflake #lumberjack 5

Thanks for stopping by today. I hope you will visit The Funkie Junkie Boutique blog to see how my teammates found their way around the Tic Tac Toe board -- there's plenty of inspiration. And then I hope you'll play along with this fun challenge for a chance to be our special Guest Designer or to win a generous shopping spree to The Funkie Junkie Boutique. I can't wait to see what you will create! Happy crafting! Sara Emily

Challenge shares:
Simon Says Stamp Monday Challenge: Something New I used my new Wrought Iron Boho Blends powder. 
Simon Says Stamp Wednesday Challenge: Something New I used my new Wrought Iron Boho Blends powder.
Scrapy Land Challenge #129 Anything Goes I used a Sizzix and a Poppystamps die.
Bleeding Art December Challenge - Anything Goes
Dies R Us Challenge #136 - Anything Goes using any brand of metal die that DRU sells I used Sizzix and Poppystamps.
Die Cut Divas New Things I used new Wrought Iron Embossing powder.

These products were used and can be found at The Funkie Junkie Boutique:

Tim Holtz Cling Stamps - Lumberjack
Sizzix Chapter 3 Sizzix Thinlits Die Set - Wreath & Snowflake
Stampers Anonymous Tim Holtz Mini Layering Stencils - Set 45
Emerald Creek Gwen Lafleur Boho Blends Embossing Powder - Wrought Iron
Emerald Creek Allure Powders - Fractured Ice
Tim Holtz Distress Splatter Brush
VersaMark Watermark Ink Stamp Pad
Ranger Tim Holtz Distress Collage Medium Matte
Distress Ink Pads -- Black Soot, Chipped Sapphire
Distress Oxide Pads -- Faded Jeans Chipped Sapphire
Tim Holtz Ranger Distress Paint - Picket Fence

Sunday, December 29, 2019

Happy, Happy New Year!

 Wishing you all a safe and Happy New Year! 2020 just seems so exciting, I had to put it on a card. I wish you could see this in person--it's so sparkly, but my camera just wouldn't cooperate.
  I used the snow die from Tim Holtz Winter Wonderland Thinlits set for the background, and gold DecoFoil peeks through. I die cut 2020 from a foil envelope liner and also black card using Classic Lower Alphanumeric Thinlits. I adhered them together, offsetting the gold from the black numbers just a bit. I layered this panel over the foil liner heat embossed with Roman Gold Ancient Gold super sparkly embossing powder by Ranger. I found this in my stash. It must be very old, but I see you can still get it online. I used the same powder to emboss the New Years sentiment, a stamp gifted to me by my friend, Autumn of Sew Paper Paint. She happens to be guest designing at Simon Says Stamp this month. so I'll be playing along in their current Party Time challenge. (Yes, that's Roger's fur under my watermark.)
The Radiant stars reminded me of fireworks, so I cut them from Metallic Kraft Stock to finish off my simple, but sparkly New Year's card. I hope where ever you will be on New Year's Eve there will be a party in your heart. Wishing you many blessings in 2020! Sara Emily

Sharing with:

Thursday, December 19, 2019

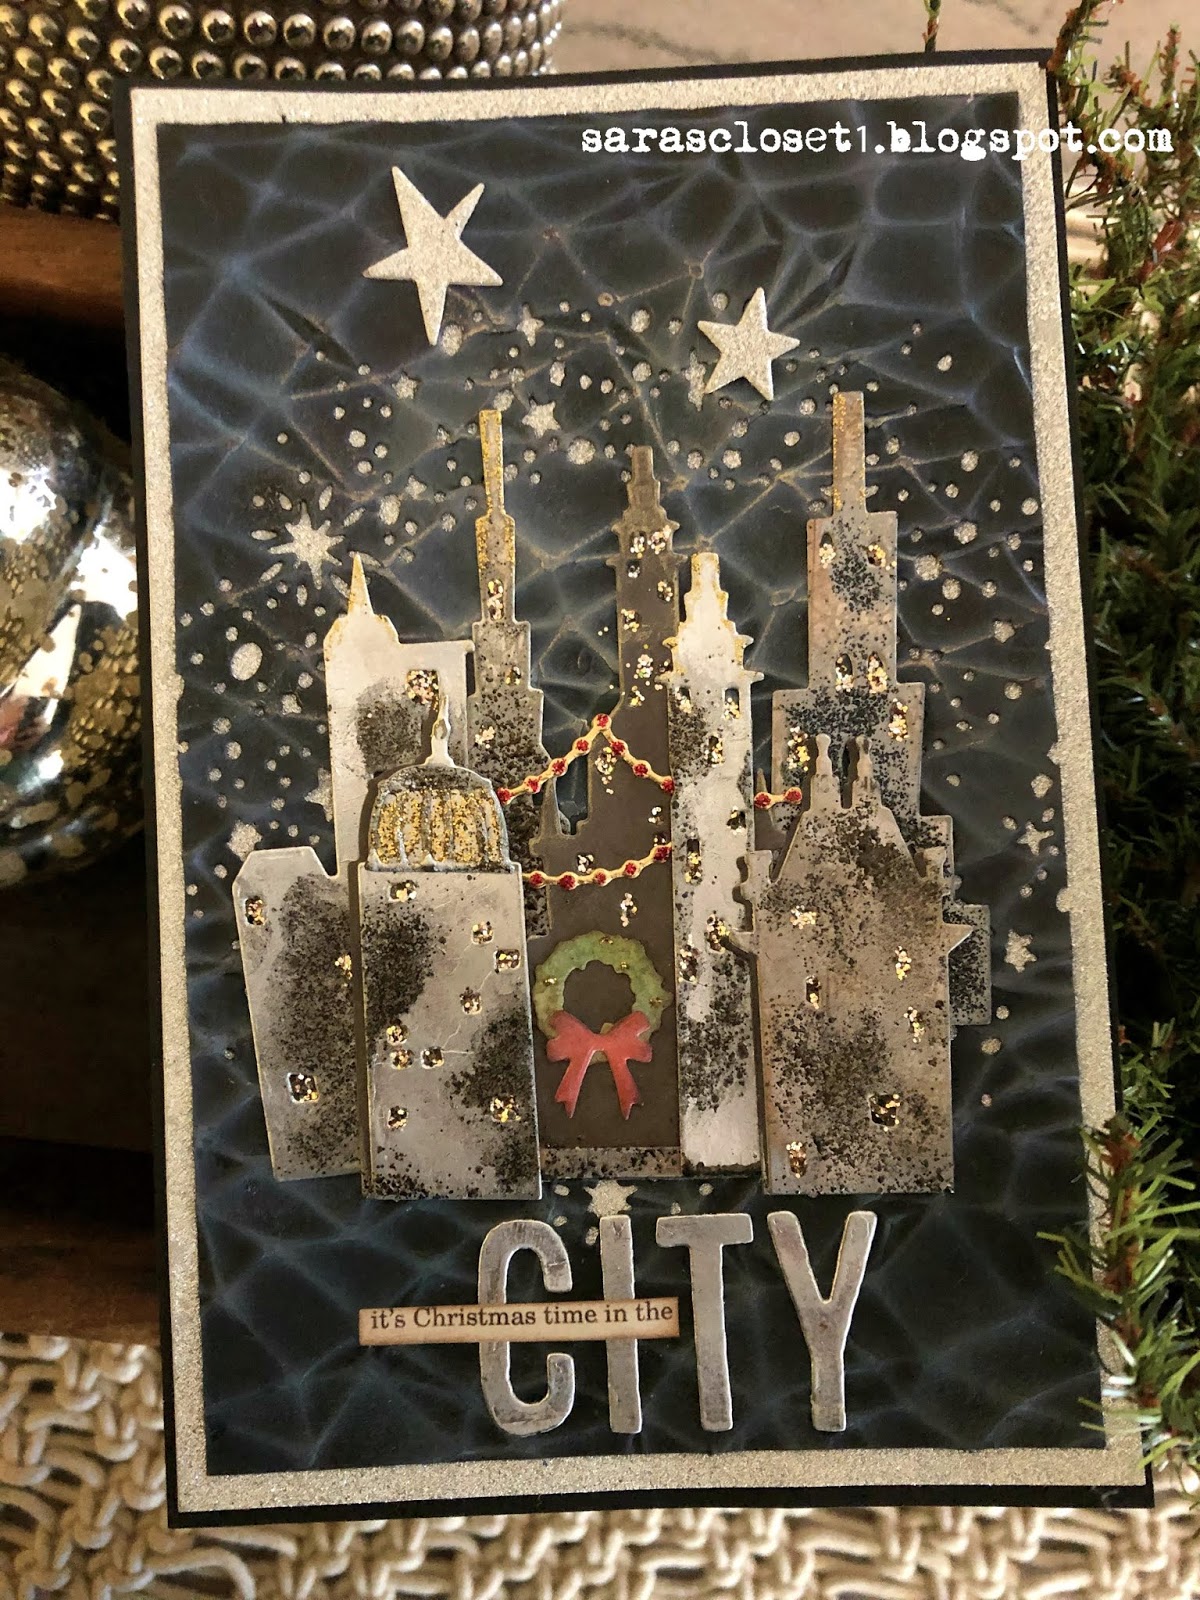
It's Christmas Time in the City!


Hello friends! Can you believe we are just a few days away from Christmas Day?! I wanted to play along in the current Cityscape challenge at Simon Says Stamp and completed my first Christmas card for 2020!


This really was quite a challenge for me, because I'm a country girl, but I was up for the dare. I pulled out a rarely used Tim Holtz Thinlits set by the name of Metropolis Cityscape (perfect!) and embossed some of the buildings with Prima Old Silver and Brushed Iron Metallique Wax and some new to me chunky Pam Bray powders for some city grunge. Some of the buildings were cut from scraps of old Tim Holtz Paper Stashes and some from scraps of Metallic Kraft Stock.


I layered my buildings over a snowy/starry sky (Tim's Snowy Stars Thinlits and Crackle 3D Texture Fade). Those Deco Sheets sure do make for a dazzling sky, don't they? You might see a little of that shimmer in the sky from more of the Metallique Wax, this time in White Gold. I just gently tapped my finger loaded with the wax on the ridges.


I die cut the wreath/bow with  the Village Christmastime set and colored with various Distress Oxides. The sparkly gold and red garland is from Festive Things. Stickles adds lots of city glam to the windows, spires and trimmings. I wish you could see this in real life!


I used a Christmas Clippings Sticker and Alphanumeric die cuts to spell out my greeting. and that's pretty much that! I seriously doubt I'll be posting anything else before Christmas, so I would like to wish everyone a very JOY-Full and Merry Christmas!

Challenge shares:
Simon Says Stamp Wednesday Challenge: Party Time Although there's no words on here that say party; if you're in the city, you're bound to be having a party!
Here's what a rainy Halloween night in the city looks like: