Tuesday, June 27, 2023

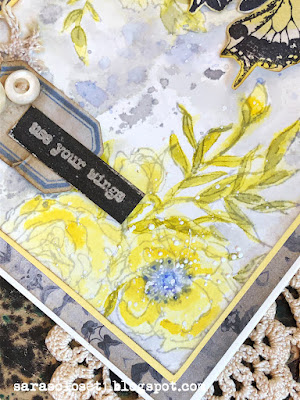
Use Your Wings


Hello, again! I continue to watch my favorite Tim Holtz You Tube re-runs, which has inspired me to use some things I've purchased a while ago and have yet to use, such as his Floral Outlines stamp set, Halloween Wallpaper and Lost Shadow Distress ink.


I'm writing this post more for me, because I'll wonder how in the heck I did this. I couldn't quite get the exposure correct as it was a painfully sunny afternoon when I took my photos, so you get a couple of the same shot essentially.


I started with a panel of Bristol Board and stamped one of the Floral Outlines with Lost Shadow Distress ink in opposite corners. I used a water brush to color the florals and greenery with these inks: Squeezed Lemonade, Fossilized Amber, Crushed Olive and Shabby Shutters, drying between layers.


Again, I used a waterbrush to color some of the background around the stamped image with Lost Shadow and Shaded Lilac inks. I then smooshed the panel into the remaining ink, doing my best to get it in the open areas, again drying between dips. I colored the centers of two flowers with Shaded Lilac marker and ink.

Last, I smooshed Frayed Burlap on my mat, spritzed with water and ran the edges of the panel in the puddle; dried. I blended a bit more of the ink around the edges when it was completely dry. The panel is layered with yellow card, then an Ideaology  Halloween Worn Wallpaper panel.


I finished my card with a butterfly I had stamped eons ago and saved in my stash. It just so happened it was inked in Squeezed Lemonade around the edges. I blended with Lost Shadow ink and added more detail with a waterbrush and Distress markers in Squeezed Lemonade and Shaded Lilac. 

The labels are from one of Tim's ephemera packs, and I aged them a bit with Frayed Burlap ink. Use Your Wings is a Tim Holtz Tiny Text Stamp embossed in clear on a white card scrap and brushed over with Black Soot paint. Before the paint dried, I wiped it from the embossed letters. My bit of old crocheted lace was a little too bright, so I dipped it in puddles of watery Frayed Burlap and Lost Shadow.
 

That's all for me today! I'll be sharing this over on the Tim Holtz Addicts Facebook group in the #timtvstampers challenge.


Friday, June 23, 2023

Make it Count


Hello! I've been watching some reruns of Tim Holtz videos and was inspired to break out a neglected Texture Fade and actually use a few die sets of his I never used to make a birthday card for one of my soon-to-be 25 year old kiddos.


I embossed Bristol Board with the Swirls folder and then dragged and dipped it in oxide ink smooshed on my mat and spritzed with water. I thoroughly dried the panel. I inked the flat side of the folder with distress ink, spritzed lightly with water and re-inserted the card in the folder and once again ran it through to transfer the ink to the background. You can see I ran a second card through to use up the ink.


I added some appropriate, suggestive Remnant Rubs and die cut the sentiment from Bold Text #1 and the smaller numbers from Alphanumeric Theory. The Perspective Butterfly is layered in black and white card. That's all for today! I will be sharing this in Tim Holtz Addicts Facebook group #timtvsizzix  challenge and Simon Says Stamp Monday Pick a Number challenge. Thanks for stopping by! 

Tim Holtz Products: Distress ink Squeezed Lemonade - Distress Oxide Mermaid Lagoon - Distress Paint Black Soot (watered down and straight up) - Swirls Multi Level Texture Fade - Sizzix Alphanumeric Theory, Perspective Butterfly, Bold Text #1 - Remnant Rubs

Thursday, June 15, 2023

Sixteen


Hello, again! Prompted by a couple challenges on Tim Holtz Addicts Facebook group, I am trying to 
#maketimetomake, and here we are again to share my results of playtime with Distress inks/oxides following Tim's video. I love my Distress inks, and my oxides for that matter, but I'm not sure I've ever made a background like Tim demonstrates before. I challenged myself to try the same technique using a variety of papers. For this background, I used Bristo board. I wasn't thrilled with the results, but it is a background, and is mostly covered up.

Since this is a Father's Day card for my husband, I chose this manly man from the pack of portrait paper dolls and stacked him up with some of Tim's ephemera, a scrap from my stash torn in two and used the stars Impresslit for the first time in a very, very long time. Of course, my husband deserves a GOLD star! 

The very cool dude was colored with Distress crayons and scuffed with steel wool. The very back layer is kraft stock embossed with Woven Texture Fade and sanded.

There's still some of these metal-ish Ideaology stars in my stash. I painted one with Lost Shadow, then crayoned with Crackling Campfire and Walnut Stain.


Hopefully, I'll get a chance to use the other backgrounds I made and share some more makes. In the meantime, I'd like to share this with Simon Says Stamp Monday where the challenge is Masculine. He's a pretty tough guy, so I'd say this qualifies. Thanks for stopping by!


Friday, June 9, 2023

Discovering: An Ocean Themed Folio


Hello! It's been way too long since I've given any attention to my blog or to my crafty things for that matter. The last time I 'played' in the Closet was about a month or so ago when I indulged in a few minutes of delightful messiness experimenting with some Brusho's I picked up at a yard sale. I had no idea what to expect from these powders, but my takeaway is they require a larger work area than I have currently and don't plan on showing your hands in public for a few days after using them. And a tarp would be helpful.


For my experiment, I chose some old cheapo scrapbook paper I was going to throw out anyway and an oversized stencil I've never used. I laid the stencil on the paper, sprinkled what seemed like a very little powder and spritzed with water. These powders make so much color, and I didn't want to waste it.  I used my painted/Brusho'd stencil to make a monoprint on a heavier piece of 12 x 12 paper and then mopped up the remainder on some scraps of card, front and back. Everything sat until yesterday, when I decided to challenge myself to use those papers. For the past couple weeks, I had been watching this video  on making a folio using one book page. (I'm not much for watching videos and can only take them in small 5 or 10 minute doses at the most with the sound turned off, so it can take weeks to watch one video at lunch or with my morning coffee.) Check it out if you want to give it a try.


I used some old Prima and Tim Holtz stamps and a Tim Holtz stencil/Translucent Grit Paste to decorate the front and back covers.


More Tim Holtz stamps decorate the pockets and the tags made from those Brusho mop up scraps. Some fussy cut stamped images (an old wood block stamp from my stash) make the shallow tuck spots that remind me of waves. They hold double sided coins that I punched from a scrap I used to test my ink/crayon colors and stencils I was using on the project. Waste not, want not.


There's lots of space to journal on the tags. I used a scrap of collage paper to decorate one of the tags and  Tim Holtz old Bigz and newer Thinlits dies to make little pull tabs on the tags. Some were cut from a blue inky scrap I had on hand and others cut from the initial cheapo scrapbook paper experiment. I used parts of Tim Holtz stamps and old Remnant Rubs to label them.


The paper I used on this side of these tags was one of my first monoprint experiments from years ago using a weird tree stencil. The greens tied right in with my Brusho papers, especially when I dipped them in some Distress inks  and added some stenciling and the Halloween lacey collage paper scraps.


What a fun and quick project this is! I love the design of the folio with it's six pockets and two tuck spots; the finished piece is 6 x 3.25 inches. 

I'm listing some of my products more for my own reference:

Distress Oxide: Wild Honey
Distress Ink: Mowed Lawn, Uncharted Mariner
Distress Archival Ink: Black Soot, Faded Jeans
Distress Crayon: Picked Raspberry
Distress Paint (on charms): Lost Shadow
Distress Translucent Grit Paste
Tim Holtz Mini Stencils
Tim Holtz Dies: Bigz Tiny Tabs and Tags, Thinlits Specimen
Stamps: Prima: Net and Wire; Tim Holtz: Glitch 1, Perspective, Sealife, Tiny Text

I would like to share my folio with Simon Says Stamp in their Not A Card Monday Challenge. Thanks for stopping by!

Tuesday, February 14, 2023

Love Birds


Happy Valentine's Day! Well, it has been a long time since I've posted and this is the first for this year. I only made two Valentine's Day cards, and the other got sent off so fast I didn't get time to photograph it.


I was debating on getting rid of my old dauber topped Distress stains because I never think to use them. So I thought I would give them another chance to see if they were something I wanted to hang on to.

 I started by free handing a heart with Candied Apple stain on water color paper spritzed fairly heavily with water. The dauber makes it so easy to 'paint' on the color. I sprayed with more water to 'loosen' the edges of the heart a bit more. I dried the panel and re-sharpened the bottom of the heart with more stain because it pretty much bled out. I edged the panel with Vintage Photo stain and sprayed with water again to blend, and dried. I did some background stamping (Tim Holtz old Boundless Flight {still one of my favorites} and Entomology) with Ground Espresso ink and also ran the ink pad around the edges of the panel and dipped the edges in a puddle of water to blend. 

After the panel was thoroughly dry, I smeared Distress Opaque crackle paste through the mini Hearts stencil with my finger. When it was completely dry, I smudged the crackled hearts with Ground Espresso crayon and splattered the panel with Speckled Egg Oxide Spray using the hose inside the bottle. I stamped a few love notes from Dina Wakely's Little Birdies set and Ground Espresso Archival ink. I mounted this panel to a panel sprayed the same colors as the birds (see below) and then a card blank.


I cut two birds (Silhouette Birds--first time in use) from a scrap I sprayed with Speckled Egg Oxide Spray, water and dripped with Vintage Photo stain and dried. I die cut the bird's legs from a panel colored with Ground Espresso stain. The branches are die cut from scraps of wood grain paper using Cozy Winter Thinlits set--also a maiden voyage. I colored the branches with the brown stains.

It looks like I'll be keeping my old Distress stains after all. Have fun crafting and thanks for stopping by! Sara Emily

I'll be sharing this in the Frame It Monday challenge over at Simon Says Stamp, as the darkened edge against the soft back panel frames my Love Birds scene. And also in Simon Says Stamp Wednesday challenge, Fun With Dies.