Welcome friends! It' s time for a new challenge at The Funkie Junkie Boutique blog and our super talented hostess, Jenny has chosen the theme
'Marvellous Metallics'. Here's what Jenny says about this challenge:
There are so many ways to add metallics to your projects, from embossing powders and pastes, metallic finish cards and foils, metallic inks and paints to metal embellishments. And you can leave them untreated for a touch of glamour or alter them for an aged or more grungy look. Show us how you like to use metals on your vintage or shabby chic projects.
As always, the Design Team will choose their top four picks, and the winner will be invited to join us in a Guest DT spot at
The Funkie Junkie Boutique Blog. The next three will receive Top 3 badges to display on their blogs. Everyone who enters and follows the rules will be entered into the draw to have the chance to win a $25 spending spree at
The Funkie Junkie Boutique.
I always learn so much about language when I'm blogging, and today I learned that there are two ways to spell marvel(l)ous--the English way (
marvellous) and the American way (
marvelous). So, no, that's not a typo in the theme title; since Jenny is from the UK, it would be natural for her to use the English spelling.
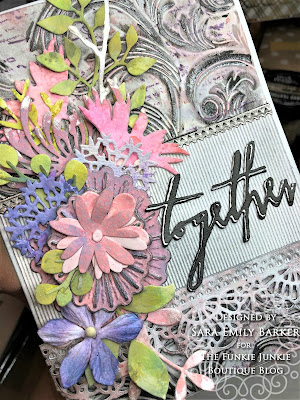
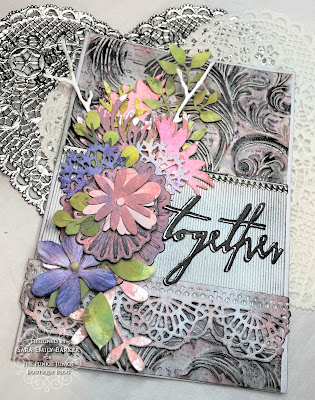
I made this card for my nephew and his lovely bride's wedding, using the colors of their flowers and wedding party and adding bits of metallic shimmer for glamour and elegance. Their bridesmaids dresses were mauve, which was not easy to replicate, but picking up the hot and soft pinks, lavenders and purples in their gorgeous flower arrangements made it all work.
I knew right away when I saw Stacy Hutchinson's stunning card at
Tattered Nest Designs that I would use her gorgeous design as inspiration for Leif and Lynnie's card, and when you visit her blog, you'll see I didn't stray far.
Like Stacy, I used the beautiful Elegant 3D Texture Fade embossing folder, and stamped script onto the flat part of the embossing folder before running it through my die cut machine the requisite 3 times with a watercolor paper panel. The script is from Entomology, and I used Dusty Concord Archival Distress ink to stamp it.
After embossing, I inked the panel in Hickory Smoke Distress ink and Oxide ink and lightly swiped the raised areas with Black Soot paint, following Stacy's tutorial. It was way too dark for a wedding card, so I went back in with Brushed Iron Metallique Wax by Prima, just very lightly brushing the raised flourishes with my finger tip. To bring in the wedding party's color, I watered down Victorian Velvet Distress Oxide Spray, and patted some on the panel randomly with my finger. this panel was adhered to a white card blank blended with Hickory Smoke ink.
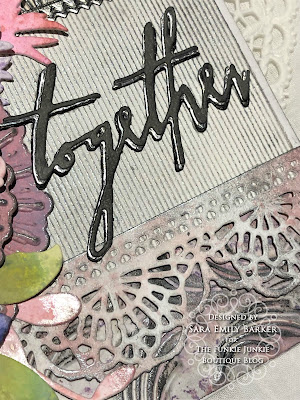
I really loved Stacy's textured card at the bottom of her card. I choose a pure white stripe textured card from my stash and picked up the texture with more Brushed Iron wax.
I dipped a Crochet die cut in the Victorian Velvet puddle left from coloring the embossed background, dried it and blended with Hickory Smoke ink. I lightly touched the edges with more of the Brushed Iron wax.
I don't have any wedding sentiments, but I thought 'together' worked fine. It is an old Handwritten Love Thinlits die, which I cut one each from grey and black card and a scrap of silver Metallic Kraft Stock. I layered and adhered them with Distress Collage Medium.
I made the trim at the top of the white panel with a scrap of silver Metallic Kraft Stock. I inserted and taped it into the Mini Scallop Impresslit, ran it through my die cut machine three times. When I removed it, I had this lovely piece of trim, which I swiped with Black Soot paint. After allowing it to dry slightly, I wiped the surface with a dry cloth, leaving some of the paint to show off the intricate design.

I inked some water color and mixed media papers and scraps with various inks, sprays and oxides (colors listed below) and die cut flowers and greens from them using Wildflower Stems #1 and #2, Funky Festive, Funky Floral #2 and #3, and Garden Greens Thinlits set. I also cut two Bursts using the Impresslit of the same name from the inky papers. The twigs were cut from plain white card and given a coat of shimmery paste from my stash. I also tipped a couple of the Wildflower Stems with the paste. The purple flower at the bottom of the arrangement was left over from another project, and I believe it was colored with Wilted Violet oxide. Everything was adhered with Distress Collage Medium Matte.
That's all for me today, but if you pop over to the blog, my talented teammates will inspire you with their '
Marvellous Metallics'. Then it's over to you! I can't wait to see what you will make! Hugs and Blessings! Sara Emily
Challenge shares:
The following products were used and can be purchased at
The Funkie Junkie Boutique:
Tim Holtz Idea-ology 8 x 8 Metallic Kraft Stock
Stampers Anonymous Tim Holtz Rubber Stamps - Entomology
Sizzix Chapter 2 Tim Holtz Thinlits Crochet
Tim Holtz Sizzix Thinlits Die Set 5PK - Wildflower Stems #1
Tim Holtz Sizzix Thinlits Die Set 5PK - Wildflower Stems #2
Sizzix Thinlits Die Set 18pk - Funky Festive by Tim Holtz
Sizzix Thinlits Set - Funky Floral #2 by Tim Holtz
Sizzix Thinlits Set - Funky Floral #3 by Tim Holtz
Sizzix Thinlits Die Set 9PK - Garden Greens by Tim Holtz
Sizzix 3-D Texture Fades Embossing Folder - Elegant
Sizzix 3-D Impresslits Embossing Folder - Burst
Sizzix 3-D Impresslits Embossing Folder - Mini Scallop
Ranger Tim Holtz Distress Ink Pad - Hickory Smoke
Ranger Tim Holtz Distress Oxide Pad - Mowed Lawn, Pine Needles, Bundled Sage, Forest Moss, Peeled Paint, Hickory Smoke, Chipped Sapphire
Ranger Tim Holtz Distress Oxide Spray - Victorian Velvet, Shaded Lilac, Wilted Violet, Peeled Paint
Tim Holtz Ranger Distress Paint - Black Soot
Ranger Tim Holtz Distress Archival Mini Ink Pad Kit #2
Ranger Tim Holtz Distress Collage Medium Matte 1 oz Bottle
Prima Art Alchemy by Finnabair - Metallique Wax - Brushed Iron

