Hello friends and visitors! It's time for the Funkie girls to reveal their inspiration for our latest challenge at
Frilly and Funkie Hosted by the mega talented Suzz. She has chosen the theme 'On the Cutting Edge'.
This challenge is all about using your dies, punches or other cutting tools to create a masterpiece featuring at least one die cut, machine cut or punched image. Make sure your art is in the vintage or shabby chic style and incorporates a cut out.
Are you ready for fall? I am ready for the cooler days ahead, and I'm preparing for some Halloween fun! Here is a selection of coffins I've prepared using lots of die cuts.
Let's take a tour of the coffin selection room. Our Funeral Director, Gus, will guide you as you make your selection. He'll show you all the fine exterior finishes and then pop open the lids to take a look at the interiors. All coffins were made using Tim Holtz Coffin Box die, and I used other Tim Holtz dies to make the embellishments and to add some texture.
Are you shopping for a modestly priced stone coffin? Although the exterior finish is quite rugged and pitted on this stone model, the interior sports the finest black velvet. (Black gesso, Prima Stone Effect paste in concrete, Small Tattered Florals Thinlits die)
Our beautiful hardwood coffin is made from the finest oak and sanded to a smooth, silky low sheen finish. It also sports a hand stitched trim on the lid. For just a few more dollars, we'll customize it with a portrait of your loved one. Oops, looks like this one's been used ! (Distress Woodgrain Cardstock, Antique Linen Distress paint, Wilted Violet and Weathered Wood stains and Walnut Stain crayon. Label: Labels Thinlits, Materialize paper stash. Trim: Stitched
Rectangles die, Distress Crazing and Walnut Stain crayon. Interior: Distress Wilted Violet stain and Walnut Stain Oxide, Archival ink, Tim Holtz Halloween 4 stamp)
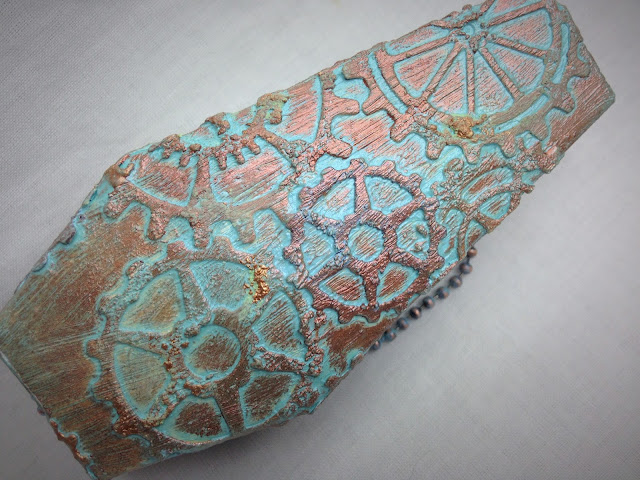
Looking for a steampunk coffin? Gus has got you covered! The exterior boasts a beautiful patina on this detailed copper version. Inside is left un-adorned for your choice of lining. (Tim Holtz Gearhead Thinlits die, Prima Brown Rust Paste, Patina Effect Brass and Mint Green pastes, Prima Metallique Light Patina and Steampunk Copper, Distress Grit Paste, Arto copper wax, Idealogy Ball Chain and Game Spinners)
I think this is Gus' favorite!
Our black granite coffin is our premium model. It's elegant carving is exposed by the rich patina. Inside is softly lined with rich red velvet for your comfort. (Tim Holtz Mixed Media #2 , Tiny Tattered Florals , Holiday Greens Mini Thinlits dies, DecoArt Patina Green Antiquing cream, Wilted Violet paint, Sparks Raven's Eye)
The Inside Scoop: Since this is such a long post, I am just focusing on one technique. I cut paper with Tim Holtz Mixed Media #2 Thinlits die, leaving the negatives pieces in the die. I set aside the actual die cut. I applied collage medium to the lid of the coffin. I placed the coffin lid over the 'filled' die and flipped it over. I carefully poked the bits out onto the glued surface with my pokey tool. I removed the die and applied another coat of collage medium over the lid. When dry, I trimmed the edges.
I made a second cut on the first die cut paper panel to extend the pattern large enough to cover the coffin base. I applied collage medium to the coffin box base, and flipped this over onto the die cut panel. I burnished this,so the die cut adhered. I gave it another coat of collage medium over the die cut, allowed to dry, and trimmed as I did with the lid.
The lid and base panels were given a coat of black gesso, top and bottom. I die cut a sticky backed red velvet panel for the base lining. The protective backing was removed, and I easily applied it to the already cut and decorated base die cut. Both lid and base were assembled and adhered. I use Glossy Accents for this type of detailed gluing. It's clear and sticks quick!
Finally, I applied DecoArt Patina Green Antiquing Cream to the exterior panels, allowed to dry and wiped with a damp cloth.
The red and black velvet panels (lining coffins) were just a few of the lovely gifts from my good friend Jackie Neal
Creating Without Crayons. Thank you, again, Jackie! Good stuff! I bet you were wondering what I'd do with these panels!
Gus is so pleased you stopped by his showroom today. Those in need of an UNDERTAKER will find it to their advantage to give him a call before applying elsewhere. And I want to thank you for hanging in there through this long post. If you like these, please stop back next Thursday when Gus will have a few more coffins in his showroom. Finally, I hope I haven't offended anyone with the content of my post today; it's all in good fun!
Here are the links to the products I used which can be purchased at
The Funkie Junkie Boutique:


