Showing posts with label Prima Wax. Show all posts

Saturday, May 16, 2020

Patina Tutorial with Prima's Matte Wax and Sizzix Embossing and Die Cutting


Hello friends! I hope you are doing well during these crazy days that are stretching out into months! I am showcasing Prima Marketing's Art Alchemy Matte Wax over at The Funkie Junkie Boutique Blog today. 


Please pop over to see how I made these cards as well as these other fine patina'd finishes: aged copper, eroded metal and rust. I hope to see you there! Be well! Sara Emily

Challenge shares:

Wednesday, July 11, 2018

Prima Havana Shabby Chic Card

Sara Emily Barker http://sarascloset1.blogspot.com/ Prima Havana Shabby Chic Card #prima #havana #lavender #rosegoldwax #timholtz #3D embossing #botanicaltexturefade 1

Welcome, friends! It's Wednesday and time for the Funkie girls to post their inspiration at Frilly and Funkie for our current challenge "B" Happy chosen by Frilly teammate, Cec.

Here's what Cec has to say about her chosen theme: "Create a shabby chic or vintage project that makes you happy and features birds, bees and/or butterflies. You must use at least one of these things with wings and it must have a place of prominence on your creation but if you wish to use two or more, please feel free to do that."

Butterflies, birds and flowers all make me happy, so I've used plenty to embellish my shabby chic top fold card (yeah, I know, so different for me!). I chose to work with Prima's Havana and Lavender collections in stock at The Funkie Junkie Boutique, because they,  too, make me happy with their lovely designs and shimmery highlights.

Sara Emily Barker http://sarascloset1.blogspot.com/ Prima Havana Shabby Chic Card #prima #havana #lavender #rosegoldwax #timholtz #3D embossing #botanicaltexturefade 3

I made my background with Tim Holtz Botanical 3D Texture Fade and one of the beautiful papers from the Havana A4 paper pad. I just gave the paper a wash of gesso and while still damp, ran it through my die cut machine with the folder. I let it dry completely and swiped Prima's Rose Gold Metallique wax over the raised areas with my finger.

Sara Emily Barker http://sarascloset1.blogspot.com/ Prima Havana Shabby Chic Card #prima #havana #lavender #rosegoldwax #timholtz #3D embossing #botanicaltexturefade 4

I actually used products from three different Prima paper collections to create and embellish this card. 'Blessed is die cut from one of the Lavender Journaling Cards using a Tim Holtz Stacked Postage die. I edged it with more Rose Gold wax and layered it with Havana Ephemera, Lavender paper and Cherry Blossom washi tape. The key is from Linda's shop; it's colored with Prima Platinum Crackle Paste.

Sara Emily Barker http://sarascloset1.blogspot.com/ Prima Havana Shabby Chic Card #prima #havana #lavender #rosegoldwax #timholtz #3D embossing #botanicaltexturefade 5

This dimensional butterfly is Lavender's Aislinne. I love how everything works so well together. I've tucked in a pair of Heirloom Roses colored with Gunmetal alcohol ink and Rose Gold wax and some fern from Funkie Florals 3.

Sara Emily Barker http://sarascloset1.blogspot.com/ Prima Havana Shabby Chic Card #prima #havana #lavender #rosegoldwax #timholtz #3D embossing #botanicaltexturefade 6

The shimmery butterfly is from the Havana Ephemera pack and the small one on the Havana Camila flower is fussy cut from the Lavender A4 paper pad. There are pages of these beautifully colored
butterflies in the pad, and that's what sold me on this collection. 


Look at that shimmer on this one! You might also pick up the shimmery crackle on the pieces inserted in the mixed media die cut. I gave them a coat of the Platinum crackle paste. I used a couple more of the papers from the Havana A4 paper pad to add layers.

Sara Emily Barker http://sarascloset1.blogspot.com/ Prima Havana Shabby Chic Card #prima #havana #lavender #rosegoldwax #timholtz #3D embossing #botanicaltexturefade 7

Inside, another of the papers from that same stack, this one featuring some more delicate butterflies and tropical birds. Love this paper!

Sara Emily Barker http://sarascloset1.blogspot.com/ Prima Havana Shabby Chic Card #prima #havana #lavender #rosegoldwax #timholtz #3D embossing #botanicaltexturefade 8

I pulled out a few more of the ephemera to make a little side load pocket and this simple tag. The larger butterfly on the pocket is another fussy cut from the Lavender paper pad. The pocket is the perfect size for a gift card. I've made this card for my brother and sister in law who will be hosting us for part of our upcoming vacation, and we usually give them a gift card to their favorite local restaurant.

Sara Emily Barker http://sarascloset1.blogspot.com/ Prima Havana Shabby Chic Card #prima #havana #lavender #rosegoldwax #timholtz #3D embossing #botanicaltexturefade 2

That's what makes me "B" Happy! Be sure to stop by Frilly and Funkie for more inspiration from both my Frilly and Funkie teammates. What makes you happy? I hope you'll find time to share your project featuring bees, butterflies or birds and play along in our "B" Happy challenge at Frilly and Funkie.  As always, there's a $25 shopping spree to The Funkie Junkie Boutique for a random winner or you could be named one of the Design Teams four favorites and win a chance to Guest Design at Frilly and Funkie.

Challenge shares:
Country View July 2018 - In The Summer Garden Actually, I've only seen two butterflies in my garden this season!


Thank you for your visit today and for taking your time to leave your precious comment!
Hugs and Blessings!
Sara Emily

These products were used and are available at The Funkie Junkie Boutique:

Wednesday, March 21, 2018

Vintage Shadow Box with Tim Holtz Ideaology and Prima Wax


Hello friends! It's that time for the Funkie girls to reveal our inspiration pieces for our current challenge 'Knock on Wood' at Frilly and Funkie. The incredibly creative and talented Suzz is our hostess this time, and here's what she has to say about her theme:

"I decided to challenge everyone with adding a touch of wood to your art this challenge. For this challenge you need to dig through your crafty stash and look for some type of wood to incorporate into your art. This can be any kind of wooden object like a wood spool, a wood button, a mini ruler or even a branch."

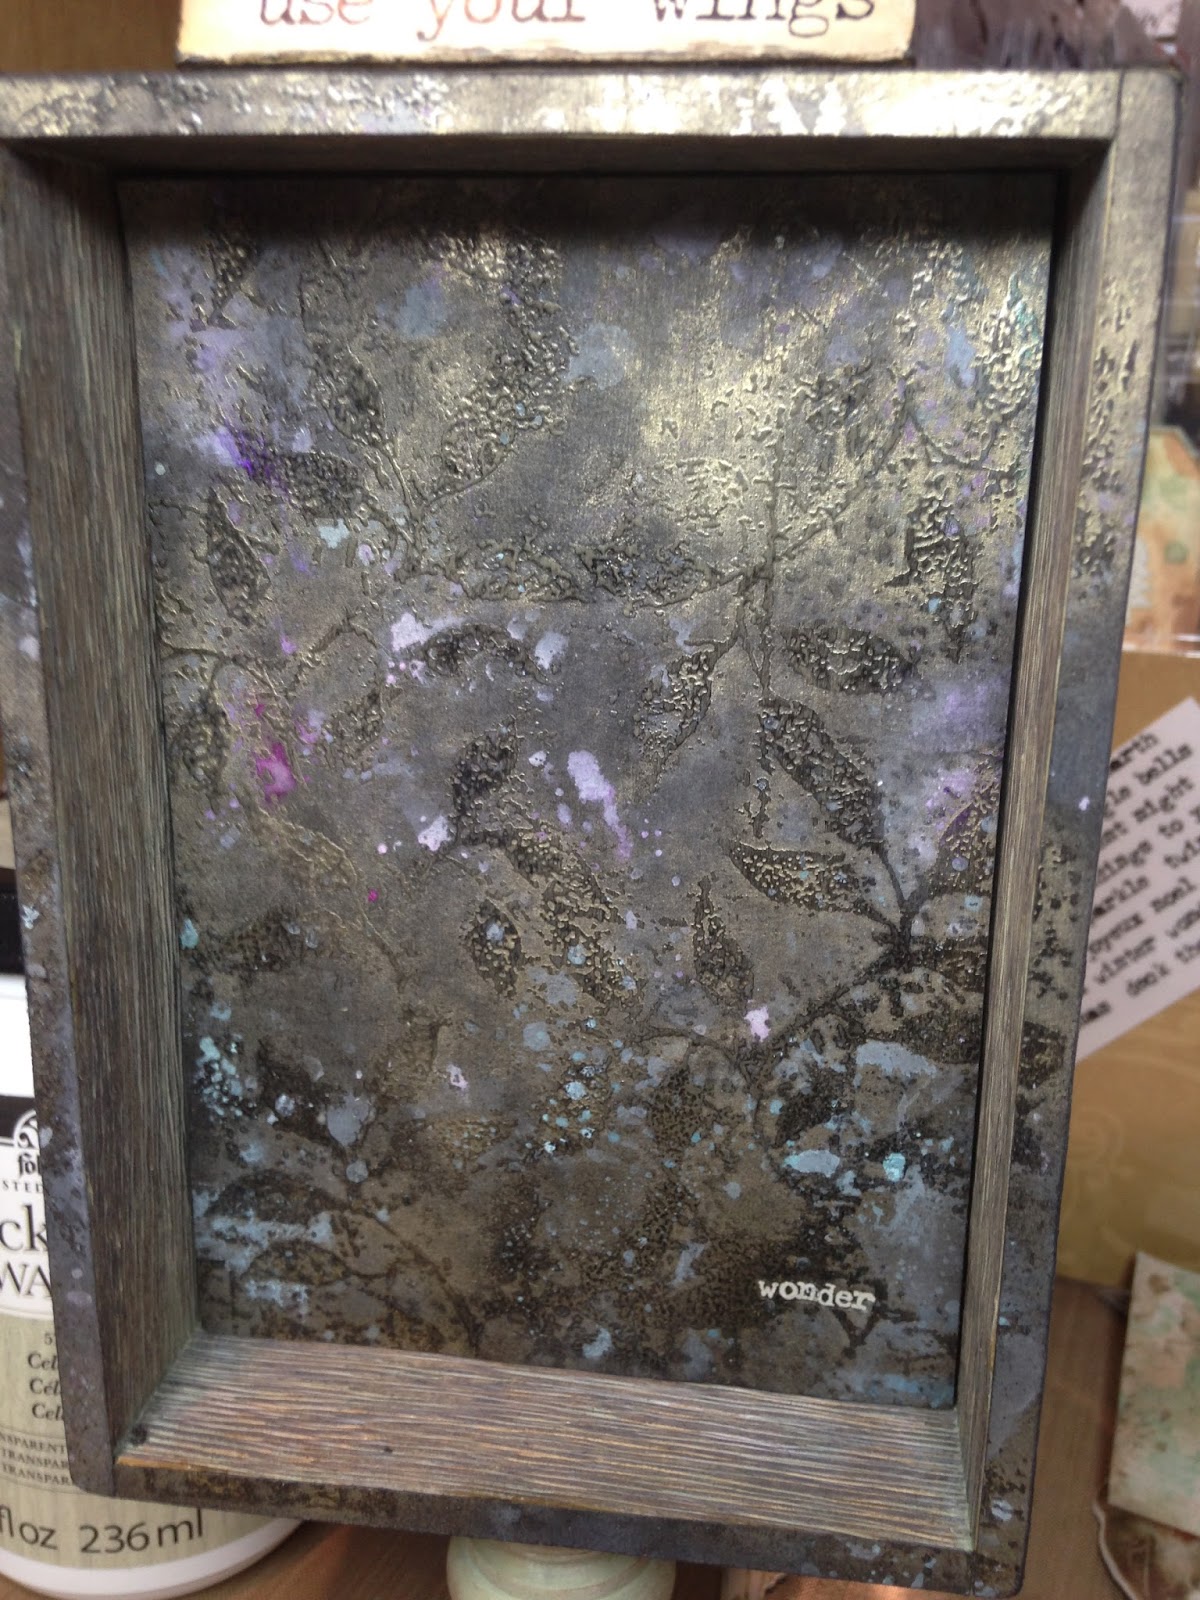
I didn't have high hopes for this one of the backgrounds I made in Frilly and Funkie's Saturday Showcase HERE, but I thought it might be useful in the future so I put it aside.


I flipped it, added some more color and cut it to fit inside a Vignette Box. I couldn't waste a bit of it and used the off cuts to edge the box and the corners as well.  I have to say, now it's my favorite of the bunch.


I started by pickling my box and Vignette Finials using Picket Fence paint, but I wasn't happy with it.  I  applied a couple coats of Pickling Wash I picked up on clearance when Autumn and I were doing a little shopping down in Columbia, SC.  It adds just the right amount of color.


The wood button and pink seam binding come on the little bundle of Rayon Seam Binding from Linda's shop, and she has a huge variety of these pretty wood buttons available for purchase. The button is already so pretty and shabby as it comes, but I added a little color with Wilted Violet Oxide ink to tie it into the flowers of my vignette. I COULD NOT get that green ribbon through the second hole, so I covered it with a half pearl.

I'll let you in on a little secret...the green ribbon started out as purple, orange, and green.  It's actually two pieces that came tied up on those little thank you bundles Linda includes in your order. These were from Halloween orders--waste not, want not. I rinsed out some of the original color and added back Peeled Paint Distress Stain and Tarnished Brass Distress Spray Stain. It's hard to see in the photo, but some of the original color is still there, and makes for the perfect match to the leaves.


I adhered my background to a piece of foam core and brought it forward in the box by placing it on a few scraps of thick cardboard box adhered to the back wall.

Choosing some pieces from the Botanical Layers pack made fast work of my vignette, and I edged each in Vintage Photo ink to add to the vintage look. Because they are much thicker than the older ephemera, they layer nicely. I just used cardboard and foam core scraps as spacers. Ranger Multi Medium Matte pulled double duty as my glue of choice, and as a sealer on top of the ephemera to take the shine off. I didn't need that shine competing with the shimmery background for the camera's attention!


I added some old white Remnant Rubs and half pearls colored with White Gold Prima Paste Wax.


The little colored balls are from my door wreath that had fallen off. I colored them with Distress Oxides in coordinating colors.


I chose a Quote Chip and colored it with Vintage Photo ink and Walnut Stain Distress Crayon. The photo below gives an idea of the dimension within the box.


That's all for me today! I hope you've been inspired to rummage through your wood pile and create a Vintage or Shabby Chic make for our current 'Knock on Wood' challenge. The winner will earn the chance of a Guest DT spot here at Frilly and Funkie, and everyone who enters and follows the rules will go into the draw for the chance to win a $25 spending spree at The Funkie Junkie Boutique. And there are Top 3 Badges for three further outstanding entries, chosen by the Design Team, because choosing just one winner is so hard! I can't wait to see what you'll make!

Thank you for your visit today! If you have any questions, please feel free to leave them in a comment below and I will get right back with your answer! Of course, all comments are appreciated!
Hugs and Blessings!
Sara Emily

Here are the links to products I used which can be purchased at The Funkie Junkie Boutique: