Wednesday, March 30, 2016

Guest Designer-Crafting By Designs-You Are My Sunshine

Hello, crafty friends! I hope you had a lovely Easter Sunday. Today I have the honor of being Guest Designer at  Crafting By Designs where the theme is Anything Goes. I chose to make a little mixed media spring time canvas that I put in my daughter's Easter Basket.  She is my biggest fan! 


I prepared my canvas with gesso and then sprayed with Dylusions Green Lime and Cut Grass and then with water to blend the colors. I brushed on Luminarte Silks Acrylic Glaze in Teal Zircon. I love how this single application makes the entire canvas glow!

When completely dry, I spread Ranger transparent matte texture paste through Tim Holtz Rays stencil and left it to dry. I colored the rays with Sunshine Yellow Craft acrylic and Mustard Seed Distress paints.  I've continued my pattern around both sides.


I added some beads and microbeads  (dew drops) using Ranger Multi Matte medium to adhere. The bird and branch is a die cut by Impression Obsession, which I colored with Distress markers and a water brush.


Tim Holtz Chit Chat stickers edged in Black Soot Distress marker, a  Tim Holtz Remnant Rub and a heat embossed Heidi Swap stamp finish it off.  Easy peasy, but made with lots of love! I used to sing this to her when she was little.


I would like to enter my mini canvas in the following inspiring challenges:
The Artistic Stamper Creative Challenge March Springtime I used a Heidi Swap musical note  stamp and heat embossed in white.
Frilly and Funkie Hip to Be Square Let me explain...Johnnie Cash released this tune in 1975.  The colors are hopefully speaking for themselves.  My canvas is square even though the photography distorts it.
Stamps and Stencils Spring is in the Air Tim Holtz Rays stencil, Heidi Swap musical stamp.
ColourArte Challenge # 10 Dew Drops I used Teal Zircon Silks on my background and my dew drops are symbolized by microbeads.
Happy Little Stampers March Challenge Water I used waster to blend my background and the microbeads represent dew drops.

Thank you for stopping in today and for all your lovely comments!  I read and appreciate each and every one of them.
Hugs and Blessings!
Sara Emily

Wednesday, March 23, 2016

Spring in a Drawer

Hello, crafty friends!  I have a spring do here for you today.  Not a canvas, not a journal page, not a card...I  don't know what you would call it.  I found this little drawer in a beat up old desk left at the curb for the trash collector.  The desk looked interesting, but it was far too big for my car, so I took the one tiny drawer that was in it.


I have a little story to go with my artwork today.  Spring has sprung here in my little corner of the world, and I'm pining away for my old gardening job.  I was let go last summer when I had foot surgery, and I think that was the saddest moment in my life so far.  The gardens where I worked are lovely.  They are privately owned and sit on the waterway.  One of my jobs was to feed the swans, the koi fish, and the birds.  I also tended the perennial garden, but there were some not so glamorous parts of my job, too.  Every spring I had to get the rust from the well water and mildew off the what seemed like endless miles of white brick wall. (I have a secret product if you have the same problem with rust.) The worst of it was by the fountain in a little courtyard, where it stays damp. There is a window near that fountain that looks just like mine. So my project today is inspired by the bittersweet loss of the best job I ever had and the beautiful gardens I worked in.  I took it outside to my own garden to photograph.

I started my project just this morning, so although I'm pleased with the outcome, there are several things I had to "cheat" on. One of these is my crackle.  No time to wait for the "good" medium to dry, so I had to do some crackle stamping (Prima) on my corrugate background (box from our new toaster). The cracks and dark stamped bricks (Prima) were heat embossed using Chic Camo Embossing Powder mixed with embossing puffs. Distress inks, stains, crayons, DecoArt media paints, bead gel, and cinnamon and coffee were used to make my background on a piece of corrugate board painted with gesso. For details on how I made my faux rust, please visit my post Rusted Porcelain.


The focal piece is watercolor paper onto which I stenciled bricks using a homemade stencil, texture paste and Easter Parade embossing powder.  When the paste dried, I heat embossed the powder. I used Distress crayons and stains to paint the "wall".


Although it's very blurry I added this shot to show the tiny bit of shimmer I was able to pick up with the camera.  The Easter Parade powder has bits of glitter in it, and it really sparkles in real life.  Love this stuff!


The window frame is chipboard I picked up at a yard sale.  It is painted with Ground Expresso Distress paint, and I used DecoArt Weathered Wood for the fine cracks. Titanium white show off the cracks.  The panel behind the frame is vintage book paper, and I threw a dozen or so products at it until I was happy with look. I do know I used my new Distress Crazing Collage Medium, but it didn't have much of an effect.  I must do some research to find out how this stuff works.


My lace bit is vintage, and I gave it a hint of color with Distress crayons and stains and cut it out to look like a flowering vine.

The flowers are Nicole Wright's awesome design Fallen Blossom.  I was wanting to debut them on another project, but I couldn't resist using just a few of the blooms here!  The are stamped on vintage book paper colored with Wilted Violet Distress spray stain and fussy cut. I centered them with my Recollections white pen. The die cut foliage is by Tattered Lace. The teensy butterflies are brads from Emerald Creek, which is where I picked up my embossing powders and Nicole's beautiful stamps. I colored them with Silks Acrylic glaze.


That's all for today...getting into one of my favorite challenges just under the deadline!


I would like to enter this into the following inspiring challenges:
Mixed Media Place March Dream On Inspired by the butterfly, the arched branch, the mauve/blues, the glitter.
Happy Little Stampers March Challenge Water I used lots of water to blend my colors, and I could here the water of the fountain, which is the place that inspired my work.
Creative Carte Blanche #2 Triple Trouble I had to laugh when I read three things that don't go together...to me, the go very well together.  My metal are the butterflies. The flowering vine is cut from a lace trim.
The Artistic Stamper Creative Challenge March 2016 Springtime (2nd entry) Stamps: Nicole Wright, Prima

Thank you so much for dropping in today and for your lovely comments!  I read and appreciate each and every one.  Please let me know if you have any questions...I didn't go into much detail on my process this time.
Hugs and Blessings!
Sara Emily

Monday, March 21, 2016

12 Tags of 2016-March--Technique Remix

Hello friends! Here is my offering for this month's technique remix at Tim's blog where this month we are inspired to create contrast between grungy and colorful layers by utilizing two techniques featured in November 2014 and August 2015--textures and dimensional die cuts.  Tim pulls out the big guns this time--his new Distress Crayons!  Of course, I only have the neutrals so far, so I had to pull a rabbit out of a hat to create this month's tag. Here is my version of March's Technique Remix (remixed of course!)


Here is Tim's beautiful tag.  Oh, I need those colorful crayons!

2016TAG

I chose to cut Tim's Layered Butterfly from my corrugate board (read recycled box) and gave it a good coat of gesso.  To color, I used Distress spray stains in Blueprint Sketch and Twisted Citron.  I edged inside and out with Blueprint Sketch Distress ink after a little edge distressing with my tonic scissors. This cardboard is thick stuff and requires the "good" scissors. Finally, I added silver foil following Tim's instructions, and for a little extra sparkle, some Shaved Ice around the butterfly. (That's for you, Karen of Kaleidoscopicsparkles, my sparkly friend! You are such an inspiration!)


For my back panel, I added Tissue wrap to my background tag, and used Mixed Media Thinlits and pretty much followed Tim's instructions from here on out with that,  with a few changes. I gave this a coat of my new Crazing Collage Medium before laying down any color, which provides very subtle crackling on the background.  I blended on Wilted Violet and Blueprint Sketch Distress Inks and flicked on some water, so I could get some color on my butterfly. After adding the crayons in Vintage Photo and Walnut Stain and blending with my finger, I laid Tim's Faded Dots stencil over it and wiped with a damp baby wipe to remove some of the color.  I love these subtle details like the tiny cracks and spots.  I flicked the finished background with some watered down Walnut Stain Distress paint for some additional depth. It is still grungy, so for contrast, I made my top corrugated layer bright (er) in absence of those pretty bright colors of the new Distress Crayons.


I didn't like the idea of three quarters of a butterfly, so I added back a wing from the corrugate board.  I painted it with gesso, blended with Wilted Violet and Blueprint Sketch Distress inks, and this time gave it a spritz of water to blend and soak into the recesses.  Then I went back in with the same inks and blended in more to deepen the color, then flicked on water for spots.  Lastly, I added some shading with the Distress crayons in Vintage Photo and Walnut Stain, flicked on some of the Walnut Stain paint, and popped the wing in it's place. I'm in the mixed media groove now!


For the thorax, I gesso-ed, then blended on Black Soot Crayon. I added a drop of Blueprint Sketch Distress spray stain, blended that on, then dried with the heat tool. A set of antenna and Tim's Ideaology words high lighted with Picket Fence Distress Crayon and some crinkle ribbon hand dyed to match finish off my tag.


I know this is totally off the grid from Tim's original, but I was feeling some mixed media creativity! (Out of limitations comes creativity.) I do hope to get my hands on all of the colors offered in the Distress Crayons...they are so fun to work with, and Oh! The Possibilities!


I would like to enter my tag into the following inspiring challenges:
Happy Little Stampers March Mixed Media Challenge Water I used water to blend my colors on the background and ribbon and used a flick of water to make some watery spots.
Mixed Media Place March Challenge Dream On Mood Board I was inspired by the butterfly and the gorgeous colors, and that dreamy glitter!

Mixed Media World MMW #12 Vintage Well, I'm 1/2 vintage, and 1/2 something else!
Time Out Challenge #52 CASE With Your Own Twist I cased the colors, the little circles and the bits of bling. My own twist is to go from CAS to Mixed Media!
Altered Eclectics March  Corrugate board from a box.

Thank you for visiting with me today and for your lovely comment, should you wish  to leave one.  I do read them all and appreciate each and every one!
Hugs and Blessings!
Sara Emily

Friday, March 18, 2016

Guest Designer For Emerald Creek Dares--Happy Easter


Hello friends!  I'm honored to be invited to Guest Design for Emerald Creek Dares today! Thank you, Kim, for having me join your talented Design team for the day! Please hop over to the blog to see all the amazing creations by the super talented Design Team there. I made an Easter card using lots of purple and Easter Parade embossing powder from Emerald Creek Craft Supplies.
.


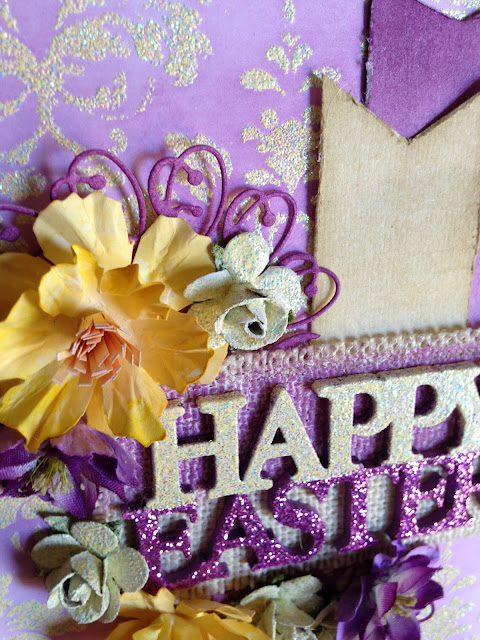
I started by making my background panel on white card stock.  I used Ranger's Embossing Dabber and a Recollections damask stencil to lay down the pattern.  I heat embossed it with Easter Parade embossing powder and blended over it with Seedless Preserves Distress ink.  I wiped it with a dry paper towel to remove the ink from the embossing. The embossing did not come out as crisp as I would like, because the stencil is quite flimsy and floppy, so the fluid of the dabber does seep underneath. I finished by distressing the edges and layering it on an inked panel (Seedless Preserves). I just love how this shimmers and shines in real life--the powder contains the tiniest flecks of glitter that provides just the right amount of sparkle.  Unfortunately the camera cannot pick up all that sparkly beauty-just a hint of it in the photo below.


I picked up this purple chipboard Easter sentiment at Michaels with purple glitter just on "Easter". I forgot to take a shot of the "before", so I flipped it over so you can see the difference.  I heat embossed the word Happy with the Easter Parade powder and the Ranger Embossing Dabber. You can see you get exceptional coverage with just one embossing. I layered the chipboard on a panel of cream burlap which I colored with gesso and Seedless Preserves ink on just the top half to provide contrast.


I tucked two hand cut banners behind the burlap; they are inked in Seedless Preserves and Frayed Burlap and distressed. I layered my flowers over two Memory Box Quinn Flourish die cuts inked in--you guessed it--Seedless Preserves! The yellow flowers are supposed to be daffodils.  I made them using Tim Holtz' Tattered Florals die, colored in Mustard Seed Distress ink and spritz and flicked.  I inked a strip of card in Dried Marigold, cut it into a fringe and rolled it up tightly to make the centers.
The light colored flowers started out as kraft paper flowers from the clearance bin.  I gave them a coat of gesso and when dry spritzed with water, dusted with Easter Parade powder and heated with my heat gun. These little guys just shimmer!  It's pretty amazing how the powder looks somewhat different on the different surfaces. Lastly, the purple flowers were a gift from Heaven!  I found these in a huge bag of fabric flowers at an estate sale this weekend. How cool is it that they would match my color scheme! Aren't they pretty? Of course, I had to make them my own by adding a petal layer from Tattered Florals colored with Seedless Preserves and Wilted Violet Distress spray.

!
I took my card outside to pose among the daffodils in my garden. I don't mean to make you jealous, but we are having the most delightful spring weather with plenty of sunshine! Easter is on it's way!


I would like to enter my card into the following inspiring challenges:
Southern Ridge Trading Co. Easter
Our Creative Corner Return of the Challenge June '13 "Recipe"  List A fabric (burlap) List B Wood (Happy Easter embellishment  is wood) List C inks (used on background, layers, flowers, banners and die cuts)
Use Your Stuff Challenge #214 Flowers and More Flowers
Craftin Desert Divas Photo Inspiration Linky Party I took my inspiration from the glittery eggs and those blossoms. So pretty!
Word Art Wednesday Challenge Weeks # 222-223 Anything Goes (1st entry)
My Sheri Crafts Challenge # 177 Spring Fever
My Time to Craft Challenge # 317 Flowers
As You Like It Favorite Style of Embossing and Why Heat embossing, because I can alter just about anything with it.  Here I've used clearance rack flowers and a chipboard sentiment in an undesirable color and made them my own.  I can also create backgrounds using stamps or stencils. The possibilities are endless!
Crafting By Designs March Anything Goes
Die Cut Divas Something Spring (4th entry)


Thank you for stopping by today and for all your amazing comments!  I read and appreciate each and every one of them!
Hugs and Blessings!
Sara Emily


Wednesday, March 16, 2016

Rusted cardboard

Hello, crafty friends!  I had so much fun using the contents of A Vintage Journey's travel bag, I wanted to give it another go. Sue would like us to use cardboard, rust, metal and lavender in our projects.  I love rust, and many of my storage containers in my craft room are old rusty yard sale finds.  I keep all of my DecoArt products in a vintage lunchbox, but my supplies are growing, so I wanted to make a larger storage container.  This started out as an orange juice box from the warehouse store (cardboard). We drink a lot of orange juice!


I started by tearing off most of the outer paper and applying gesso, which I scraped back with a credit card to reveal some of the cardboard which adds a nice vintage texture.  I added vintage book pages and Ideaology Tissue wrap, then various paints and sprays and water to blend for my rust and lavender background. I can't really recall exactly what colors I used, because I was texting back and forth with my good blog friend,  Niki of Pawsatively Creative at the time.  It's our way of getting together to craft even though we live at opposite sides of the country. When dry, I added glass bead gel and DecoArt Crackle medium like I did here on my rusted tag and paints, alcohol inks, and antiquing cream to highlight these mediums. I did some stamping on tissue paper (Stampendous image/Watering Can Archival ink) and adhered.


It was a bit too shiny for my liking (left), so I gave it a coat of DecoArt Dura Clear Ultra Matte Varnish (right).


Next came the embellishments. Frilly and Funkie wants to see three of a kind on our projects for their current challenge, so I made three rusted belt buckles. I only show 2 in my process shots because I had already experimented on the first, larger one.  The two larger ones from my stash and layered on top of each other are made of plastic, and the smaller one you might recognize as being Ideaology (metal).  To rust my buckles, I first applied a coat of Mod Podge in Matte, and while wet add a sprinkle of cinnamon and instant coffee. When completely dry, I coat with more Mod Podge.  This is also too shiny, so I added a coat of DecoArt Utra Matte Varnish.  I patted on DecoArt Quinacridone Gold to give it a look of old rusted iron. I threaded some hand colored vintage seam binding through the buckles and tied it off with a piece of hand colored twine. Excuse the next three photos--not so pretty, and Blogger wouldn't cooperate with the placement.


Since we're looking for three of a kind, I decided to make three kinds of faux rust on my project...the first is the glass bead gel rust, the second is cinnamon and coffee, and for my third, I rusted some metal pieces (metal) from my husband's hardware drawer using household chemicals.  Actually, the nails and nuts were already rusted, but the washers and key rings were faux rusted using a bath of vinegar for 24 hours, followed by a  soaking in a mixture of salt and hydrogen peroxide for another 24 hours, then a sun bath for another day. Time consuming, but I just had to try it. Notice there are three washers, three nuts, three nails and three key rings.


Since we are  on the subject of trios, I decided to embellish just three sides of my box.  The other side will be against a wall anyway.  For the third panel, I added three clocks.  (Shhh! There's really 4, but the tissue paper stamping (which is a clock) didn't look enough like a clock once I was through with it, so that doesn't count.) Two of the clocks are Tim Holtz Remnant Rubs and the third is an old watch face  (metal) from my stash (yes,  I have a box of old watches, too!!) I painted the face with Rusty Hinge Distress paint and DecoArt Q-Gold, then Ranger Rock Candy Crackle paint, and finished with DecoArt Antiquing cream in Raw Umber. I kept all my embellishments simple and flat, because this will be a functional piece, and it will sit on a shelf when not in use.


The fourth side is left unembellished, but has enough going on with the torn top layer of cardboard, the tissue, book pages, crackle, and rust. I also left the inside unfinished as it will be holding messy paints anyway, and will develop a scene of it's own soon enough. Below is my old DecoArt storage and then my new roomy box.  Now I can get some more supplies!


And now for a quick tour of all four sides:


I would like to enter my rusted box into the following inspiring challenges:
-Mixed Media Place Creative Gym # 17 Coffee  I used coffee along with cinnamon for one of my rust techniques.
-Happy Little Stampers March Mixed Media Challenge Water I used water to blend my background colors.

Thank you for stopping by today and for all your lovely comments!  I read and appreciate each and every one of them!
Hugs and Blessings!
Sara Emily